
Lightbeams and Mirrors
by
Bedazzled
It's all done with mirrors
All screen shots from The Scroll of Destiny
If you have played TR4 you may remember that
in the Tomb of Semerket there was a puzzle which involved pushing three
movable objects into beams of light. This in turn switched off three
light beams in a room below, which were now deflected by mirrors onto a
casket in the middle of the room. Once all the beams had been reflected,
the casket slid aside to reveal a passage underneath.
For my
level 'The Scroll of Destiny', I created a new puzzle based on those
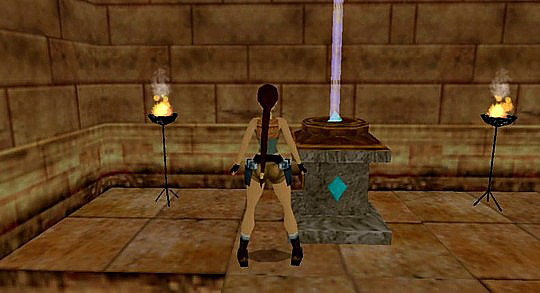
mirrors and light beams. In this version, as Lara enters the gem room
where she will place the Gem of Light
into its puzzle hole, a camera cuts away to show the room containing the
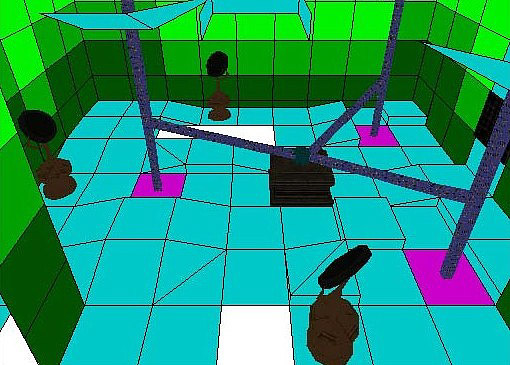
mirrors as seen in this screenshot.
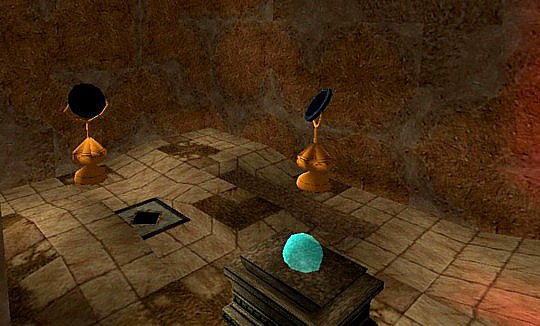
As yet, there are no light beams visible in this room and the Orb in the centre is opaque. Back in the gem room Lara now places the Gem of Light and a vertical beam appears.
A flyby leads the player back to the previously inaccessible mirror room, where vertical beams of light have now appeared as seen below:
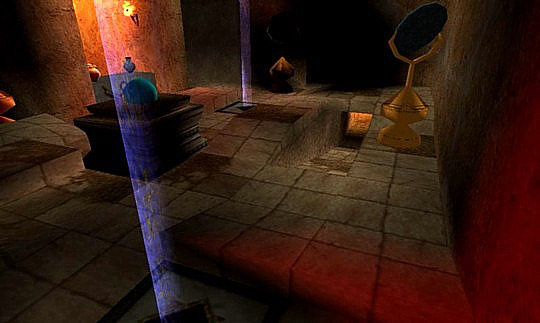
Now let's see what happens as each mirror is moved into those light beams. The mirrors deflect the beams onto the centre Orb.
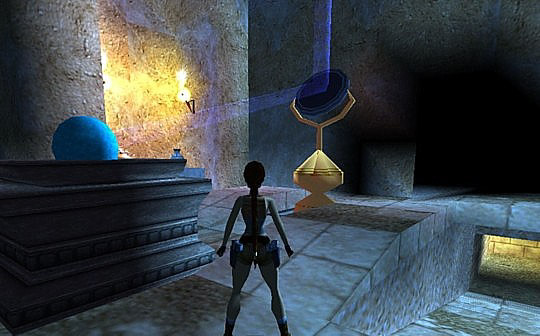
After all three beams have been deflected onto the Orb, it becomes semi-transparent and a door opens.
How it was Done
Ok so that's got the background to it out of
the way. Let's take a look at how it was done.
The light beams
from the original puzzle used waterfall slot 1 for the angled beam and
waterfall slot 2 for the vertical beam. These were copied into the same
slots and a custom version of the mirror was copied into a pushable
object slot using Wadmerger.
The
Puzzle Hole
The requirement for
this object was that a vertical beam of light would appear when the
puzzle was solved. Easy enough you might say, just use the waterfall 2
object, with the invisible button in its ocb setting's box pressed.
Trigger it using a key trigger placed under the puzzle hole, that way it
will become visible once the puzzle is solved.
This is where the
first problems raised their ugly heads!!!
1. The waterfall 2
object flows downwards, but I wanted the light beam to appear to be
flowing upwards.
2. I had already used up the available
waterfall slots.
These problems were overcome by creating an
additional waterfall object in one of the animating slots.
Thanks
to Titak for this
tutorial showing how it's done.
The Pushable Mirror Room
There were several requirements for this room.
1. The player
had to be shown the room before it was accessible and before the light
beams were visible.
2. Once the Gem of Light was placed, a flyby
would show that three vertical light beams had appeared. The entrance
door to the room would also be triggered by the camera.
3. As
each mirror was placed under its corresponding light beam, the beam
would be deflected onto the Orb on top of the central casket.
4.
After all three mirrors were in place, the Orb would become
semi-transparent and the exit door would open.
Lets look at
these one at a time.
No.1
This posed a problem because of the waterfall objects being
triggered by the game engine. The solution was to make a copy of the
mirror room minus the waterfall objects. A simple camera triggered
by Lara showed this room while a door prevented access to the real
mirror room.
No. 2
This just needed a flyby camera sequence triggered by placing the
Gem of Light. The sequence showed the player the route to the real
mirror room; a heavy trigger under one of the cameras triggered the
entrance door to open, and the sequence ended by showing the three
vertical light beams. This gave the player the impression that the light
emitted from the puzzle hole was being channelled into the mirror room.
No. 3
That's easy, place a vertical and an angled
light beam onto the same floor tile and trigger them on and off at the
appropriate time. Easy peasy? Think again!!!
A straightforward
trigger/anti-trigger will not work unless the beams have very specific
settings in their ocb boxes.
Vertical beams
These are initially on and will be triggered
off.
Code
bits 1-5 + Invisible = pressed and an ocb code of 2 entered
Angled beams
These are initially off and will be triggered
on.
Invisible
= pressed and an ocb code of 2 entered
The following triggers were placed under each pair of beams:
Heavy trigger for the vertical beam above.
Trigger for the angled
beam above.
Trigger for a rolling ball associated with this pair
of beams.
Now as each mirror was placed into position, the
vertical beam would be replaced by the angled beam and a rolling ball
would be triggered. More about these rolling balls a little later.
This shot shows the layout of the objects & the position of the triggers.
No.4
This
involved two versions of the central casket placed onto the same floor
tile. One had an animation to make it drop below floor level when
triggered, and had an opaque dome, this was the one seen before placing
all the mirrors. The other had a semi-transparent dome and was set
invisible in its ocb settings box. When all the mirrors were placed in
position both caskets were triggered. Of course, the player could not
see this change of object taking place, giving the impression that the
dome had reacted to the light beams.
The next problem
The two caskets and the exit door needed to be triggered only after
all three mirrors were in place. This is done by using the code bits in
the triggers for these objects. Unfortunately, however, if these
triggers were placed with the triggers under the beams, they would
affect every trigger placed on the same tile.
This is where those
rolling balls come into play. As each mirror is placed into position it
triggers a rolling ball, which passes over stacked triggers.
These stacked
triggers are Trigger for casket A, Trigger for casket B and a Heavy
trigger for the exit door. To ensure the caskets were swapped and the
exit door opened only after all the mirrors were placed, each heavy
trigger for the exit door had different code bits set.
Heavy trigger 1 - code bits 1+2 pressed
Heavy trigger 2 - code bits 3+4 pressed
Heavy trigger 3 - code
bit 5 pressed
In this way each mirror only supplied part
of the final trigger needed for the caskets and exit door.
As you
can see, what started out as a simple idea actually involved a
considerable amount of work and more than a little problem solving. I
hope reading this will inspire you to have a go.