
Level Jumps - Advanced
by
EssGee
Read
a pdf version of this tutorial
This tutorial assumes that you have already learned the basic concepts of level jumps described in the TRLE Manual and Uvavoo's Level Jumping Tutorial. The tutorial focuses on multiple level exchange jumps.
Definitions:
Lara Object: The Lara object that is normally placed at the start of a level. The placement of this object defines the first start point in a level.
Lara Start Position Nullmeshes (LSPs): A nullmesh that is placed in a level to create alternate Start positions to the Lara Object location.
Hub Level: Any level that has multiple exit/re-entry points to and from the level.
Satellite Level: Any level that has both an entry point from and a re-entry point to a Hub Level.
Linear Level: Any level that has an entry point from a preceding level and/or one exit point to the following level.
Rules:
1. If you are only doing a one-to-one level exchange between Level 1 and 2 then place a Trigger(1:0) to Finish 2 and an LSP (OCB1) at the end point of level 1. Place a Trigger(1:0) to Finish 1 and an LSP (OCB1) at the start of level 2.
For Multiple level exchanges:
2. If the finish trigger for a satellite level is the only jump to the Lara Object start point in a Hub Level then no Timer value is required on the Finish trigger.
3. If the finish trigger for a satellite level is a jump to an LSP in a Hub Level then the Finish Trigger must have the corresponding Timer value to the LSP's OCB value to which it is jumping.
4. For Hub levels that have multiple entry/exit points then LSPs must be put in place at each re-entry point of the Hub level. Each LSP must be assigned a sequential OCB where OCB1 is the first point that Lara re-enters the Hub level; OCB2 is the second point that Lara re-enters the Hub level; OCB3 is the third point that Lara re-enters the Hub level, etc.
***Note that I said exchange point, not necessarily Start point. For example, a preceding level that is one way traffic into the Hub level to the Start of the level (Lara Object) needs only a normal Finish Trigger to the Hub level. In other words, any level connecting to a Hub level at any other start point than where the Lara Object is placed will need a Timer value in its Finish trigger to the Hub Level and a corresponding LSP in the Hub level with the same OCB value.
5. If the Lara object start point of a Hub level is not one of the exchange points to/from a satellite level then it does not require an LSP. If the Lara Object location is also an exchange point in the Hub level then it will need an LSP (with corrrect OCB) placed on the same tile.
6. If the re-entry point to a satellite level is at a location different to the Lara object location then it must have an LSP (OCB1) at the re-entry point.
7. Each level has a limit of 10 LSPs.
Vehicles and Torches
If Lara is able to carry out a level jump in a vehicle you must place a vehicle object somewhere in the map of the level she is jumping to and have the necessary vehicle animations (Vehicle Extra object) in the level she is jumping to.
If Lara is carrying a torch between levels you must have another torch placed somewhere in the map of the level she is jumping to.
For the final finish trigger in your game place a Trigger(0:0) to Finish 99. This will take the player back to the Load Game screen.
Reset HUB
The TR game engine can remember Save Game information for up to 7 consecutive levels. After that, you must use ResetHUB in your script to allow Save Games to be recalled properly.
There are four things that you must take into consideration when creating multi-level jumps. The Lara Object, Lara Outfit (Lara Skin), Weapons and Inventory. To avoid crashes during level jumps, observe the following rules:
1. The Lara object contains all the necessary
animations for each level. The set of animations can differ between each
level. Having wads with different animations does not affect level
jumps.
2. Using a different Lara outfit in different levels can
cause crashes. This can be avoided by observing the following rules:
a. If the outfits only vary by cosmetic differences (different
textures), then no ResetHUB is required.
b. If the outfits are
structurally different (contain different meshes) then you must
use ResetHUB in your script between the levels to prevent the game from
crashing.
3. Ensure that you maintain integrity between level
wads. For weapons, ensure that you have the weapon and ammo items in
each of your wads that you can carry over the items from a previous
level.
4. For inventory items that are carried over to subsequent levels such as medipacs, flares and puzzle items ensure the items are the same between wads. If any item is carried over from a preceding level and the object is not in the wad of the subsequent level then a 'Lara Butt' mesh will be displayed instead of the inventory item.

Lara's Butt Mesh
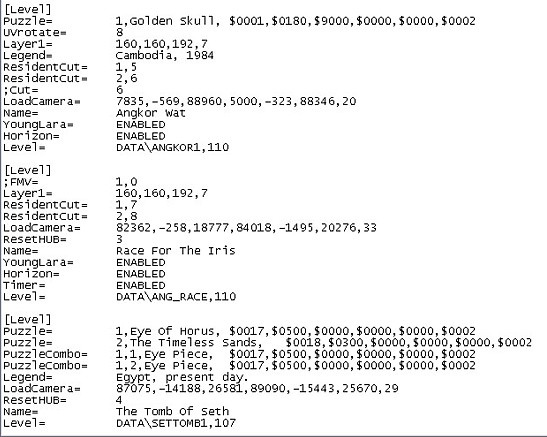
Example script from Tomb Raider - The Last Revelation
In the above example, Levels 1 and 2 use the Young Lara object. The ResetHUB command (ResetHUB= 3) is used in the Race for The Iris level to allow the change to the Classic Lara outfit in Level 3 - The Tomb Of Seth.
ResetHUB Conditions
Be aware that using the ResetHUB command to allow level jumps for different Lara Outfits is not the only function of this command. When a ResetHUB script command is invoked, it will also remove from Lara's inventory all carried over inventory items except weapons, ammo, flares, medipacs and quest items.
Example1:
Set up for three levels where L1<>L2 exchange point is at the end of L1 and the start of L2, and L2<>L3 exchange point is at the end of L2 and the start of L3. In this example, Level 2 is a Hub Level and L1 and L3 are satellite levels.
In Level 1
Trigger (0:0) for Finish 2; LSP at end of L1 OCB 1
(Note: No timer field required because this is the only place from which you want to jump to L2; The LSP has OCB 1 so that Lara will start at this spot when returning from Level 2)
In Level 2
At Start
Trigger (1:0) for Finish 1 ; Lara object only
(Note: Timer=1 because you want to jump to LSP with OCB1 in Level1;
At End
Trigger (0:0) for Finish 3 ; LSP at end of L2 OCB 1
(Note: No timer field required because this is the only place from which you want to jump to L3; The LSP has OCB 1 so that Lara will start at this spot when returning from Level 3)
Trigger (1:0) for Finish 2; No LSP
(Note: Timer=1 because you want to jump to LSP with OCB1 in Level 2; No LSP required because the only place you want to start in level 3 is where the Lara Object is placed.)
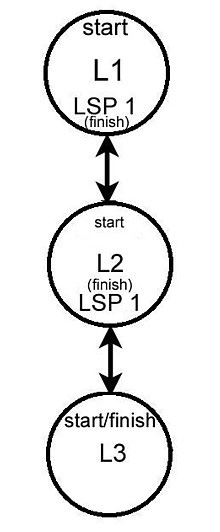
Example 1
Example 2:
Hub level 1 has 4 satellite levels - L2, L3, L4, L5. Each satellite level has it's own exit/re-entry location in the Hub level.
Setup:
(For L2) Trigger (0:0) for Finish 2; LSP (OCB1)
(For L3) Trigger (0:0) for Finish 3; LSP (OCB2)
(For L4) Trigger (0:0) for Finish 4; LSP (OCB3)
(For L5) Trigger (0:0) for Finish 5; LSP (OCB4)
Level 2
(For L1) Trigger (1:0) for Finish 1; No LSP
(For L1) Trigger (2:0) for Finish 1; No LSP
(For L1) Trigger (3:0) for Finish 1; No LSP
(For L1) Trigger (4:0) for Finish 1; No LSP
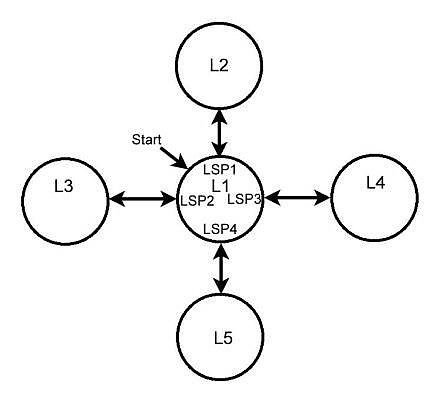
Example 2
Example 3:
Three levels are all inter-connected. L1 can go back and forth between L2 and L3; L2 can go back and forth between L1 and L3; L3 can go back and forth between L1 and L2.
(For L2 exchange point) Trigger (1:0) for Finish 2; LSP (OCB1)
(For L3 exchange point) Trigger (2:0) for Finish 3; LSP (OCB2)
(For L1 exchange point) Trigger (1:0) for Finish 1; LSP (OCB1)
(For L3 exchange point) Trigger (1:0) for Finish 3; LSP (OCB2)
(For L1 exchange point) Trigger (2:0) for Finish 1; LSP (OCB2)
(For L2 exchange point) Trigger (2:0) for Finish 2; LSP (OCB1)
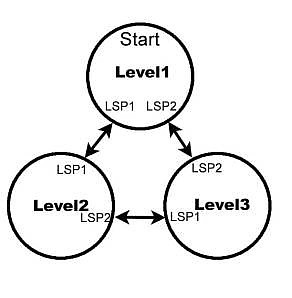
Example 3
Example 4:
Level 1 is a Hub Level that has two clusters of three interconnected levels attached to it. Cluster A (L2, L3, L4), Cluster B (L5, L6, L7)
(For Cluster A) Trigger (1:0) for Finish 2; LSP (OCB1)
(For Cluster B) Trigger (1:0) for Finish 5; LSP (OCB2)
Cluster A
(For L1) Trigger (1:0) for Finish 1; LSP (OCB1)
(For L3 exchange point) Trigger (1:0) for Finish 3; LSP (OCB2)
(For L4 exchange point) Trigger (1:0) for Finish 2; LSP (OCB3)
(For L2 exchange point) Trigger (2:0) for Finish 2; LSP (OCB1)
(For L4 exchange point) Trigger (1:0) for Finish 4; LSP (OCB2)
(For L2 exchange point) Trigger (3:0) for Finish 2; LSP (OCB2)
(For L3 exchange point) Trigger (2:0) for Finish 3; LSP (OCB1)
Cluster B
(For L1) Trigger (2:0) for Finish 1; LSP (OCB1)
(For L6 exchange point) Trigger (1:0) for Finish 6; LSP (OCB2)
(For L7 exchange point) Trigger (1:0) for Finish 7; LSP (OCB3)
(For L5 exchange point) Trigger (2:0) for Finish 5; LSP (OCB1)
(For L7 exchange point) Trigger (2:0) for Finish 7; LSP (OCB2)
(For L5 exchange point) Trigger (3:0) for Finish 5; LSP (OCB1)
(For L6 exchange point) Trigger (2:0) for Finish 6; LSP (OCB2)
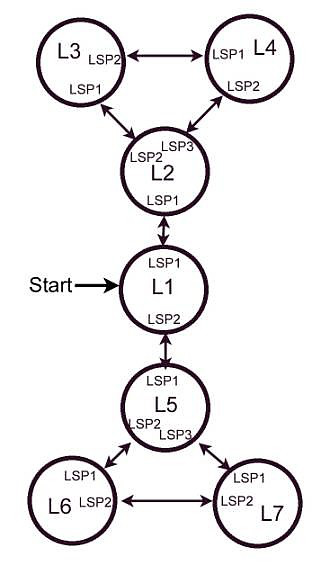
Example 4
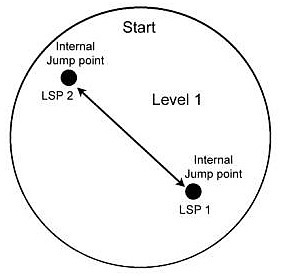
Internal Level Jumps
An internal level jump is one where Lara is moved from one room in a level to another room. Essentially you use LSPs in the same way that you would for a level jump, only that the LSPs are placed within the one level rather than between two levels.
If you are creating a level jump within your level and it is level 1 in the game, you would place in your map:
1. Lara
Object where the level starts.
2. A Trigger (1:0) for Finish 1 at the
place in your level where you wish to move Lara from.
3. An LSP (OCB
1) at the place where you wish to move Lara to.
Things to avoid with level jumps
You should not use any sort of 'one-time-only' finish trigger as an exchange point. If you intend to jump back and forth between a level, do not end a level with a rolling-ball trigger, a flyby, an enemy death trigger, a Lara animation with special command, a one-shot lever or switch etc etc. as these will not reset, so the level jump can only be made once.
Example 5:
If you were using this as a teleporter effect, you might wish to be able to transport back to the original teleport location. In this case you would place:
1. Lara
Object where the level starts.
2. A Trigger (1:0) for Finish 1 at the
place in your level where you wish to move Lara from; plus an LSP (OCB
2) to designate the place to return to.
3. An LSP (OCB 1) at the
place where you wish to move Lara to; plus a Trigger (2:0) for Finish 1
to jump back to the original teleportation location.
Example 5
Different versions of the TRLE
Acknowledgements
Thanks to Anders (QRS) for his input and reviewing the text.