
Hidden Triggers in TRNG
by
AkyV
Page 1,2,3,4,5,6,7,8,9,10,11,12,13,14,15,16
The hidden triggers are executable or condition triggers (with the
trigger name 'Variables') in TRNG. But - unlike other triggers - the
hidden triggers are useless if we use them alone, i.e. a hidden
trigger will be useful only if we use it combined with other hidden
triggers.
And it's recommended to use the combinations of hidden triggers
because those combinations will be able to do things you cannot achieve
with other triggers!
Let's see two examples to understand how it works:
a, Executable combination:
When BADDY_1 comes to life then he will shoot maximum four rounds
with his Uzi at Lara before he runs out of the bullets (shooting 7
bullets in each round). Do you have a trigger in TRNG to give more
initial ammunition for a given BADDY_1 enemy? No, you don't have.
But you can use a combination of 'Variables' triggers to do that.
The combination is a TriggerGroup, containing these triggers (in
this order), for example:
$5000, 85, $36, $2000, 232, $4650, $2000, 257, $1750
The meaning of the triggers in the combination:
; Set Trigger Type - ACTION 54
; Exporting: TRIGGER(54:0) for ACTION(85)
; <#> : BADDY_1
ID 85
; <&> : Variables. Set the index of
<#>moveable as Selected Item
; (E) :
; Values to add in script command: $5000,
85, $36
; Set Trigger Type - FLIPEFFECT 232
; Exporting: TRIGGER(18000:0) for
FLIPEFFECT(232)
; <#> : Variables. Numeric. Set
<&>Variable with (E)value
; <&> : Local Short Alfa1
; (E) : Value 70
; Values to add in script command: $2000,
232, $4650
; Set Trigger Type - FLIPEFFECT 257
; Exporting: TRIGGER(5968:0) for
FLIPEFFECT(257)
; <#> : Variables. Memory. Copy from
<&>Numeric Variable to (E)Selected Item Memory
; <&> : Local Short Alfa1
; (E) : Custom_C (Different usage in
according with type of item) (Short)
; Values to add in script command: $2000,
257, $1750
So, as the first trigger of the combination, A54 says the required
BADDY_1 is which one has Object ID85. Then F232 trigger will define
a value - which is 70 now - in a variable - which is Local Short
Alfa1 now. Then F257 trigger will put that 70 into Custom_C field of
the so-called Item Memory Zone. Custom_C field means - in the case
of each placed BADDY_1 enemy - the actual ammunition.
Now we forced 70 into Custom_C field which means BADDY_1 with ID85
(still not living) will have 70 Uzi bullets (for 70/7=10 rounds)
when comes to life.
(Naturally you can force new bullets for the baddy even if he
already lives.)
b, Condition combination:
We want to know if Mesh9 (right wheel on the front side) of
ANIMATING6 objects of the original tut1.wad (the jeep) is
shatterable in the given moment or not.
The combination is a TriggerGroup, containing these triggers (in
this order), for example:
$2000, 292, $1B5, $2000, 293, $1071, $8000, 113, $228
The meaning of the triggers in the combination:
; Set Trigger Type - FLIPEFFECT 292
; Exporting: TRIGGER(437:0) for
FLIPEFFECT(292)
; <#> : Variables. Memory. Set the <&>Slot
as Selected Slot Memory
; <&> : ANIMATING6
Id=437
; (E) :
; Values to add in script command: $2000,
292, $1B5
; Set Trigger Type - FLIPEFFECT 293
; Exporting: TRIGGER(4209:0) for
FLIPEFFECT(293)
; <#> : Variables. Memory. Copy from
(E)Selected Slot Memory to <&>Numeric Variable
; <&> : Local Long Beta
; (E) : Explosion Mask. (Each bit a type
of weapon able to do explode it (Long)
; Values to add in script command: $2000,
293, $1071
; Set Trigger Type - CONDITION 40
; Exporting: CONDITION(40:58) for
PARAMETER(113)
; <#> : Local Long Beta
; <&> : Variables. The <#>Numeric Variable
is = than (E)Big Number value
; (E) : Value of
Parameters=PARAM_BIG_NUMBERS at index= 2
; Values to add in script command: $8000,
113, $228
So, as the first trigger of the combination, F292 says the subject
of the combination is each object of ANIMATING6 slot. (ID437 is the
slot ID - see the slot indices in NG Center/Reference.) Then F293
trigger will put the actual value of Explosion Mask field - which is
a field of the so-called Slot Memory Zone - into a variable - which
is Local Long Beta now. Explosion Mask field works for the
shatterable properties of the meshes of the given object slot.
(Whatever the field name says.) Each bit in the field means the mesh
with the same ID number is shatterable. So, if the value of Local
Long Beta is 512 (=Bit9)* now, that means Mesh9 (and only Mesh9!)
for each object of ANIMATING6 object slot is shatterable in the
given moment. That's why C40 trigger will examine if Local Long Beta
is 512 now.
(*: bits are exponents for Value 2. Bit0 is Value 2 with exponent
0=1, Bit1 is Value 2 with exponent 1=2, Bit2 is Value 2 with
exponent 2=4, Bit3 is Value 2 with exponent 3=8 etc. So Bit9 is
Value 2 with exponent 9=512.)
Let's suppose we have this Script entry:
Parameters= PARAM_BIG_NUMBERS, 1024, 659, 512, 4096
The first number (1024) of PARAM_BIG_NUMBERS has ID0, the second
number (659) of PARAM_BIG_NUMBERS has ID1 etc. It means the number
with PARAM_BIG_NUMBERS ID2 is 512 now. So if C40 compares Local Long
Beta to PARAM_BIG_NUMBERS ID2 number, that means C40 compares Local
Long Beta to 512:
- If Local Long Beta is 512 then the condition is true, only Mesh9
is shatterable.
- If Local Long Beta is not 512 then the condition is not true, not
only Mesh9 is shatterable, not Mesh9 is shatterable or there is no
shatterable mesh.
Important things you need to know
I-1. General measure units in the
tutorial
1 square=4 clicks=1024 units
1 second=30 frames
I-2. Which object index should I use
in the combinations?
Usually it is the Room Editor index (Paolone calls it 'NGLE index').
I will tell you if you should use the game index (Paolone calls it
'tomb index') instead of that.
'Room Editor index' is the index that you can see in that little
yellow box that will pop up if you click on the object in the Room
Editor.
'Game index' is the index the object uses in the game. (I will tell
you later how you can meet a game index of an object.)
I-3. I'd like to calculate 'facing'
- but what is a 'face' of an object?
The 'face' of the object is the side of the object which will always
see the east if you have just placed the object in the Room Editor.
(Be careful! It is not always 'the real face' of the object, i.e.
the side that looks like a face.) - It is north in the game.
I-4. Learn more about variables and
memory zone fields, if you want
See these tutorials on Skribblerz:
- NGLE Encyclopedia
- Paolone's tutorial for variables
- Memory Zones tutorial
- Condition triggers with variables (if you want more special
conditions than I listed in the present tutorial)
I-5. What are memory zones and
memory zone fields?
Memory Zones contain the different properties of the game:
- Item Memory Zone: the most of the Moveable objects have some
properties that can be represented by numbers. The numbers -
representing the actual state of the object in that property (for
example, the direction of Lara's facing or the length of a blown
flame etc.) - are recorded here.
- Savegame Memory Zone: the amount/presence of given things are
recorded here (for example the air amount in Lara's lungs or the
type of the weapon which is just on Lara's back etc.), so the game
will know - if the player loads the game - the proper
amount/presence of things when a savegame has just been loaded.
(I.e. now we use this technique to record/study these values any
time we want.)
- Code Memory Zone: this zone represents some special properties of
the game, such as which camera type is just being used etc.
- Slot Memory Zone: each Moveable object slot in a WAD has the same
values for each object that is placed of that slot. This zone
represents the actual values for these general slot properties. (Eg.
the size of the shadow or which meshes are shatterable etc.)
- Animation Memory Zone: some properties of the Moveable object
animations are known for WADMerger, some of them are not. This field
represents the actual values of these known/unknown animation
properties (Next Frame, Accel etc.).
- Inventory Memory Zone: this zone contains data about the
inventory. (In fact, about the items in the inventory. Mostly about
their positions in the inventory.)
Each memory zone has more fields. Each field controls a given
property in its zone.
I-6. What are variables?
The purpose of the variables is 'only' to take different numeric (or
sometimes textual) values. So the variables are independent of any
concrete feature of the game engine. That's why if you have a value
in a variable then you can apply that value to control various
TR4/TRNG procedures.
Note:
In this tutorial we don't care about variables for textual values,
only about numeric variables.
I-7. When should I use variables?
- Do you remember that F232 trigger above with Value 70? Well, if
you use an F232 to put a value (eg.70) into a variable then you can
print that 70 on the screen with another trigger, not using A54 or
F257 at all. - So, as you see, you can use variables even
independently of memory zone fields, if you want.
But in this tutorial we don't care about variables without memory
zone fields.
- As you saw above in F257 or F293 triggers, you need variables
a, when you force a value into a memory zone field to change the
property of that field, or
b, when you put a memory zone field value into a variable to study
it.
Important!
If you use an executable combination, then you don't need variables
everyway. I mean, you can force a value into a memory zone field directly with
a trigger, i.e. without using a variable.
For example, above we defined Value 70 by F232 and then we forced it
into a memory zone field by F257. But, instead of those two
triggers, you can use only one F255 to force Value 70 directly into
that field, avoiding variables.
But we can use the direct method only with the executable
combinations of these memory zones:
- Item Memory Zone
- Savegame Memory Zone
- Code Memory Zone
- Inventory Memory Zone
So if you have the possibility to choose between a variable method
and a non-variable method then naturally you will choose the easier
one, with the non-variable method.
Except:
- if you want to force/study a really big value (i.e. above 65535).
Moreover, in some memory zone fields you can have problems even with
using not too big values. (I'll tell you later why). Or
- if you want to be tricky with the forced value. I mean, consider
this:
The variable method is more flexible. I mean, eg. you replace that
F232 by an F231. F232 said this: 'Value=constant 70'. But F231 says
this: 'Value=X+constant 70' in which X is a non-constant value.
For example, you have another TriggerGroup, this one: 'if A happens
then X=0, or else if B happens then X=50, or else if C happens then
X=170'. So, depending on the outcome of the 'another' TriggerGroup,
not always 70 will be forced as the new ammunition amount, but
perhaps 0+70=70, perhaps 50+70=120, perhaps 170+70=240.
See more below about the variable triggers or the triggers of the
direct forces we use.
Note:
In this tutorial I won't mention all the triggers about variables
and memory zones, only the more important ones.
For example, F259 is a trigger which will force bits into a memory
zone field. Bit0=1, Bit1=2, Bit2=4, Bit3=8 etc. But I didn't want to
make the things more complicated that's why I skipped that trigger.
I.e. if you want to force bit values, then force directly 1, 2, 4, 8
etc. (Or feel free to swap the original trigger by that F259, if you
want.)
I-8. What values can I use?
Possibly we can use values (either in variables or directly) 'only'
in the 'from -2 147 483 648 to 2 147 483 647' interval.
But be careful! We can't have digits after the decimal point. So,
for example, Value 25,76 will be treated as 25.
I-9. Which variable should I choose?
As you saw above in F232 or F293 triggers (and as you can it in
several other 'Variables' flipeffect triggers) you're the one who
needs to choose the variable that will be used in that trigger.
Usually you should choose a variable of the Local Alfa, Local Beta,
Local Delta, Global Alfa, Global Beta or Global Delta series.
After all, your choice is RANDOM (i.e. you can choose any variable
you want) if you observe some rules:
1. As you see, there is a 'byte', 'short', 'long' remark in the name
of the memory zone fields (see eg. in F232 or F293 triggers). Use a
Byte variable for any 'byte' field, a Short variable for any 'short'
field and a Long variable for any 'long' field. (Each series has 1
Long, 2 Short and 4 Byte variables.) - The remarks mean the size of
the field:
a, The value of a 'byte' variable must be always between 0 and 255.
I.e. a field with 'byte' remark will have its values between 0 and
255.
b, The value of a 'short' variable must be always between -32 768
and 32 767. I.e. a field with 'short' remark will have its values
between -32768 and 32767.
c, The value of a 'long' variable must be always between -2 147 483
648 and 2 147 483 647. I.e. a field with 'long' remark will have its
values between -2 147 483 648 and 2 147 483 647.
In fact, it's not quite right. I mean, some combinations will use -
relatively - little values, because that combination will not use
all the possibilities of that field.
So you can choose a 'less' variable if you want. For example, if the
field is 'short', but the biggest value the combination will use is
smaller than 100, then feel free to use a 'byte' variable, if you
want.
2. The default value of each numeric variable is 0. Unless you
change their values, Global variables will keep their values in the
whole game, Local variables will keep their values 'only' in the
whole level.
(It means eg. if you used Local Byte Alfa1 variable with Value 50 in
Level A, and then if you used Local Byte Alfa1 variable with Value
75 in Level B, then Local Byte Alfa1 will be 50 again, if Lara goes
back to Level A.)
Please, don't misunderstand:
I mean, the constancy of the variable
value and the constancy of the field value is not the same!
For example, the amount of the big
medipacks is a global value, because, if you have X amount of big
medipacks at the end of Level A, then you also have X amount of big
medipacks of the start of Level B, if you jump at the end of Level A
to the start of Level B.
So, if you use a local variable to define
X medipacks at the end of Level A, and you jump to Level B, then the
amount of the medipacks will remain X - though that local variable
will become 0 at the start of Level B.
Notes:
a, Global variables may lose their values in the next level if you
used a ResetHUB command during the level jump!
b, The title is a 'separate world'. I.e. you cannot carry variable
values from the title into the game - or vice verse -, even with
global variables.
3. You cannot use a variable of a series if you use another variable
of the SAME series AT THE SAME TIME.
In fact, sometimes you are allowed to use another variable of the
same series. Here are the exact rules:
a, If you use a 'Long' variable for a field then you can't use any
other variables of the series at the same time. (So, for example,
you can't use Global Long Beta with Global Short Beta1 at the same
time. But you can use Global Long Beta with Local Long Beta or
Global Long Alfa or Local Short Beta2 or Global Byte Delta4 etc. at
the same time in your game.)
b, If you use a 'Short1' variable then you can't use 'Long' or
'Byte1' or 'Byte2' variables of the series at the same time.
c, If you use a 'Short2' variable then you can't use 'Long' or
'Byte3' or 'Byte4' variables of the series at the same time.
d, If you use a 'Byte1' or 'Byte2' variable then you can't use
'Long' or 'Short1' variables of the series at the same time.
e, If you use a 'Byte3' or 'Byte4' variable then you can't use
'Long' or 'Short2' variables of the series at the same time.
4. 'Current Value' is a special long and global variable, use it if
I say that.
5. Last Input Number, Local/Global Long Timer or Store variables are
special variables, don't choose them now - see more about them at
the end of the tutorial.
I-10. What an executable combination
should contain?
As you see above in the example with baddy ammunition, the formula
of an executable combination (i.e. a TriggerGroup) usually contains
these triggers:
1. The first executable trigger is a trigger that defines the
subject of the combination. (You need it only in the case of Item,
Slot, Animation or Inventory Memory Zone.) The subject is the thing
whose properties will change if the value has been forced.
2. The second executable trigger defines a value in a variable.
3. The third executable trigger forces the value of the variable
into a memory zone field. - And now the field has started using the
forced value, i.e. the property (that is attached to that field) has
changed.
Or an alternative version without variables (only for Item,
Savegame, Code or Inventory Memory Zone):
1. The first executable trigger is a trigger that defines the
subject of the combination. (You need it only in the case of Item or
Inventory Memory Zone.)
2. The second executable trigger forces a value into a memory zone
field. - And now the field has started using the forced value, i.e.
the property (that is attached to that field) has changed. (As you
see, if it is Savegame or Code Memory Zone, then there is only one
trigger in the TriggerGroup. So if you wanted to use an F118 to
activate the combination, then you don't need that F118 and that
TriggerGroup. I.e. just place this only one trigger in the map, and
that's all.)
When we execute the combination that means all the triggers in the
combination will be executed, in the given order. If the last
trigger of the combination has been executed then the purpose of the
combination has been happened (i.e. the value has been forced into
the field).
If you activate that TriggerGroup, then the combination will be
executed.
Note:
'Usually' means:
Some combinations could be more complicated, with more triggers than
three.
(You can increase the amount of the triggers in the combination:
a, because the combination wouldn't work without that, or
b, the effect of the combination will be more interesting this way.)
See more about all of this below.
I-11. How can we activate the
TriggerGroup of the executable combinations to execute the
combination?
The general possibilities to activate that TriggerGroup:
- An F118 trigger (in 'single' mode, a TRIGGER or a HEAVY) placed in
the map, for the given TriggerGroup. (Maybe having a CONDITION
trigger overlapped with it.)
- Or a GlobalTrigger which will activate the given TriggerGroup if
the condition for the GlobalTrigger is true. (The condition could be
anything you want.)
Note:
'General' means there are some other functions that are also able to
activate any TriggerGroup, including the TriggerGroups of executable
combinations. (See eg. Switch Script command etc.)
I-12. What a condition combination
should contain?
As you see above in the example with the shatterable mesh, the
formula of a condition combination (i.e. a TriggerGroup) usually
contains these triggers:
1. The first one is an executable trigger that defines the subject
of the combination. (Only in the case of Item, Slot or Animation
Memory Zone.) The subject is the thing whose properties will be
examined in the condition trigger.
2. The second one is also an executable trigger that puts the actual
value of a memory zone field into a variable.
3. The third one is a condition trigger that studies the value of
the variable. - I.e. if we know the value of the variable then we
know the value of the field, so we know the value of the property
attached to that field.
Unfortunately conditions for Inventory Memory Zone don't work!
When we start the combination, that means:
- First of all, all the executable triggers in the combination will
be executed, in the given order. If the last executable trigger of
the combination has been executed, that means the executable
triggers have 'filled up' the condition trigger with data.
- After that, the condition trigger will able to study the value,
because the trigger has the proper data for that, at last.
If you activate that TriggerGroup, then the combination will be
started.
Note:
'Usually' means:
Some combinations could be more complicated, with more triggers than
three.
(You can increase the amount of the triggers in the combination:
a, because the combination wouldn't work without that, or
b, the effect of the combination will be more interesting this way.)
See more about all of this below.
I-13. How can we activate the
TriggerGroup of the condition combinations to study the value in the
combination?
The general possibilities to activate that TriggerGroup:
- A C15 trigger placed in the map, for the given TriggerGroup. An
executable TRIGGER is naturally placed on the same square,
overlapped with the CONDITION trigger, and naturally will be
executed if this condition is true.
- Or a GlobalTrigger which has the given TriggerGroup as the
condition for the GlobalTrigger. If this condition is true then the
GlobalTrigger will execute an executable trigger.
Notes:
- An alternative solution instead of C15+TRIGGER: place only one
TRIGGER (or one HEAVY), without a C15. This TRIGGER (HEAVY) is an
F118 to activate the TriggerGroup of the condition combination, but
this time in 'multiple' mode. The executable trigger that will be
activated when the condition is true, this time will be placed in
this TriggerGroup, just after the condition trigger. (This
alternative method is maybe better because now we don't waste
triggers, using only one instead of two. Moreover, with C15, you
can't use a HEAVY.)
- 'General' means there are some other functions that are also able
to activate any TriggerGroup, including the TriggerGroups of
condition combinations. (See eg. Switch Script command etc.)
I-14. Smaller/bigger condition
relations
Naturally not only the 'if the value is X' is the only logical
condition - but only if the examined value is a part of a sequence.
Sequences could be for example:
- timer
- distance from a given point
- ammunition amount
- speed of an animation
- earthquake intensity
- 360 degrees
- etc.
So, you can use 'smaller/bigger' condition triggers in these cases,
such as
'if time in the timer is smaller than ... frames'
'if the baddy has less Uzi ammunition than ... bullets'
'if the object is farther from a given point than ... units'
'if the earthquake intensity is bigger than ...'
Etc.
See more about it below.
Notes:
- In fact, we have only 'bigger or equal' conditions, so we don't
have clearly 'bigger' conditions. I.e. be careful when you want to
describe a condition exactly. (For example, if you want a 'bigger
than 50' condition, then you need to use a 'bigger than or equal
with 51' condition.)
- Hereafter I call 'simple condition' if a condition is not a
sequence.
I-15. Cycle sequences
The 360 degrees of a circle is treated in TRNG as a circle which is
split into 65535 parts. It means 1° is about 182(=65535/360) and
about 0,005° is 1. So we have 0,005° precision now.
That 65535 works in two half-circles. One of the half-circles goes
from 0 to 32767: 0, 1, 2... 32765, 32766, 32767. The other half-circle
goes from -1 to -32768: -1, -2... -32766, -32767, -37678.
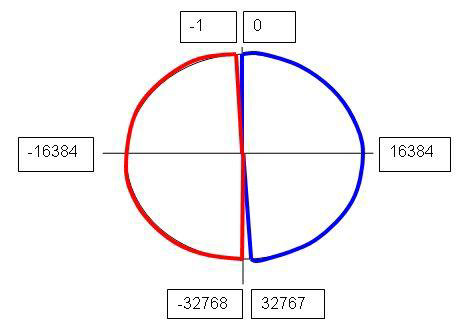
0 is the default point=0 degree=360 degrees.
So eg. 'equal with -32768' means a turn of 180 degrees, 'bigger than
16384' means 'farther from 0 degree than 90 degrees clockwise',
'less than -16384' means 'closer to 0 degree than 90 degrees
anti-clockwise'.
Note:
The values of a circle perfectly fit in a Short variable: -32768 to
32767.
But be careful! I experienced sometimes -32768 wouldn't fit a Short
variable so I needed to use a Long variable for that value.
I-16. When could we avoid memory
zones?
You may ask me: 'You said at the beginning of the tutorial that
combinations will able to do things you cannot achieve with other
triggers. Why did you say that? That's not always true. I found Transparence
level (0 = opaque / 126 transparent / over 127 removes item) (Short) Item
Memory Zone field in F257 trigger. But A53 is able to do the same. I
don't want to choose the hard memory zone method instead of the easy
A53'.
Well, in fact, there are some memory zone fields that are able to do
the same thing that a 'regular' trigger. (Probably Paolone developed
some regular triggers basing on memory zone fields.) But that
doesn't mean it is not worth using a memory zone field if that has a
'regular pair'. Because there can be 'irregular circumstances', when
the regular trigger is unable to work.
For example, A53 is not able to study if the actual transparence
level of the object is smaller than a given value or not. ButTransparence
level (0 = opaque / 126 transparent / over 127 removes item) (Short) field
is able to achieve that examination.
See more about it below.
I-17. How can I know which value
should I force/which value should I study?
Naturally it is clear several times. I mean, if you want to give 70
bullets to the baddy, then the value in the variable is 70.
But, for example, how should you know that 'Value 51' means the
proper value for the hit condition? - I.e. if the value of a given
field is 51 (by the way it is 'Flags of Item' Item Memory Zone
field), then that means this condition: 'if the enemy has just been
hit by a bullet'.
Well, usually you don't need to search values like that. I searched
them yet and wrote them in the descriptions of the combinations
below.
You ask how I got them? - Well, Paolone's tutorial about variables
helped me a lot. But not always and not clearly everyway. So as I
wanted to know the unclear values of the fields, I needed to use
three additional tools:
a, Diagnostics
If you use a Diagnostics Script command, then lots of Diagnostics
messages will show up on your screen during the game.
If you want only a concrete message on the screen (removing the
bothering, unnecessary messages) you need another Script command as
well. This is DiagnosticType.
Use DiagnosticType with DGX_COMMON_VARIABLES constant, so only the
message about the numeric variable actual values will be typed on
the screen.
And now you need a GT_ALWAYS GlobalTrigger that will activate a
TriggerGroup. This TriggerGroup contains one or two triggers:
Trigger1. To defines the subject of the combination. (Only in the
case of Item, Slot or Animation Memory Zone.)
Trigger2. To put the actual value of a memory zone field into a
variable.
Build the Script, and start the game. See the Diagnostics message
about the given variable. The field value will be updated
continuously in the variable. I.e. if you notices any change in the
variable value printed on the screen, that means something has just
happened that changed the field value.
So, for example, if the variable value has turned into 51 when you
use 'Flags of Item' in Trigger2 and when a shot of Lara is just
hitting the subject enemy, then you will know it means this:
- the 'Flags of Item' field is useful if you want to use a hit
condition, and
- the value of 'Flags of Item' field is 51 if a bullet hits the
subject enemy.
You can remove that GlobalTrigger and that TriggerGroup if you stop
using Diagnostics this way.
b, Log program
Sometimes the variable values in the Diagnostics message on the
screen is changing too fast, you will be unable to follow them. (It
happens naturally mostly if the studied field belongs to a
sequence.) - That's why you need the log function.
First of all, you need the ID of the variable you use in Trigger2.
You can find the variable ID's in NG Center\Reference\Variable
Placefolders, in #XXXX format. So, for example, the ID of Local Byte
Beta1 variable is #0044.
Now choose a (any) Extra NG string in NG Center. Type that variable
ID into that string.
Then, place one more trigger (Trigger3) after Trigger2 in the
TriggerGroup. It is an F308 - with that string in the Timer window.
Now build the Script.
You can find the log program for TRNG TR4.exe in the Tools folder of
the Level Editor. This is TOMB4_LOG.exe. Start it and the empty
window of the program will pop up.
Start the game. The log program window should remain over the Tomb
Raider screen, and a lot of 'unnecessary' entries show up fast in
the log window, after each other.
When the 'attack of the unnecessary entries' has stopped, then you
will probably see a constant value in the log window. It is the
actual value of that variable. - For example, the field is about
some distance, and the subject is Lara object. If the value is eg.
59770 that means Lara is from 59770 units distance from a given
point.
Now Lara starts moving, so the values start running in the log
window - for example this way: 59723, 59676, 59629, 59582, 59535,
59491 etc.
Each new entry means a new frame. So you can see how the value is
changing frame by frame.
If you stop studying the value, then exit the log program.
c, Log TXT
Each usage of the log program creates/updates a tomb4_log.txt in
Tools folder. This TXT shows each entry that showed up in the log
program when the log program was open the last time.
If the values in the log window are still too fast for you (or if
you are unable to see the log window when the game is running) then
open this TXT, find the part about the variable value, and examine
that.
Notes:
- As you see, if the value is constant (i.e. 'if Lara doesn't move'
now) then the value won't be updated in the log program, though the
time is passing.
If you want the log program to repeat the constant values, frame by
frame, then check this in the log program drop down menu bar (File):
'Show also same mexages in different times'.
- The described three methods won't work in Inventory Memory Zone.
And why did I tell all of that?
Because not all the combination descriptions have an exact list of
(all) the possible values.
For example see that 59723, 59676, 59629, 59582, 59535, 59491
sequence above. I mean, Lara's distance from a point is naturally
chaotic, could be anything, we cannot describe the possible distance
values in an exact way in a tutorial.
That's why in those 'chaotic cases' it's you who should discover the
proper values for yourself, using Diagnostics or the log.
I-18. Conditions with tolerance
Sometimes you MUST use smaller/bigger relations in the conditions of
the sequences. - Here are two examples to help to understand:
a, When the timer is running, then it is changing linearly, one by
one. Eg. 86, 87, 88, 89, 90, 91, 92 etc. frames. So you can use eg.
this condition: 'if the time in timer is 90 frames (3 seconds)'.
b, Probably you think when an objects moves then it moves nicely.
So, for example, if its distance from a given point is just 617
units and it starts going away then you think, the value will start
changing this way: 618, 619, 620, 621 etc.
But it's not true. When the object starts moving from 617 units,
then the game will detect its next position for example at 625
units. So if you have an 'if the distance is 620 units' condition
then the condition will fail - though the object will reach that
position when moving.
The solution - use the condition with a tolerance. For example, 'if
the distance is bigger than 618 units AND if the distance is smaller
than 626 units'. And now the game will detect that 625 instead of
the impossible 620. (So you don't need to try other values again and
again in an 'equal' condition if that 620 fails.)
Let's see for example how we should reform a basic condition formula
for a case with a tolerance:
A basic formula:
Trigger1. Define X object as the subject of Item Memory Zone.
Trigger2. Put Y field value into Z variable.
Trigger3. Study if Z variable value is A (620) or not.
The reformed formula:
Trigger1. Define X object as the object of Item Memory Zone.
Trigger2. Put Y field value into Z variable.
Trigger3. Study if Z variable value is bigger than B
(618) or
not.
Trigger4. AND study if Z variable value is smaller than C (626) or
not.
(Naturally it works in a similar way in the case of the basic
formulas of other memory zones.)
So if your examined value is a value of a sequence, but the 'equal'
condition fails then you probably should change the 'equal'
condition for a 'bigger than... and smaller than...' condition.
Note:
The tolerance is not always so little (i.e. 626-618=8). Sometimes it
could be bigger or much bigger. For example, when Lara is turning
and the game detects its start position at 4541 - it means about 25
degrees clockwise from the north direction in the game -, then her
next position (clockwise) will be probably at 5936 - which is about
32-33 degrees. So now you should use about a 1400-1500 big
tolerance.
Test your tolerance idea in the game (and/or use Diagnostics or the
log), and you will find the proper tolerance sooner or later!
Important!
You can have another reason to apply conditions with a tolerance in
the case of sequences. For example, if I say the examined value is
between 1 and 150, and you use a 'bigger than/equal with 140'
condition, then the solution could be problematic. Because it's not
sure that 150 means 'maximum value in that field', perhaps that
means 'the biggest value in that field you can use in the condition
without problems'. So if the condition fails (as the value becomes
151 or bigger, and that is really the wrong number) then you should
suspect it can be a problem like this.
So try to prevent the problem with using a condition with a
tolerance: 'bigger than/equal with 140, smaller than 151'.
I think it's the better if you apply smaller/bigger conditions
always in 'a tolerated way' if you don't know that field too much.
I-19. Conditions with negative
values
If you want to force a negative value with an executable combination
then you probably won't have a problem with it. (I will tell if you
will.)
But if you want to study a negative value in a condition
combination, that could be buggy if you don't do that considerately.
- We have this method to prevent the problem:
Let's see this example: a vertical distance above Floor Level 0 is
always negative, but a vertical distance below Floor Level 0 is
always positive. Naturally the value is 0 if it is exactly Floor
Level 0.
We use three reformed formulas instead of one basic formula:
a, If the examined value is below Floor Level 0 or exactly Floor
Level 0 (hereafter
we call it 'Positive formula'):
Trigger1. Define X object as the subject of Item Memory Zone.
Trigger2. Put Y field value into Z variable.
Trigger3. A C41 trigger to study if Z variable value >=0.
Trigger4. Study if Z variable value is A or not.
b, If the examined value is above Floor Level 0 or exactly Floor
Level 0 (hereafter
we call it 'Negative formula'):
Trigger1. Define X object as the subject of Item Memory Zone.
Trigger2. Put Y field value into Z variable.
Trigger3. A C42 trigger to study if Z variable value <1.
Trigger4. An F284 trigger to turn the sign in Z variable. (Nothing
happens if you want to turn the sign with 0 - i.e. if the condition
is exactly Floor Level 0. Which is good.)
Trigger5. Study if Z variable value is A or not. ('A'
must be the positive version of the negative number!)
c, If the examined value is exactly Floor Level 0 (hereafter
we call it 'Null formula'):
Trigger1. Define X object as the subject of Item Memory Zone.
Trigger2. Put Y field value into Z variable.
Trigger3. Study if Z variable value is 0 or
not.
(Naturally it works in a similar way in the case of the basic
formulas of other memory zones.)
Note:
If you use a 'smaller than 0' anywhere, then that is not a condition
for a negative number - because the studied value is 0, not a
negative number -, though it's about negative numbers.
I-20. When do I need to use
PARAM_BIG_NUMBERS?
- Triggers to force positive values (to variables or directly), when
the value is defined in the trigger: work from 0 to 127.
- Triggers to force negative values (to variables or directly), when
the value is defined in the trigger: work from -1 to -128.*
- Triggers to force any values (to variables or directly), when the
value is defined in PARAM_BIG_NUMBERS: work from -65536 to 65535.*
- Triggers to study any values (in variables), when the value is
defined in the trigger: work from 0 to 31.
- Triggers to study any values (in variables), when the value is
defined in PARAM_BIG_NUMBERS: work from 0 to 65535.**
*: forcing negative numbers sometimes could be buggy. In those cases
we will force positive numbers, inverting the sign - just as we did
that above in the conditions. (See more about it later, in the
descriptions below.)
**: you can type negative numbers now, but they will be useless.
(See above how we'll study negative values.)
So, if you want, you can use PARAM_BIG_NUMBERS all the time,
skipping the method when the value is defined in the trigger, you
don't need those triggers. But I don't recommend the exclusive usage
of PARAM_BIG_NUMBERS if you have too many numbers to be defined as a
big number. I mean, the big number ID's run from 0 to 254. It is 255
numbers. So if you need many big numbers, then it's better if you
don't waste big number ID's for 'little numbers'.
I.e. if you need many big numbers then everyway
- use the triggers (when the value is defined in the trigger) for
the 'little numbers", and
- use PARAM_BIG_NUMBERS only:
a, If you want to force a value from -65536 to -129 or from 128 to
65535.
b, If you want to study a value from 32 to 65535.
I-21. If the big number is too big
for an executable combination
Unfortunately PARAM_BIG_NUMBERS is unable to handle too big numbers,
i.e. values above 65535. So if you need values above 65535 to force,
then you must perform some tricks:
See how we must change a basic formula (feel free to choose any
method) to force a value above 65535:
This is our basic formula for the examples:
Trigger1. Define X object as the subject of Item Memory Zone.
Trigger2. Put Y value into Z variable.
Trigger3. Force Y value of Z variable into A field.
a, Using addition:
Trigger1. Define X object as the subject of Item Memory Zone.
Trigger2. An F263 to put U value into Current Value variable. (U is
from 0 to 65535 big number)
Trigger3. Put W value
into Z variable. (W
is from 0 to 65535 big number)
Trigger4. An F285 to add U to W (U+W=Y).
Trigger5. Force Y value of Current
Value into
A field.
b, Using multiplication (1):
Trigger1. Define X object as the subject of Item Memory Zone.
Trigger2. An F263 to put U value into Current Value variable. (U is
from 0 to 65535 big number)
Trigger3. Put W value
into Z variable. (W
is from 0 to 65535 big number)
Trigger4. An F288 to multiply U by W (UxW=Y).
Trigger5. Force Y value of Current
Value into
A field.
c, Using multiplication (2):
Trigger1. Define X object as the subject of Item Memory Zone.
Trigger2. Put W value
into Z variable. (W
is from 0 to 65535 big number)
Trigger3. An F251 to multiply U by W (UxW=Y). (U is from 0 to 127,
defined in this trigger.)
Trigger4. Force Y value of Z variable into A field.
(Naturally it works in a similar way in the case of the basic
formulas of other memory zones.)
Notes:
- These methods don't work if you don't use variables in the
executable formula.
- We don't need these methods for 'too big negative numbers',
because TRNG memory zone fields won't use a 'more negative' number
than -65536. (I think that -32768 above is 'the most negative' used
value of TRNG memory zone fields.)
I-22. If the big number is too big
for a condition combination
Unfortunately PARAM_BIG_NUMBERS is unable to handle too big numbers,
i.e. values above 65535. So if you need values above 65535 to study,
then you must perform some tricks:
See how we must change a basic formula (feel free to choose any
method) to study a value above 65535:
This is our basic formula again for the examples:
Trigger1. Define X object as the subject of Item Memory Zone.
Trigger2. Put Y field value into Z variable.
Trigger3. Study if Z variable value is A or not.
a, Using subtraction:
Trigger1. Define X object as the subject of Item Memory Zone.
Trigger2. Put Y field value into Current
Value variable.
Trigger3. A C38 trigger to study if Current Value variable value
>=V. (V=65535 big number.)
Trigger4. An F263 to put U value into Z variable. (U=any positive
big number.)
Trigger5. An F286 to subtract U from W (W-U=A). (W=a number above
65535 we wanted to study originally)
Trigger6. Study if Current
Value variable
value is A or not.
Notes:
- Don't use this method if the maximum value is more than about 130
000. ('Maximum value': for example, if we examine the values of a 0,
1, 2... 98, 99, 100 interval then the maximum value is 100.)
- If you don't know how to choose Value U, then here's the help:
(presumed) maximum value minus Value U equals with a number being at
least a bit less than 65535. (So eg. if maximum value=100 000, then
choose eg. U=35 000 because 100 000 minus 35 000 is 65 000.)
- So eg. if U=35 000 and if you wanted to study 80 000 originally
then A=80 000 minus 35 000=45 000.)
b, Using division (1):
Trigger1. Define X object as the subject of Item Memory Zone.
Trigger2. Put Y field value into Current
Value variable.
Trigger3. A C38 trigger to study if Current Value variable value
>=V. (V=65535 big number.)
Trigger4. An F263 to put U value into Z variable. (U=any positive
big number.)
Trigger5. An F287 to divide W by U (W/U=A). (W=a number above 65535
we wanted to study originally)
Trigger6. Study if Current
Value variable
value is A or not.
Notes:
- 'A' must be a number below 65535 after dividing W by U.
(So eg. if we wanted to study 80 000 originally then 200 is a good
U, because 80 000/200=400=A.)
- The combination could be pretty complicated if we'd like to use a
condition with tolerance (see above) eg. for the 'a' (Subtraction)
formula. But this 'b' formula is a pretty good formula to solve that
tolerance problem in the case of too big numbers, if you choose a
proper U.
Just think about it: as we know, there can't be digits after the
decimal point, so A will be 400 not only if W=80 000, but if W is a
value from the 'from 80 000 to 80 199' interval. (Because 80
199/200=400,995=400, but 80 200/200=401.) I.e. if you choose U=200
now that will work as if you used a 'bigger than 79 999 but smaller
than 80 200' condition.
c, Using division (2):
Trigger1. Define X object as the subject of Item Memory Zone.
Trigger2. Put Y field value into Z variable.
Trigger3. A C38 trigger to study if Z variable value >=V. (V=65535
big number.)
Trigger4. An F253 to divide W by U (W/U=A). (U is from 0 to 127,
defined in this trigger. W=a number above 65535 we wanted to study
originally)
Trigger5. Study if Z variable value is A or not.
Notes:
- 'A' must be a number below 65535 after dividing W by U.
(So eg. if we wanted to study 80 000 originally then 2 is a good U,
because 80 000/2=40 000=A.)
- That 'tolerance solution' that I mentioned at 'b' formula works
now as well. But the efficiency seems too low now.
Because 80 000/2=40 000 and 80 001/2=40 000,5=40 000 but 80 002/2=40
001. I.e. it means only a 'bigger than 79 999 but smaller than 80
003' tolerance.
(Naturally it works in a similar way in the case of the basic
formulas of other memory zones.)
I-23. Single and continuous combinations
As I said above the technique of the executable combination works this way: a trigger forces a value into a memory zone field.
The question is: if you forced a value into a field, then the 'natural procedures' of the game will want to overwrite it in the next moment or not?
So we can have two results:
1. The 'natural procedures' don't want to overwrite it - this needs a 'single force'. You can achieve it in two ways:
- You force only once, in that moment. (It is not a One Shot function. The force happens only once in that moment, that's all.)
- You force again and again, in each moment, but it is only the first moment when anything happens. (I mean, in the further moments, the 'natural procedures' won't overwrite anything, so the value in the field remains the same, so the further forces won't cause anything new.)
2. The 'natural procedures' wants to overwrite it - this needs a 'continuous force'. You can achieve it in one way:
- You force again and again, in each moment. The value will be forced in the first moment. In the second moment, the 'natural procedures' would like to overwrite it, but you are still forcing, so the value will be forced again. In the third moment, the 'natural procedures' would like to overwrite it again, but you are still forcing, so the value will be forced again. Etc.
To understand 'single' or 'continuous' forces, read this:
First of all we need to talk about single and continuous parameters:
- The conditions in the GlobalTrigger could be both single and continuous:
= For example, a GT_USED_BIG_MEDIPACK is a single condition, because it becomes true only for a moment, when the player uses a big medipack.
= For example, GT_LARA_HOLDS_ITEM is a continuous condition. I.e. eg. till Lara is holding the pistols in the hands, the condition is true.
= GT_ALWAYS is clearly a continuous condition.
= For example GT_COLLIDE_ITEM could be an interesting case. If Lara goes slowly to the object and touches it gently, then it is a continuous condition. But if she jumps forwards and bounces back from the object, that is a single condition.
= The GT_CONDITION_GROUP condition could define several single or continuous TriggerGroups, as conditions.
= FGT_SINGLE_SHOT(_RESUMED) flag is a good tool to make the continuous conditions single.
We can have similar single/continuous conditions in the CONDITION triggers overlapped by F118 triggers:
= For example, use C20 trigger ('if the Screen Timer is just at X seconds') as a single condition.
= For example, 'if Lara is performing X animation' is a nice continuous condition.
- The executable combinations could have both single and continuous parameters:
= For example, 'force X time into the running timer of the object' is a single thing because the time is running, not constant.
= For example, 'make the object disabled' is a continuous thing, because the disabled state is constant, the object remains disabled till we enable it again.
The possibilities are:
a, If you use a GlobalTrigger for the force that could be either single or continuous.
- Single GT condition with single executable combination parameter: eg. 'if a big medipack has been used, then force 25 seconds into the timer of the object'. This is a single force, because the timer runs further at once after Lara has used the medipack: 26, 27 etc. seconds.
- Continuous GT condition with single executable combination parameter: eg. 'if Lara holds the pistols, then force 25 seconds into the timer of the object'. This is a continuous force, because she is holding the pistols continuously, so 25 seconds will be forced continuously. So the timer won't run - as if it weren't a timed object at all. (So it doesn't really matter which second value you will force continuously. I mean, perhaps it could matter - because, if you stop forcing, holstering the pistols, then the timer starts running from that 25 seconds.)
- Single GT condition with continuous executable combination parameter: eg. 'if a big medipack has been used, then make the object disabled'. This is a single force, because nothing new will happen, the object remain disabled after Lara has used the medipack.
- Continuous GT condition with continuous executable combination parameter: eg. 'if Lara holds the pistols, then make the object disabled'. This is a single force, because the object will be disabled the first time when the GlobalTrigger detects the pistols in Lara's hands. Then the pistols are still in her hands - but nothing new will happen because the object has been disabled yet.
b, If you use F118 to activate the combination that is always a single force:
- Single executable combination parameter, without a condition trigger overlapped: eg. 'force 25 seconds into the timer of the object'. This is a single force, because the timer runs further at once after the force: 26, 27 etc. seconds.
- Continuous executable combination parameter, without a condition trigger overlapped: eg. 'make the object disabled'. This is a single force, because the object remain disabled after the force, nothing new will happen. (Anyway, after the single force, the trigger won't care about Lara even if she is still on the square of the trigger.)
- Single condition trigger with single executable combination parameter: eg. 'if the screen timer is at 30 seconds, then force 25 seconds into the timer of the object'. This is a single force, because the object timer runs further at once after the screen timer has turned into 30: 26, 27 etc. seconds.
- Continuous condition trigger with single executable combination parameter: eg. 'if Lara is performing Animation 1, then force 25 seconds into the timer of the object'. This is a single force, because placed Condition triggers will detect Lara only in the moment when she reaches the square of the trigger. Animating1 is the walking animation, so if Lara is walking over that square, then the 25 seconds will be forced only once, when Lara steps on that square - not continuously while she's walking over that square. (So, after all, the condition works like a single condition.)
- Single condition trigger with continuous executable combination parameter: eg. 'if the screen timer is at 30 seconds, then make the object disabled'. This is a single force, because nothing new will happen, the object remain disabled after the screen timer has turned into 30.
- Continuous condition trigger with continuous executable combination parameter: eg. 'if Lara is performing Animation 1, then make the object disabled'. This is a single force, because the object will be disabled when Lara steps on the trigger square by walking. Then she's still walking - but nothing will happen because the object has been disabled yet and because the Condition trigger won't detect her now. (So, after all, the condition works like a single condition.)
And why did I tell all of that?
Because the executable combinations must be used definitely only with a single or only with a continuous force, so we are allowed to use only one of the methods for a task! (I will tell you which task works with which force method.)
Notes:
- Be careful, test cautiously with other methods - i.e. eg. if you activate the TriggerGroup by a Switch Script command, that is a single or a continuous force at the given task?
- Single conditions could be pretty hard conditions in placed Condition triggers. For example, 'if the screen timer is at 30 seconds' will be true only if Lara will step on the trigger square exactly in that second when the screen timer is at 30 seconds. The chance of this is pretty low. (Naturally it is not true if a continuous condition work like a single condition.)
- If the one that activates the trigger is not Lara (but eg. a pushable object) that also be detected on the trigger square only for a moment.
- As the 'regular' conditions in GlobalTriggers or in placed Condition triggers (see above), condition combinations naturally could also be single or continuous
= in placed Condition triggers or
= as conditions for GlobalTriggers
('Simple' and 'single' conditions are
naturally not the same.)
I-24. When am I allowed to use the parts of a combination again?
Be careful with any combinations, because the combination just working will engage
- the subject that the combination uses, and
- the variable that the combination uses, and
- the field that the combination uses.
So:
- you can't have another subject for that memory zone, and
- you can't use that variable for other purposes, and
- you can't use that field for anything else
in the moment when that F118 for the combination is just being triggered or while that GlobalTrigger for the combination is enabled.
Except:
- If the GlobalTrigger has a single condition and you are sure that the condition won't be true while you want to use that memory zone/variable/field for another purpose. (This naturally won't work if a 'do it if the condition is not true' TriggerGroup is also attached to the GlobalTrigger.)
- If you use a pair of that combination at the same time. I.e. if you force something by an executable combination, and meanwhile you examine that value in a condition combination, then in the executable/condition pairs you will use the same subject/variable/field.
(Attention! As you will see later, if we have both an executable and a condition combination with a field, that doesn't always mean they are a pair, because perhaps they will work for different things. See eg. Chapter 1.2.1.: what the executable combination executes is not the same what the condition combination studies.)
I-25. Block the effect of GlobalTriggers by disabling/enabling them
Please don't forget: if a GlobalTrigger is enabled then it is able to do its effect till we disable it. So, for example:
- If it is an 'if a big medipack has been used, then force 25 seconds into the timer of the object' GlobalTrigger, then it will force 25 seconds into the timer each time when the player uses a big medipack.
- If it is an 'if Lara holds the pistols, then force 25 seconds into the timer of the object' GlobalTrigger, then it will force 25 seconds into the timer each time till Lara holsters the pistols.
So now it doesn't matter if a GlobalTrigger will perform a single or a continuous force. What matters is the GlobalTrigger is able to perform its effect any time till the GlobalTrigger is enabled.
Naturally you are not always interested in that. I mean, probably eg. you don't want X executable combination to be always activated when Lara is holding her pistols.
For example you want the GlobalTrigger of that combination to work only when Lara is in a given room. That's why
- the GlobalTrigger has an FGT_DISABLED flag (so the GlobalTrigger is disabled when the level starts), and
- there is an F109 trigger at the entrance of the room to enable the GlobalTrigger when Lara enters the room, and
- there is another F109 trigger at the exit of the room to disable the GlobalTrigger again when Lara exits the room.
Notes:
- Sometimes you should disable a GlobalTrigger only for technical reasons. For example a GlobalTrigger has this condition: 'if X enemy has died'. The GlobalTrigger should be enabled only just before the enemy comes to life. And the GlobalTrigger should be disabled again as soon as possible after the enemy died. (I mean a GlobalTrigger wastes your memory when the GlobalTrigger is enabled - because an enabled GlobalTrigger will be study its condition in each frame when being enabled. That's why you will save some memory if you disable the GlobalTrigger when the enabled status is unnecessary.)
-Be careful! Usually I don't recommend using FGT_DISABLED because that could often be buggy. Instead of that, you should place Lara object on an F109 trigger to disable the GlobalTrigger when the level starts.
I-26. Possible problems between executable and condition combinations
Be careful when you use a condition combination.
I mean, if you use an executable combination after that, to change the examined value.
For example, what if you study if a countdown timer has reached 10 seconds and the answer is yes. It means the condition is true. The timer goes further, reaching 5 seconds, and now you force the timer back to 15 seconds. The condition will become false because of that - though 5 seconds before that you got the answer: 'yes, the timer will expire in 10 seconds'.
Maybe it is logical for you in the actual situation, maybe it is not.
Or: you force a value continuously, meanwhile you examine the same field in a combination. Now naturally the condition is useless, because the solution is the constant, forced value, not something changing that you should study.
I-27. Savegame and level jump stability problem in executable combinations
If you singly forced a continuous parameter (eg. 'the object is disabled') into a field, then perhaps sometimes you experience that the value in a field is not stable, i.e. the field will lose the forced value if you
- save the game and, after that, load that savegame, or if you
- jump to the next level.
Solution in the savegame-stability problem:
- If you wanted that single force by an F118:
The executable combination must be activated by a GT_ALWAYS GlobalTrigger with FGT_DISABLED flag. There won't be an F118 where you want to start the single force, but an F109 will be there to enable that GlobalTrigger.
Or: activate the combination by an F118, as usual, but also activate an F109 there to enable a GlobalTrigger. This GlobalTrigger works in GT_LOADED_SAVEGAME mode, using FGT_DISABLED flag. The executable trigger in the GlobalTrigger is the executable combination.
- If you wanted that single force by a GlobalTrigger:
If the condition in the GlobalTrigger is true then that activates not the combination but an F109. This F109 activates a GT_ALWAYS GlobalTrigger with an FGT_DISABLED flag. The executable trigger in the second GlobalTrigger is the executable combination.
Or: if the condition in the GlobalTrigger is true then that activates not only the combination but an F109 in the combination of the TriggerGroup as well. This F109 activates a GT_LOADED_SAVEGAME GlobalTrigger with an FGT_DISABLED flag. The executable trigger in the second GlobalTrigger is the executable combination.
Solution in the level jump-stability problem:
The executable combination must be activated by a GT_ALWAYS GlobalTrigger, when the level starts.
Or place an F118 TRIGGER under Lara object to activate the combination when the level starts. (You can't use any Condition trigger overlapped with that TRIGGER this time.) There is a GT_LOADED_SAVEGAME GlobalTrigger in the Script, having the executable combination as the executable trigger.
Because of the problem, test all of your executable combinations on savegame stability and on level jump as well (if you want to keep the forced value after level jump).
Notes:
- You can disable these GlobalTriggers later, by other F109 triggers, if you don't want to keep the forced value any more.
- When you disable those GlobalTriggers to lose the forced value that doesn't always mean the forced value will be changed at once. I.e. the value will change any time after that, when the 'natural procedures' of the game want that.
- There is an important difference between the GT_ALWAYS and the GT_LOADED_SAVEGAME method:
GT_ALWAYS is a continuous condition, GT_LOADED_SAVEGAME is a single one. So
= you can't use the memory zone/variable/field of the GT_ALWAYS GlobalTrigger for another purpose till the GlobalTrigger is disabled, but
= if you are sure that the GT_LOADED_SAVEGAME condition won't be true while you want to use that memory zone/variable/field for another purpose, then you can use that memory zone/variable/field for another purpose. (This naturally won't work if a 'do it if the condition is not true' TriggerGroup is also attached to the GlobalTrigger.)
-if you want a more precise but more complicated method, then see the chapter in Paolone's Variables tutorial - The wooden Door: how save and restore our changes, about GlobalTriggers with GT_BEFORE_SAVING_VARIABLES and GT_AFTER_RELOADING_VARIABLES constants. Also see the relevant parts in the Script/project attached to that tutorial.
I-28. Savegame and level jump stability problem in condition
combinations
Some of the fields (independently of the field just has a 'real' or a forced value) will lose their values (though nothing happened in the status of the examined thing) if you
- save the game and, after that, load that savegame, or if you
- jump to the next level.
That means a problem in condition combinations:
For example, a continuous condition studies if a value of a field is X or not. The value turns into X so the condition will become true. Then the player saves the game and then loads that. Now the value turns into Y. The continuous condition is still enabled, so it studies the examined thing again. But now the condition becomes false - though the status of the examined thing is still the same when the value was X.
So the condition starts working in a bad way.
If we encounter that problem then we'll change the executable trigger that should be executed when the condition is true.
Let's say the condition uses Variable A. The new executable trigger is an F271 flipeffect which will copy the value of Variable A into Current Value variable. - So if Variable A=X is true then F271 will copy X into Current Value. (So X will be the new value of Current Value.)
And we also need a new, GT_ALWAYS GlobalTrigger (in the next level, too, if we also want to study the value there):
condition: 'if Current Value is X' - i.e. almost the same condition as the original one, but this time the variable is Current Value, not Variable A.
executable trigger: the trigger you want to execute originally.
And now the condition should work properly any time.
(Disable the GlobalTrigger if the condition isn't important for you any more.)
Because of the problem, test all of your condition combinations on savegame stability and on level jump stability as well (if you want to study the vaule after level jump).
Note:
Naturally if the original condition is 'smaller' or 'bigger' for Variable A, then that is 'smaller' or 'bigger' for Current Value as well.
I-29. A problem source: the same value in different states
See an example to understand:
A field in Item Memory Zone has these values:
- 0 when the object (the actual subject of the zone) is inactive
- non-0 values when the objectis active
- sometimes 0 when the object is active
That's why if you want to examine a 0 value in that condition but it is important for you that the condition won't say 'yes, it's true' when the subject is not active, then you should prevent that somehow:
- Use one more condition in the formula (placed just before the condition you can see there): a C14 trigger in 'the subject is active/alive' mode. (A creature can be either 'active' or 'alive' in that condition. But a non-creature is never 'alive', that always must be 'active'.)
- Or, another solution instead of C14: the condition combination cannot be used when the subject is inactive. - For example, you don't want Lara to step on the F118 TriggerGroup trigger for the condition combination when the subject is inactive, that's why a door - between Lara's actual position and that F118 - will also close when Lara step on the antitrigger that turns off the subject.
- Another example: if the condition combination is the condition of a GlobalTrigger then disable the GlobalTrigger when the subject becomes inactive.
So always test your condition combinations of Item Memory Zone in
these situations:
- if the object (enemy, other) haven't been
activated yet,
- if the object is active (i.e. if the enemy is
alive),
- if the object is antitriggered or the enemy is killed.
Note:
In the case of the creatures it is trivial what 'alive' or 'dead' means. But if a non-creature doesn't move after having been activated that doesn't mean it is 'not active'. I mean, eg., if a door has opened or a boulder has stopped at the end of its track, then they are active objects, because we didn't deactivate them after activating them. So, use an antitrigger to close the door or to make the stopped boulder do nothing - and now they are 'not active' again.
(However, all of this knowledge is not always too helpful. I mean, see for example the value of 'Custom_D' field in the case of FLOOR_4BLADE trap. It is 200 when the trap is almost stopped, it is still 200 when the trap has been stopped, and it is still 200 when the idle trap has been antitriggered. So, if you use a C14 'if the trap is active' condition, that rules out the antitriggered part, but 200 will still have two meanings: the trap is almost stopped or has been stopped.)
I-30. Ruling out problematic methods
In fact - as opposed to what I say in the previous Chapter - you'll never find 'Value 200' in the description of FLOOR_4BLADE trap. Why? Because, as I said above, I try to save big number ID's because we have only relatively few (255) of them.
That's why I skipped that '=200' condition. Instead of that, I used a '>=21' condition (which doesn't need a PARAM_BIG_NUMBERS ID), which is naturally means 200, because the possible values in that field with FLOOR_4BLADE are 0, 20, 200. (I didn't even mention that Value 200 in the description of that trap.)
I:e. the 'bigger/smaller condition' could be useful even for technical reasons, not only for sequences.
Note:
Anyway, I used the same method to get rid of the problematic 'conditions with negative numbers' thing, where I was able to, using 'smaller than 0' condition.