
Weather - the complete tutorial
by
AkyV
Sky and Horizon
Sun
Thunder and Lightning
Rain and Snow
Fog and visibility
General notes
Everything in our NGLE Tomb Raider world always happens inside the rooms. So if you want to see what is outside the rooms then you won't see anything in the game but 'black nothing' out there.
First maybe it sounds silliness, but it sometimes makes sense to see that 'outside world'. No, not because we want to see that 'black nothing' but because we want to see sky and horizon around our level. Since the sky and the horizon are placed OUTSIDE the rooms, in the black nothing.
You don't
need to place skies or horizons. All you need is provide your level with
a sky and a horizon (unless your level plays, e.g., deeply inside a dark
tomb, without the need to see sky/horizon anywhere.) - and the game will
place them automatically.
Horizons are Moveable objects with the
name HORIZON.
Open WADMerger and look at a HORIZON object. For example, the HORIZON of
tut1.wad. As you see, it's a ring, showing belt of hills. The rooms are
inside the ring in the game. (I.e. the ring is around the rooms.)
So if there's an area in the game where the
player will see the horizon, then (s)he will see belt of hills
everywhere on the horizon now, when Lara is turning around her vertical
axis in an area like that.
Skies are RAW files in graphics\wads
folder, with the same name as the WAD (placed also in that folder) has.
- It means, if you use X.wad for a level, then the game will use X.raw
for the same level.
Use some program (for example, BmpToRaw) to
open RAW files. As you see, those RAWs contain the color of the sky and
the pattern of the clouds. The picture of the RAW will show up in the
game as a rectangle-shaped 'lid' above the rooms (and above the ring of
HORIZON), showing the picture 'on the bottom of the lid'.
So if there's an area in the game where the
player will see the sky, then (s)he will (almost) see the color/pattern
of the RAW of the level, if Lara is looking up in an area like that.
(See below what 'almost' means.)
It seems the sprite-taking object named SKY_GRAPHICS has nothing to do
with the sky/horizon. You don't even need that object in your WAD.
Okay, but where can I find the 'areas' in which the player will see
the horizon/sky? - I mean, what shall I do to see the horizon/sky in the
outside world?
Well, you need to place special texture tiles on some room surface
elements (room surface elements are: walls, ceiling/floor squares) to
make those elements transparent. And as that element is transparent,
Lara will be able to look through that, so she will be able to look out
into the outside world there to see horizon behind that transparent
wall, and to see sky above that transparent ceiling square.
You can find that 'special texture tile' on
the bottom of Room Editor, on the upper left corner of the so-called
Color Palette: click on that tiny black square so a red border will show
up around it. (So this time it's not Texture Panel we select a texture
tile from!) Now click on a room surface element if you want Lara to be
able to look through that into the outside world. That element becomes
totally transparent now.
(Don't worry:
- the black lines
around the transparent elements won't be there in the game,
- Room Editor doesn't show sky/horizon around
your level, but the game will do.)
In fact, you must answer some
other requirements to see the (proper) sky/horizon in your game:
1. You must type this entry in the [Level] block of your level:
Horizon= ENABLED
Without Horizon=
ENABLED value, the horizon won't show up in the game.
2. You will use a layer. Imagine that layer as a layer you painted
'on the bottom of the lid', i.e. on the RAW picture.
Let's say, the color of the sky in RAW is blue
and the color of the 'painted layer' is red. It causes you will see the
blue sky through a red layer, so the sky won't seem blue but an
aggregated color of blue and red. (That's why I said above 'almost'.)
To define the layer, type this entry in the
[Level] block of your level:
Layer1= A, B, C, D
In which:
A= the red factor of the RedGreenBlue color value of the layer, in
an interval from 0 to 255
B= the green factor of the RedGreenBlue color
value of the layer, in an interval from 0 to 255
C= the blue factor of the RedGreenBlue color
value of the layer, in an interval from 0 to 255
D= actually, it has nothing to do with the
color of the layer. It's the speed of scrolling the picture 'on the
bottom of the lid' - so this is the way to make the illusion of
'drifting clouds'. The values are:
0: the clouds are still
from 1 (minimum speed) to 127 (maximum speed):
the clouds are drifting northwards (Room Editor facing)
from 128 (maximum speed) to 255 (minimum
speed): the clouds are drifting southwards (Room Editor facing)
You need Layer1 entry even if you don't
want to use a 'painted layer'. Without Layer1 values, the sky won't show
up in the game. (Use a 'neutral' layer, i.e. RGB= 128, 128, 128 color,
if you want to see exactly the RAW sky color.)
And, you also need a HORIZON object in your WAD
to see this RAW sky in your level. (But Horizon= ENABLED is not
necessary now.)
Notes:
1.
If you change a RAW of a level, you need to convert TOM to realize the
change in the game.
2. You can find a special RAW in
graphics\wads folder. This is pcsky.raw. If you want to show sky in a
level built from X.wad, but you don't have X.raw, then the game will
automatically use pcsky.raw as a RAW of that level.
3. The more
extreme the layer color is (e.g. RGB= 255, 0, 0 is a very extreme one)
the more it seems to override the original RAW sky color (and sometimes
the extremity also affect the proper visibility of the cloud pattern).
4. There is another layer: Layer2. It works the same way (i.e. with
Layer2= A, B, C, D entry) as Layer1. If you use Layer2 then you don't
need Layer1.
To be more exact,
under 'general circumstances' it doesn't matter if it's Layer1 or Layer2
that you use for your sky. - See in the thunder/lightning section of the
tutorial where I'll tell when it does.
Other tasks for Layer2:
- Layer2 could be an alternative
layer instead of Layer1 - see the FLIPEFFECTs below how we can change
them with each other.
- You can use Layer1 and Layer2 together at
the same time, if you want. (Now the colors of the two layers will show
up in an aggregated way.) - For example, just think about it: Layer1
scrolls the clouds northwards, but Layer2 scrolls the clouds southwards,
as if you had two RAWs in the level. It looks a pretty chaotic and
interesting sky.
But using Layer2, the north/south intervals are
swapped with each other. (So 1-127 is the south interval, and 128-255 is
the north one.) Except: if both of the layers are being used at the same
time.
5. If you want to fiddle with layer values, during the
game, then activate some of these FLIPEFFECT triggers:
- Weather.
Sky, <&>Enable/Disable the (E)Layer1/2: to use Layer1 or Layer2 or both
of them at the same time.
- Weather. Sky, change slowly the color of
Layer1 to <&>color in (E)seconds: if you are just using Layer1 (with
Layer2 together or not) then activate this trigger to change its color
to a ColorRGB script value. The change will happen by degrees, so the
required value will be realized in the given seconds.
- Weather. Sky, change slowly the color of
Layer2 to <&>color in (E)seconds: if you are just using Layer2 (with
Layer1 together or not) then activate this trigger to change its color
to a ColorRGB script value. The change will happen by degrees, so the
required value will be realized in the given seconds.
Be careful:
according to my experiences, that could be problematic, if the
difference is relatively too big between the start and the end RGB
values when you change the color of Layer1 or 2 by degrees. (I.e. the
color changes won't be too smooth.)
- Weather. Sky, Set new
<&>Color for (E)Layer1/2: whether you are just using the given layer or
not, you will define its new color (using a ColorRGB script value). The
change will happen at once.
- Weather. Sky, Set new <&>Speed for
(E)Layer1/2: whether you are just using the given layer or not, you will
define its new scrolling speed. The change will happen at once.
6. The border between the sky and the horizon is ugly sometimes. You can
recuperate that ugliness, if you type this entry in the [Level] block of
your level:
ColAddHorizon= ENABLED
In fact, that entry
won't always help if the sky and the horizon don't fit perfectly.
The command originally used at Coastal Ruins
level - so the command is definitely successful there.
So if you still have the original Coastal
Ruins TRLE level, with the original horizon object, RAW file and layer
values, then see, how the command works in the game. - And then, you can
try how ugly the fit will be if you remove ColAddHorizon entry of that
level (or if you type DISABLED instead of ENABLED).
7. In fact,
you can use 'real' texture tiles on those transparent room surface
elements instead of those 'tiny black squares':
- Those real
texture tiles can be tiles that have smaller or bigger magenta
'transparent' part(s) when you load those tiles into TBuilder. (So now
I'm talking about the tiles you use usually on Toggle Opacity or Toggle
Opacity 2 squares.) Let's see for example the last tile of the original
TGA of Playable Tutorial Level: it's a grating. Place that grating on
those surface elements - and, in the game, Lara will see the sky/horizon
through the 'holes' of those gratings.
- Or those real texture tiles can be any
tiles, if you place them on those surface elements with Transparent
button switched on. - In the game, Lara will see the sky/horizon through
those transparent tiles.
But don't forget: these cases won't work
well if you don't texture at least one room surface element using a tiny
black square, in each room where you use these cases.
8. If you
switch on 'O' button in Room Editor, the actual room will become an
'outdoor area' in the game, in which Lara's hair will be moved by the
invisible and dumb wind.
Though, the connection between them seems
logical (so usually you switch on 'O' button in a sky/horizon area),
outdoor areas have nothing to do with the areas where you can see
sky/horizon. - So:
- If you want, don't switch on 'O' button in a
sky/horizon area, saying, e.g., 'this is a windless day out here now'.
- If you want, switch 'O' button in a
non-sky/horizon area, saying, e.g., 'this room is draughty, you should
shut the windows'.
9. If you want to change your horizon during
the game, then put the new horizon into a (any) Moveable object slot of
your WAD (that must be unused for any other purposes this time, by the
way), and activate this FLIPEFFECT trigger to accomplish the change:
Swap Mesh. Swap mesh of current Horizont object with <&>Slot mesh
& slot is the slot in which you placed the new horizon.
Activate the trigger again, if you want your
old horizon back.
10. In fact, you can use several types of the
horizon, not only the TR4-type 'open' ring.
See for example the TR3-type horizons in any
TR3 WAD: it's a ring, closed by a cone at the top, and closed by another
one at the bottom.
(The sky will be drawn on the upper cone at
the TR3-type horizons, so if you use a TR3 horizon in your NGLE level,
then the RAW file and the layers are useless. Anyway, the upper cone
covers the RAW picture above it, so the RAW picture isn't seeable now.)
11. The 'tiny grey square' (next to the 'tiny black square') is
known as a transparent 'texture tile' at textured portals (doors).
But the grey square is not equal with the
black square now, so don't use the grey square (or some magenta patch)
instead of the black squares to show sky/horizon.
Sun
Now I'm talking about the sun disk on the sky/horizon.
To define the values of the sun disk, you must
type this entry in the [Level] block of your level:
LensFlare= A,
B, C, D, E, F
In which:
A, B, C= the coordinates of the
sun
D= the red
factor of the RedGreenBlue color value of the sun+its beam, in an
interval from 0 to 255
E= the green factor of the RedGreenBlue color
value of the sun+its beam, in an interval from 0 to 255
F= the blue factor of the RedGreenBlue color
value of the sun+its beam, in an interval from 0 to 255
It's not
easy to define the 'real' color of the sun+beam. Because other colors
affect that color more or less. For example, if the sun is seen on the
sky, then the 'real' sun color is some kind of aggregation of D, E, F
color and the sky color.
It's not easy to define the coordinates
of the sun disk either. - Maybe this simple method will help:
Place Lara in a room where the sky is above
her. Then hit F1 in the game. Numbers will show up in the upper left
corner of the screen. (If they won't, then DOZY cheat is disabled.)
Holding F1 pressed down, also hit F3 to take a screenshot.
Release the keys, exit the game, and open that
screenshot from the main folder of Level Editor. See the first ( A ),
second ( B ) and third ( C ) number of 't' row, and type them into
LensFlare entry.
Build the script, and start the game. The sun
disk is exactly above Lara now. This is a good start point to adjust the
required sun position. So now you can start your experiences, modifying
the script, and then seeing the result in the game:
- Type a less
positive number in Position A. That moves the sun northwards. Or type a
bigger positive number in Position A. That moves the sun southwards.
(Room Editor facing)
- Type a less positive number in Position C.
That moves the sun westwards. Or type a bigger positive number in
Position C. That moves the sun eastwards. (Room Editor facing)
- Type a less negative number (closer to zero)
in Position B. That moves the sun down. Or type a bigger negative number
(farther from zero) in Position B. That moves the sun up. (Feel free to
take experiences with positive numbers in Position B.)
Without LensFlare entry, the sun disk and its
beam won't show up in the game.
Notes:
1. The Sun light bulb and the sun disk have nothing to do with each
other, even if it's advisable to harmonize them: so, in a given room,
the Sun bulb should shine in the same direction in which the sun disk
shines, if both a Sun bulb and the sun disk affect that room.
The sun disk has nothing to do with other
light effects, either.
2. As you see, the numbers in Position A,
B, C are big/huge numbers. So, if you want noticeable changes in the
position of the Sun when you change the coordinates, then don't be
afraid of big/huge changes with those numbers.
3. It doesn't
affect the size of the sun if that is closer or farther from Lara,
whether vertically or horizontally.
4. From the position of Lara,
the same horizontal value seems less from the center of the sky, if the
sun is in a higher position:
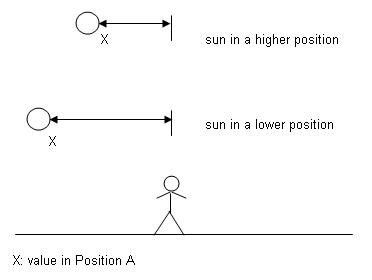
So, if
the sun is higher (i.e. if the negative value in Position B is farther
from zero), and the value is X in Position A, then the sun will look
closer to the center of the sky. But if the sun is lower (i.e. if the
negative value in Position B is closer to zero) and the value is X in
Position A, then the sun will look farther from the center of the sky. -
And of course the same thing is true with the higher/lower sun and the Y
value in Position C.
(Don't misunderstand: the center of the sky
is NOT the position when, using the F1 method - see above -, the sun is
exactly above Lara.
I mean, of course, it could be, accidentally,
but it's not general.)
5. From the position of Lara, the same
horizontal distance farther seems less than when we realize that closer:
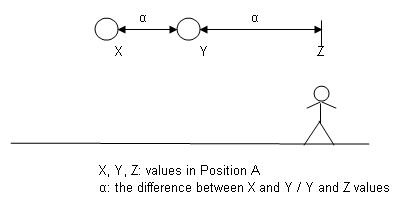
So, let's
say, the sun is exactly in the center of the sky when the value in
Position A is 22000 (Z). Then type 12000 (Y) into Position A, so the sun
will move northwards. The difference between Z and Y is 10000 units (α).
And now move the sun northwards more: move it further 10000 units, so α
again, typing 2000 (X) into Position A. Though Lara didn't move during
the changes, you definitely found the first α move bigger from Lara's
position in the game than the second α move. - And of course the same
thing is true with the same horizontal distances in Position C.
6. If you realize the coordinates won't work in the way I wrote above
then that means you chose an invalid value for some of the coordinates.
('Invalid value'=a value that is out of the used interval of that
coordinate.)
7. It's a general rule that the sun will show up
perfectly (i.e. with its beam together) in a room,
- if the sun
shows up in the sky/horizon in that room (so, thanks to the proper A, B,
C coordinates, the game wants to position the sun on the sky/horizon and
not on the other parts of the room), and
- if that room is an outdoor area.
But
there are special rules, too:
- If Lara gets too close to the
room surface element where you can see sky/horizon then the beam will
disappear.
- If
the room is an outdoor area, logical obstacles won't be obstacles for
the beam. (For example, you will see 'the sun shining through the brick
wall' in that room, if the game won't position the sun on the
sky/horizon, but on the brick wall.) Switch on the 'NL' button of Room
Editor to disable the sun+beam in that room.
- Whether the room is an outdoor area or an
indoor one, you will see sun there, if the sun shows up in a portal
(door) of the room. But sometimes you will see beam with the sun in that
room, sometimes you won't. It depends on the room at the other side of
the portal being an outdoor or an indoor area, and the portal itself
being a non-textured, a Toggle Opacity textured or a Toggle Opacity 2
textured one.
-
If the room is an indoor area, the sun will show up on the sky/horizon
in that room, but without the beam.
But I'd like to remark:
- In fact, you don't even need HORIZON in your WAD or Horizon or
Layer script commands or triggers to see sun disk+beam in the level. -
It means, if you use tiny black squares on room surface elements, but
without sky/horizon out there, so you will see the black nothing out
there, then the sun disk will be seen on the black nothing, as if the
sky/horizon were out there.
(But I can't tell what happens to the sun
disk+beam, if you don't have a RAW for your level. Because, remember:
there is always a general RAW, pcsky.raw for the levels.)
- The sun disk will never show up in any other
cases, whether with the beam or without it.
- There are some cases (at certain sun
positions?) when the rules seem a bit relative. For example, sometimes
the 'Lara is too close to that element' will happen, when she is in
several squares distance from that element.
8. The beam effect of
the sun can be simulated by a placed LENS_FLARE nullmesh ('red pyramid')
object. The emitting point of the beam will be where you placed the
nullmesh. (So the single LENS_FLARE and the beam effect of the sun look
the same way in the game, but, despite of that, they have nothing to do
with each other, they work perfectly without each other.)
LENS_FLARE objects don't need LensFlare Script
entry to work.
The color of a LENS_FLARE beam is a standard white color, i.e. nothing
seems to affect its color.
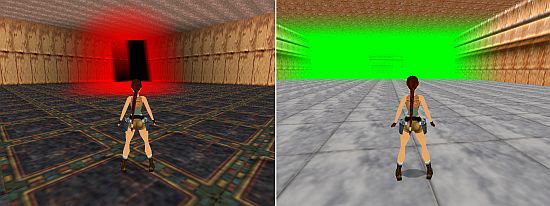
Thunder and
lightning
When I say
'thunder' then it means the game plays the sound WAV file of ID 182
THUNDER_RUMBLE sound slot, in a random mode (or in some kind of
pattern?), during the whole level:
- if the lightning is enabled,
and
- if Lara
sees sky/horizon around herself or if she is in a room that is near a
room with sky/horizon.
And when I say 'lightning' then it means
the game shows light effects on the sky, synchronized with the thunder
sounds, during the whole level:
- if the lightning is enabled,
and
- if the
layer is just Layer1 and not Layer2 (or, at least, we can just see both
the layers at the same time), and
- if the seen graphics of the sky is the
picture of the RAW file, and, e.g., not the drawn sky on the upper cone
of a TR3-style horizon.
To make the lightning enabled:
-
Type this entry in the [Level] block of your level, and the lightning
will be enabled already at the start of the level:
Lightning=
ENABLED
- Or activate this FLIPEFFECT trigger in enabled mode, so
the lightning will be enabled only at a given point of your level:
Weather. Lightning, <&>Enabled/Disable the Lightning
(Activating the trigger in disabled mode, you will disable the lightning
at a given point of your level, of course.)
Notes:
1.
Two problems with color:
- Be careful with extreme sky colors.
For example, I don't think you will see lightning on the sky, if the
color is RGB=255, 0, 0.
- If you use both Layer1 and Layer2 at the
same time when you want to see the lightning then maybe the sky color
won't be the one you count on. Moreover, maybe you won't see lightning
and/or any clouds on the sky.
2. The rooms of thunder/lightning
don't need to be outdoor areas to present the thunder/lightning.
3. Actually, you will hear thunder even if you don't use Horizon or
Layer script commands or triggers to show sky/horizon. All you really
need is put a HORIZON object in your WAD.
That's why if you place a 'tiny black square'
texture tile in a room, not to show sky/horizon but due to technical
reasons (see, e.g., when the floor is transparent under steps objects),
then you will also hear the thunder in those rooms. - So consider to
accomplish that technical transparency in some other way now: with tiny
grey squares or magenta patches.
4. You don't need to use Horizon
script command to see the lightning - but you need to put a HORIZON
object in your WAD.
5. Sometimes it's worth making the lightning
enabled in a level, if you use a horizon that is closed at the top (see,
first of all, the TR3-sytle horizons), because, though, you won't see
the lightning, but you will hear the thunder.
(Another trick: if you texture the upper cone
of a TR3 horizon to be magenta, then that will be transparent, so you
will see the RAW picture above the cone in the game - but it doesn't
mean you will see the lightning.
But it may be useful, if you want to see RAW
sky, using TR3 horizon, but you also want to texture the bottom cone to
show horizon below - ! - the level, through the floor squares textured
using those tiny black square 'tiles'.)
6. This lightning light
effect has nothing to do with the electric arches of
LIGHTNING_CONDUCTOR, FLAME_EMITTER3 etc. setups or any other lighting
techniques (light bulbs etc.).
7. See this FLIPEFFECT:
Weather. Enable lightning with data in <&>Parameters for (E)Durate
This trigger doesn't work yet, Paolone is still working on it. But
it sounds interesting ...
(The trigger is removed from TRNG 1.2.2.7 beta
just now, so, as things are, this feature won't be realized in the near
future.)
Rain and snow
There is a button in Room Editor that reads 'Normal'. If you click
on it some times, it will read 'Snow' or 'Rain'.
Maybe you think if that button reads Snow then
it will snow in the given room, or if that button reads Rain then it
will rain in the given room.
But I must tell it is not quite
right, because:
a, If you want to see rain in your level, you
have to type this entry in the [Level] block of your level:
Rain=
A
In which A could have these values:
RAIN_SINGLE_ROOMS:
it will rain in all the rooms that are outdoor areas and have the 'Rain'
button switched on.
RAIN_ALL_OUTSIDE: it will rain in all the
rooms that are outdoor areas.
RAIN_DISABLED: this value is useless,
actually. Because it has the same result as if you didn't have Rain
entry in the [Level] block.
b, If you want to see snow in your
level, you have to type this entry in the [Level] block of your level:
Snow= B
In which B could have these values:
SNOW_SINGLE_ROOM: it will snow in all the rooms that are outdoor areas
and have the 'Snow' button switched on.
SNOW_ALL_OUTSIDE: it will snow in all the
rooms that are outdoor areas.
SNOW_DISABLED: this value is useless,
actually. Because it has the same result as if you didn't have Snow
entry in the [Level] block.
Moreover, this is still not the whole
truth. I mean, if you want to see (proper) rain/snow in a room, you must
also answer these requirements:
- Texture at least one room
surface element with the tiny black square in the room. (But you don't
need Horizon or Layer script entries or triggers, or HORIZON in your
WAD.)
- The room
should have at least 10-12 clicks height (or a bit more than that,
instead).
- It
always 'starts raining/snowing' from the ceiling of the rainy/snowy
room. Lara's eye level should be lower by minimum 8-10 clicks than those
starting points.
- At least one horizontal or one vertical
portal (door) must be in the POV of the actual camera - even if that
door is textured by Toggle Opacity or Toggle Opacity 2 method or is far
away, behind the end of the visual range. (This problem exists only at
snow.)
To adjust the intensity of rain, these are your
possibilities:
- If you use 'Single' case, then all the rainy
rooms will have their own intensities - the one you chose in the little
window next to Rain button in that room. (1: the lowest intensity, 4:
the highest intensity.)
- If you use 'All' case, then at least one of
the rooms of the level must have the Rain button switched on. It doesn't
matter if that room is an outdoor or an indoor area. (Naturally, if that
is an indoor area, then it won't rain there.) But when Lara enters that
room she defines the rain intensity (chosen in the little window next to
Rain button in that room) for all the outdoor (rainy) rooms.
As you see, 'Rain' and 'rainy' terms are
not always the same in 'All' case: it's not sure if it rains in rooms
with Rain button switched on, but it's possible that it will rain in
rooms without Rain button switched on.
(That room with Rain button switched on is the first rainy room of
the level or, at least, you hadn't seen the first rainy room of the
level before you stepped into that room with Rain button switched on. -
I mean, just think about it: if you step into the first rainy room of
the level before you step into that room with Rain button switched on,
then it means you saw some unwanted rain intensity in the first rainy
room of the level, because the intensity still isn't defined in that
first room.)
After that, if you want to change the rain intensity, then step with
Lara into another (outdoor or indoor) room with Rain button switched on,
and all the rainy rooms will have the intensity that is chosen in the
little window next to Rain button in that room.
Adjusting the
intensity of snow is analogous with that.
Notes:
1.
Activate this FLIPEFFECT, if you want to switch off Rain or Snow button
of the room, during the game.
Room. Remove from the <&>room the
(E)type of room
But I'd like to remark:
- Never choose
'Flipped' names from the list. It means we cannot switch off the
Rain/Snow state of flipped rooms, using this trigger.
- If you want to create a flipped room only to
switch off Rain/Snow button in the game (so, e.g., if it rains in the
original room, but it doesn't in the flipped one), it's an alternative
solution if you activate this trigger.
- This trigger is a great tool to use three
states for a room. For example: the original room is a rainy room. We
use this trigger to stop raining there, then later we activate the
flipped room of the room to make the room to be a water room.
- Some FLIPEFFECTs - just like this - use a
room list in Window &. - But that is the source of a problem.
See this example:
This is the starting state, where the
FLIPEFFECT uses Room038 in the game that is Room53 in Room Editor:
[036] Room50
[037] Room52
[038] Room53
Now we've deleted Room52.
According to the new state, the FLIPEFFECT will still work on Room038 in
the game, but that is Room54 now in Room Editor and not Room53:
[036] Room50
[037] Room53
[038] Room54
2. If a room is (just) doesn't have Rain/Snow button
switched on, then you can switch them on in the game, activating this
FLIPEFFECT:
Room. Set the <&>room as (E)type of room
But
I'd like to remark:
- The remarks of Item#1 are also valid now
(in an analogous way, of course).
- This trigger is a good method to experiment
with the states. So, e.g., in Room Editor you can switch on only Rain or
only Snow button, but if the Room has Rain state, you can also switch
Snow state now - without switching off Rain state -, using this trigger.
(So, this is a good method to make 'snowy rain' - sleet - in a room. -
Another good method, if you have 'All' cases both for the rain and the
snow.)
3. You can change the case (single/all/disabled) of
rain/snow, if you want, if you activate one of these FLIPEFFECTs:
Weather. Rain. Set <&>new state for Rain in current
Weather.
Snow. Set <&>new state for Snow in current
(Now 'disabled' state
is useful to represent that 'the rain/snow has been stopped in the whole
level'.)
4. If we have a Room A (above) and a Room B (below) and
they are vertically connected with each other, and we want to see
rain/snow in both, then some requirements (see them above) look this
way:
- '10-12 clicks' requirement: there will be proper rain/snow
in both rooms now, if the difference between the ceiling of Room A and
the floor of Room B is 10-12 clicks at least.
- 'Lara's eye level' requirement: there will
be proper rain/snow in both rooms, if Lara's eye level is lower by
minimum 8-10 clicks than the starting point. And the starting point is
the ceiling of the upper room now.
But these things are true only
for the room parts above/below the portal, and if the portal is not
textured by Toggle Opacity (impassable) method. (And it is true for the
rain only if you have rain in both rooms, and it is true for the snow
only if you have snow in both rooms.)
5. There are some special
cases when the vision of the rain could be imperfect:
- For
example, this is what is adjusted: Room C and Room D are horizontally
connected with each other, and, in Room C, there is no rain, but, in
Room D, it's raining.
But that's what will happen in the game: Lara
is in Room C and looks through the portal into Room D. If she is not too
close to the portal, then she won't see any rain in Room D, even if that
has a high intensity.
- If the rainy room has paper thin walls/floor
squares, then Lara will see some of the rain drops hitting those
walls/squares, if she looks at those walls/squares from their 'other
sides' (i.e. from an adjacent room).
You could have the similar
problems with snow.
6. You can see only one rain/snow intensity
at the same time.
So, for example, Room E and Room F are
horizontally connected with each other. In Room E, there is Rain
Intensity 1 adjusted, and, in Room F, there is Rain Intensity 2
adjusted.
If
Lara stands in Room E in the game, she can see Intensity 1 there. But,
if she looks through the portal into Room F, she will see Intensity 1
there as well.
Now Lara goes into Room F. She will see Intensity 2 there. But if she
looks through the portal back into Room E, she will see Intensity 2
there as well.
(In this regard, the rain and snow intensities are independent of each
other.
I mean,
change the example, so the adjusted Intensity 2 of Room F now is snow
intensity.
If
Lara stands in Room E, seeing Rain Intensity 1 there, she will see Snow
Intensity 2 in Room F, if she looks through the portal into Room F.)
7. If the problem I described just above in Item#6 doesn't exist, it
doesn't mean you won't have problems with seeing the proper intensity in
the adjacent rooms.
I mean, see e.g. that problem of Room C and D
above. If you realize, standing in Room C, you don't see the proper
intensity in Room D - though you are close enough to the portal between
them - then activate this FLIPEFFECT trigger so you will see the proper
rain intensity in Room D:
Weather. Set in advance the rain
setting using the intensity of <&>Room
(I don't know if this
trigger has any - real - effect on a similar snow problem.)
8.
Activate this FLIPEFFECT trigger, if you want to change the rain/snow
intensity of a given room:
Weather. Set Rain/Snow intensity for
<&>room with the new (E)intensity value
But I'd like to remark:
- Don't misunderstand: the trigger won't change the intensity if the
room doesn't have Rain/Snow button switched on. (So it won't affect the
intensity of rooms in 'All' case if those rooms don't have Rain/Snow
button switched on.)
But the trigger will always change the
intensity if the room has Rain/Snow button switched on. (So it will also
affect the indoor rooms with Rain/Snow button switched on, though, it
doesn't rain/snow there.)
(To activate the new intensities in 'All' case
for outdoor rooms, naturally you need to step into those Rain/Snow
rooms.)
- Never
choose 'Flipped' names from the list. The intensity value is always the
same in the 'original' room and its flipped room, so always choose the
name of the 'original' room. (Whether the original room has Rain/Snow
button switched on or the flipped room does or both do.)
- Don't forget to use this intensity-setting
trigger to add the intensity to a new state if you give a new state to a
room (see: Item#2). But also don't forget: if you give a new state to a
room (e.g. Snow), using the Item#2 trigger, but you don't remove the old
state of the room (e.g. Rain), then the intensity-setting trigger may
affect the intensity of the old state as well. (On the other hand, if
you give a new state, using the Item#2 trigger, not removing the old
state, but without using this intensity-setting trigger, then the new
state may 'adopt' the intensity of the old state.)
Moreover, having more states at the same time
in the same room may disturb the adjusted intensity of that room.
9. The rain could be customized, if you type this into [Title] block
(now the customization is valid for the whole game) or if you type this
into a [Level] block (now the customization is valid only for the actual
level):
Customize= CUST_RAIN
See more about this
customization in NG Center\References.
The snow cannot be
customized at the moment.
Fog and visibility
There are more methods to see fog, mist or some similar effect
(smoke, steam, water dust etc.) in the game. To make the things easier,
let's call all of them 'fog' in this tutorial from now on.
Local fog - it goes for only a given
point of the level:
-
SMOKE_EMITTER_WHITE nullmesh ('red pyramid') object: switch on/off by
triggers. The objects emits vertically an about 1,5 clicks height
'white' (I'd rather say light grey), harmless, continuous smoke.
- SMOKE_EMITTER_BLACK nullmesh object: I think there isn't any (real?)
difference between this object and SMOKE_EMITTER_WHITE.
-
STEAM_EMITTER nullmesh object: switch on/off by triggers. The objects
emits vertically an about 1,5 clicks height white, harmless, continuous
steam.
Type
values in its OCB window to change its properties:
= Type -2008:
not the object itself emits the vertical steam now, but an edge of the
square of the object (on the vertical coordinate of the object). It is
the edge in which direction the bottom of the 'red pyramid' faces.
= Type X, in which X=(480xA)+8. The object
emits horizontally (in the direction the peak of the 'red pyramid'
faces) an about 1,5 clicks long white, harmful ('hot') steam. It works
rhythmically: it works for 3-4 seconds, interrupted by A seconds long
pauses.
= Type
only 0 or 1 if the object is in water (but not in quicksand). The
objects emits vertically an about 1,5 clicks height, harmless chain of
bubbles. (0: periodical activity, 1: continuous activity.)
-
WATERFALLMIST nullmesh object: switch on by triggers. It simulates the
continuous mist when the waterfall hits the pool below. You can use a
complex OCB number (see NG Center\References) if you want to customize
the waterfall mist.
(Attention! The waterfall mist stops working
if you load a savegame. To prevent that, activate this mist by not a
trigger but with having all the OCB buttons of the object switched on.)
- Special fog attached to a given object: see AddEffect Script
command in NG Center\References, when you add ADD_MIST or ADD_SMOKE type
effects.
- Textures on portals: do you remember how 'the steam
above the jungle' was represented in TR3 Coastal Village level? There
was a Toggle Opacity 2 textured portal between a higher and a lower
jungle room, with (non-animated but double sided and transparent)
'steam' texture tiles on it.
- Other steam objects: if you want
some similar steam like that 'jungle steam', but when the steam has some
'special form', then take a (any) object (without collision) and texture
that, using those 'steam' tiles, and then place that object in a room.
- Mist rooms: the room will be a mist room if you switch on the 'M'
button of Room Editor in that room. To adjust the intensity of the mist
there, choose the value in the little window next to M button in that
room. (1: the lowest intensity, 4: the highest intensity.)
If a room is a mist room that means you will
see some spooky light effect on the floor (lowest) level of the room
(it's something like the effect of reflex rooms) and on the vertical
room surface elements that are around that floor section.
(Some mist rooms look good if Toggle Opacity 2
textured portals border them, with 'steam' textures on them.)
-
Fog bulbs: it works as a Light bulb, but it emits not light but fog
around itself.
First, choose 'Fog Bulb' in Drop Down Menu Bar\Effects to get a fog
bulb, and place that down. Then select this bulb, switch on 'Show Light
Meshes' button, and adjust the sizes of the white and red circles, using
Out and In buttons on Light Panel. (This In/Out is the same thing as you
do at Light bulbs.)
(See more about fog bulbs below.)
Global fog - it goes for the whole level: distance
fog - see more below.
If I want
to talk about the distance fog, I must talk about the visual range (i.e.
the range Lara can see) first:
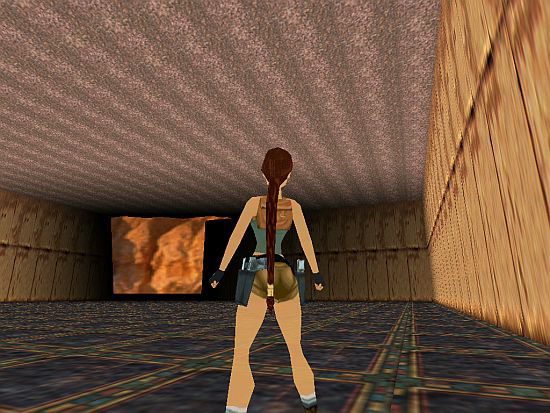
For example, let's create a large
(Size 18x18) room in a level without sky/horizon. Stand with Lara in the
southwest corner of the room, and look towards the far northeast corner.
If we removed the distance fog that's what we could see:
Why?
Because the things being far away are mostly unimportant and
(relatively) small. The game doesn't want to waste its resources to care
about them, so the far things won't be drawn. - And this is the visual
range (Paolone calls that 'farview'). I mean, if something is inside the
visual range, that will be drawn, but if something is outside the visual
range, that won't be drawn.
The default value where the visual range ends
is 20 squares. In a 18x18 room like above, the distance between the
southwest and the northeast corner is about 25,5 squares long (see
Pythagoras' theorem), so if Lara looks from the southwest corner to the
northeast one, then the things in the northeast corner will be out of
her default visual range, so those things won't be drawn. (So this
screenshot was taken using the default visual range.)
So, if we can't see the northeast corner of
the room, because that is too far, then we will see the 'black nothing'
behind that non-drawn corner.
The distance fog is a technical
tool that covers nicely the non-drawn parts of the room:
But,
unfortunately, the distance fog won't cover anything that is out of the
rooms.
In the
picture just above this problem is not noticeable, because the black
nothing being out of the room and the room parts covered by the black
distance fog have the same (black) color.
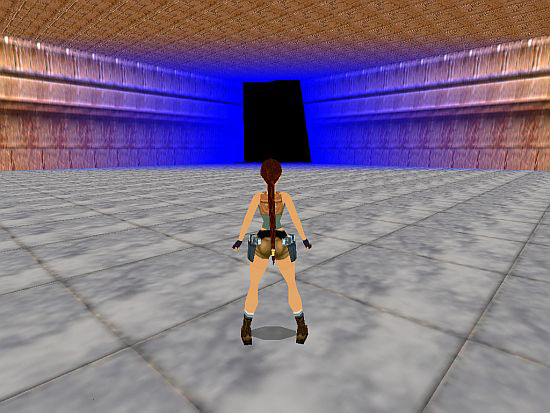
But the problem will show up, if the
sky/horizon of the level is there behind the non-drawn corner:
So, a
'belt of hills' horizon is seen in the picture just above - though, we
don't want to show sky/horizon from this room.
A nice method to solve that problem if we
won't let Lara see to the end point of her visual range - so if we place
obstacles in the visual range.
For example, if we create a fat column, using
the green 'Wall' button:
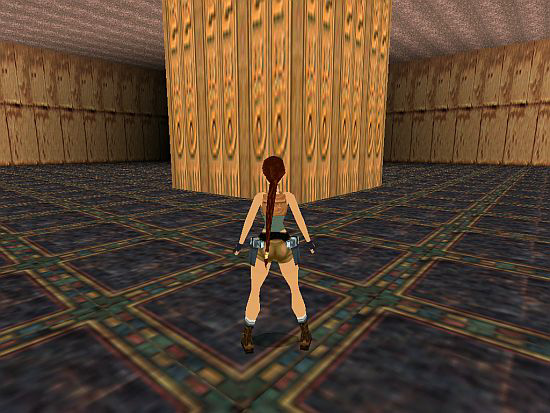
Anyway, on
the room surface elements you WANT to show sky/horizon through, the
visual range is 'endless', so you'll always see a perfectly drawn
sky/horizon there. And, without seeing any distance fog on them.
Thanks to some features 'born' in TRNG, we are able to fiddle with
the visual range or the distance fog. It means:
- You make the
game to use a bigger visual range (maximum to 127 squares), so you can
see the things far away, even if those things are unimportant and small.
(So, if you want, we don't need to care about the non-drawn parts any
more, because there won't be non-drawn parts. I mean, e.g., if your
level largest scene is a huge scene in which there are 70 squares
distance between the opposite corners, then use e.g. 75 squares visual
range, and Lara will never encounter a non-drawn part in the level,
surely.)
(By the
way, now you can use even a tiny visual range, if you want.)
- You can use the distance fog not only for
technical reasons, but as a new feature to create nicer atmosphere in
the game.
First of all, let's talk about how we can adjust the
required visual range value:
a, You are able to define a new
visual range for the whole game. Just type this entry in the [Options]
block:
WorldFarView= X
In which X is the required (end
point of the) visual range (in squares).
b, You are able to
define a new visual range for the actual level. Just type this entry in
the [Level] block of that level:
LevelFarView= Y
In which
Y is the required (end point of the) visual range (in squares).
(If you use both WorldFarView and
LevelFarView, then WorldFarView value will be used on all of your
levels, except where you have LevelFarView entries.)
'Fiddling
with the distance fog' means you can customize the start/end point and
the color of the distance fog (because of whether technical reasons or a
nicer atmosphere).
But what 'the start/end point of the distance
fog' means? - Well, it means the density of the distance fog is not
constant:
- The distance fog always starts in a given distance
from Lara. At this point, the density is the thinnest.
- The distance fog always ends in a given
distance from Lara. At this point, the density is the thickest.
The bigger the distance between the start
and end points of the distance fog is the more gradual the thickening of
the fog between those points is.
To define new start and/or end point for the distance fog of your level,
type this entry in the [Level] block of that level:
FogRange= A,
B
In which:
A: the value of the new start point (in
squares). (The default value is 12 squares.)
B: the value of the new end point (in
squares). (The default value is the actual visual range end point.
If the distance fog ends closer to Lara than
the visual range does, then the density is constant, maximal from the
end of the fog to the end of the visual range. - So this time we'll see
distance fog behind the end point of the fog, as well.
If the visual range ends closer to Lara than
the distance fog does, then we'll never see too dense fog in the level,
because the 'real dense part' is behind the end of the visual range.)
(Type IGNORE in Position A or B, if you want to define only a new
start or end point by this FogRange, i.e. if you want to let the other
point alone in its default value.)
Before we are talking about
how to modify the color of the distance fog, we must talk about the
connection between fog bulbs and the distance fog:
If the effect
of the distance fog is perfect then the effect of fog bulbs isn't
perfect. - This is what happens if we 'enable' the distance fog but
'disable' fog bulbs.
On the other hand, if the effect of the
distance fog isn't perfect then the effect of fog bulbs is perfect. -
This is what happens if we 'disable' the distance fog but 'enable' fog
bulbs.
If you enable one of the
fog types (the distance fog or fog bulbs) then the other type will
always be disabled automatically.
To enable/disable the distance fog/fog bulbs, we have three methods:
a, global method for the whole game:
Check 'Volumetric FX' in the setup of the
game. Now the distance fog is disabled, fog bulbs are enabled.
Uncheck 'Volumetric FX' in the setup of the
game. Now the distance fog is enabled, fog bulbs are disabled.
b,
global method for the whole level:
If you want to override the fog adjustment in
the setup for the given level, then type this entry in the [Level] block
of that level:
ForceVolumetricFX= A
In which A could be
ENABLED or DISABLED.
If A is ENABLED then the distance fog is
disabled, fog bulbs are enabled.
If A is DISABLED then the distance fog is
enabled, fog bulbs are disabled.
(It's also a good method, if you
want enabled/disabled distance fog/fog bulbs in the level everyway, but
you don't know if the player will check or uncheck 'Volumetric FX' in
the setup.)
c, local method for a part of the level:
If fog bulbs are disabled and the distance fog
is enabled at a given point of the level, then you enable fog bulbs and
disable the distance fog there, activating this FLIPEFFECT trigger:
Weather. Fog. Enable Volumetric FX in current level (Disable fog
Distance)
Or, if the fog bulbs are enabled and the distance fog
is disabled at a given point of the level, then you disable fog bulbs
and enable the distance fog there, activating this FLIPEFFECT trigger:
Weather. Fog. Disable Volumetric FX in current level (Enable fog
Distance)
But what does 'perfect distance fog/fog bulbs' mean? -
Well, it's about the color/presence of the fog. I.e. 'perfect' fog could
be colorful, 'imperfect' fog could be only black - moreover, 'imperfect
fog bulbs' won't show up in the level.
A fog bulb always has the same color that all
the other fog bulbs just have. (I.e. there are no plural fog bulb colors
at the same time.)
And never try to change fog bulb color on Light Panel. This operation
works unlike light bulbs. - Instead, use the method below:
These are your possibilities to change fog colors:
A, If fog
bulbs are just enabled/the distance fog is just disabled:
a, fog
bulb color:
- If fog bulbs haven't been disabled in the actual
level before, and if there is not a Fog entry in the [Level] block, and
if OldFlip color triggers haven't been activated yet - then fog bulbs
will be seen, having black color.
- If fog bulbs haven't been disabled in the
actual level before, and if there is a Fog entry in the [Level] block,
and if OldFlip color triggers haven't been activated yet - then fog
bulbs will be seen, having the color that is defined in Fog entry.
- If you activate an OldFlip color trigger -
then fog bulbs will be seen, having the color that is defined in this
trigger.
- If
you activate a Weather color trigger - then nothing will happen about
fog bulbs.
b, distance fog color:
- The distance fog will
be seen, having black color.
- Fog entry or any color trigger has no effect
on the distance fog now.
B, If fog bulbs are just disabled/the
distance fog is just enabled:
a, fog bulb color:
- Fog
bulbs won't be seen.
- Fog entry or any color trigger has no effect
on fog bulbs now.
b, distance fog color:
- If the distance
fog hasn't been disabled in the actual level before, and if there is not
a Fog entry in the [Level] block, and if Weather color triggers haven't
been activated yet - then the distance fog will be seen, having black
color.
- If the
distance fog hasn't been disabled in the actual level before, and if
there is a Fog entry in the [Level] block, and if Weather color triggers
haven't been activated yet - then the distance fog will be seen, having
the color that is defined in Fog entry.
- If you activate a Weather color trigger -
then the distance fog will be seen, having the color that is defined in
this trigger.
-
If you activate an OldFlip color trigger - then nothing will happen
about the distance fog.
Just
enabling fog bulbs/the distance fog during the level, those/that always
'adopt(s)' the latest (non-black) fog color, that whether fog bulbs or
the distance fog had in that level. (Of course, that is black color, if
there hasn't been other fog color in the level so far.)
These are the entry and triggers I've just been talking about:
a, Fog entry:
Fog= A, B, C
In which:
A= the red
factor of the RedGreenBlue color value, in an interval from 0 to 255
B= the green factor of the RedGreenBlue color
value, in an interval from 0 to 255
C= the blue factor of the RedGreenBlue color
value, in an interval from 0 to 255
b, OldFlip color trigger - is
a FLIPEFFECT trigger:
OldFlip. Set the RGB color for the fog
bulbs to the <&>value
c, Weather color trigger - is a FLIPEFFECT
trigger:
Weather. Fog. Set the <&>Color for Distance Fog
Notes:
1 If you think it's a good idea to change the level actual visual
range during the game, then activate this FLIPEFFECT:
Distance.
Set level far view (max distance) to <&>number of sectors
2 If
you define the visual range by a LevelFarView script entry or a trigger
(see just above), then that visual range can't be bigger than
-
the default visual range value of the game, or
- if WorldFarView script entry exists, then
the value of WorldFarView.
3 You may start worrying: 'okay, that
is nice that I use a bigger visual range, but won't that overload the
game'?
If you
think it's a real problem, but you don't want to decrease the visual
range to solve that, then do something else that helps the game to use
less memory. For example, delete some objects from the level, have less
active objects at the same time etc.
Or, type 'Turbo' entry into the [Level] block
of the level. (See more about Turbo script command in NG
Center\References.)
4. It's not easy to tell shortly what this
FLIPEFFECT trigger do:
Weather. Fog. <&>Enable/Disable all fog
(distance fog or fog bulbs)
So I'll tell you in detail now:
- If fog bulbs are just enabled/the distance fog is just disabled,
and we'll activate this trigger with 'disable' value - then fog bulbs
will be disabled (unseen) and the distance fog will be unseen.
- If fog bulbs are just disabled/the distance
fog is just enabled, and we'll activate this trigger with 'disable'
value - then the distance fog will be disabled and unseen.
- We've never activated this trigger with
'disable' value in this level, but now we'll activate this trigger with
'enable' value - then nothing will happen.
- We've activated this trigger with 'disable'
value in this level, but now, after that, we'll activate this trigger
with 'enable' value - then:
= fog bulbs will remain disabled
(unseen), and
=
the distance fog will be enabled (seen). (Activating a Weather color
trigger just before this 'enable' activation, the distance fog will have
the color defined in Weather color trigger, when showing up.)
If
you enable the distance fog (in 'the usual way' - i.e. see 'local
method' above) between this 'disable' and 'enable' activation, then
nothing will happen.
- We've activated this trigger with
'disable' value in this level, but now, after that, we'll activate this
trigger, with 'enable' value (but, between them, we enabled fog bulbs in
'the usual way') - then:
a, first, when enabling fog bulbs:
= the distance fog will remain disabled, but will be seen, in black
color, and
= fog
bulbs will be enabled (seen). (Activating a Weather color trigger - sic!
- just before this 'enable' activation, fog bulbs will have the color
defined in Weather color trigger, when showing up.)
b, then, when
activating this trigger with 'enable' value:
= if you didn't
disable fog bulbs (in 'the usual way') between a and b activations:
nothing will happen now, or
= if you disabled fog bulbs (in 'the usual
way') or maybe then enabled them again (in 'the usual way'), then maybe
disabled them again, then maybe enabled them again, etc., but all of
these happened between a and b activations:
< Before b
activation, disabling fog bulbs: the distance fog will remain disabled
but will be unseen. You can adjust the color of the just unseen fog
bulbs by Weather color triggers from now on.
< Before b activation, enabling fog bulbs: the
distance fog will remain disabled but will be seen, in black color. You
can adjust the color of the just seen fog bulbs by OldFlip color
triggers from now on.
< Performing b activation, if fog bulbs are
just disabled: the distance fog will be enabled and seen. Fog bulbs will
remain disabled (unseen).
< Performing b activation, if fog bulbs are
just enabled: nothing will happen.
5. Though it sounds strange,
there is a possibility to use negative values for the distance fog
range. - This illustration about an example may help you to understand:
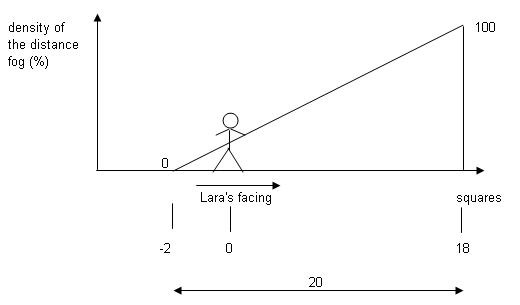
Now the
start point of the distance fog is at Square -2, and the end point of
the distance fog is at Square 18. The density of the fog is 0 % at the
start (-2) point, and the density is 100 % at the end point (18).
The range of the distance fog is 20 squares
long now, that's why it changes plus 5 % at each square (see 100/20=5)
if we head from the start point for the end point:
-2: 0 %
-1: 5 %
0: 10 %
1: 15 %
etc.
So at Square 0 (i.e. where Lara
is) the density is 10 %. It means whatever we do in the level, Lara's
closest environment will be always in 10 % density distance fog, that
will be thicker, if we look farther.
(No, that doesn't mean the fog will be thinner
behind Lara. I mean, the negative value is only theoretical, because the
distance fog is always the thinnest at Lara and always getting thicker
farther from her. Whether the 'farther' is in front of her or behind her
or on her left hand or on her right hand.)
But I'd like to
remark:
- Never type -1 as a FogRange value. I mean, don't
forget: -1 is the numeric code for IGNORE script command.
- 'On the sky/horizon room surface elements
the visual range is endless, without distance fog on them' - I said
above, but it's not true, if the start point of the distance fog is a
negative value. I mean, in these cases, the distance fog will be some
kind of 'color layer' on the horizon. I think, the density of that
'layer' is the distance fog density at Lara.
- My theory works with linear change. But
maybe my eyes can see things in the wrong way, and the density may
change in an exponential way or in some other function. So, if I'm
wrong, then the intensity is not 10 % in the example above, but some
other value.
6. If you think it's a good idea to change the
distance fog range during the game, then activate some of these
FLIPEFFECTs:
a, new end point, with a sudden move:
Weather. Fog. Set <&>End Fog limit for Distance fog
b, new start
point, with a sudden move:
Weather. Fog. Set <&>Start Distance
Fog value
c, new end point, in an endless way:
Weather.
Fog. Change End limit of Distance Fog in <&>way with (E)speed
The
change will be continuous, endless. - Let's see an example:
The end point of the distance fog just before
activating this trigger is Square 10, and you choose '16 sectors' in the
trigger.
10-(16/2)=2 and 10+(16/2)=18, so Square 2 and 18 will be the new end
points during the endless changing:
- If the change is 'pulse'
type, the change will happen exactly between Square 2 and 18.
- If the change is 'random' type, the change
will happen anywhere between Square 2 and 18 (including 2 and 18
themselves).
To stop this changing, activate this trigger:
Weather. Fog. Stop the <&>Change limit of Distance fog effect
The new, constant end point will be the point where the change has
just been stopped.
d, new start point, in an endless way:
Weather. Fog. Change Start limit of Distance Fog in <&>way with (E)speed
To understand this trigger, just see 'Change End limit' trigger just
above.
And use
the same trigger to stop changing. (The new, constant start point will
be the point where the change has just been stopped.)
e, new
start point, in a given time:
Weather. Fog. Change Start Fog
distance to <&>Distance in (E)seconds
At the moment, there is no similar trigger for
the end point.
f, new start and
end point, in an endless way:
Weather. Fog. Pulse Start distance
Fog from current to <&>Distance in (E)seconds
In a given time,
the start point moves to the given, new position, then comes back (in
the same time), continuously.
The range of the distance fog remains constant
during that, so the end point will move in the similar way.
To
stop this changing, activate this trigger:
Weather. Fog. Stop the
Pulse Start distance fog and set new <&>Fog Distance
The new,
constant start point will be the point you give in this trigger.
The new, constant end point will be the end
point just before this continuous change.
Never affect the continuously changing distance
fog range by any other trigger until you stopped the continuous change.
(Whichever continuous change that is.)
7. The distance fog range-modifications won't work properly if fog
bulbs are enabled or you are just enabling them (in 'the usual way'):
- If fog bulbs are enabled, the continuous changes (except: 'Change
Start Fog') won't work.
- If you are just enabling fog bulbs, the
continuous changes (except: 'Change Start Fog') being in just operation
will be stopped and annulled suddenly. (As if they hadn't been started.)
- If you are just enabling fog bulbs, the
distance fog range will get the default values (i.e. start point=12
squares, end point=visual range end point). (Then disable fog bulbs in
'the usual way', 'to correct this mistake', i.e. to restore the values
just before the enabling. - But, you can't do that restoring, of course,
if you changed the values between the enabling and the disabling.
Or another way to restore if you activate the
trigger in Item#4, in enabled mode.)
8. This FLIPEFFECT trigger
changes the visibility of fog bulbs:
Weather. Fog. Set <&>Max
visibility distance for Fog Bulbs
Use only positive sector values
of Window &. If Lara is farther from any fog bulb than the given value,
she won't see the fog of the bulb. (The default value is only: 'inside
the visual range', as I know.) - The trigger can be activated even when
fog bulbs are disabled.
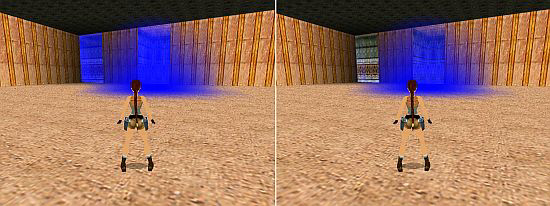
9. Some special visual problems of fog
bulbs/the distance fog:
As you
see, the appearing black nothing will be ugly, if you use a non-black
distance fog. - A good choice to solve the problem, if you use a
TR3-style horizon, texturing the whole horizon with monochrome texture
tiles, where the tiles have the same color as the distance fog has.
(This TR3 thing can be even intentional. - See
more about it in this tutorial on Skribblerz:
Distance Fog: The basics.)
In the
left screenshot, we can clearly see the end point of the visual range,
with black distance fog, through the red fog bulb. This is obviously
ugly. - Avoid this kind of situations.
In the right screenshot, we can see a short
wall in the middle of the background. That wall is far behind the end
point of the visual range, so we shouldn't see that at all, through the
light green distance fog. But we can see that, because the room of that
wall is a reflex room and reflected parts are seen behind the end of the
visual range. This is obviously ugly. (The problem is not so rough with
black distance fog.) - Avoid this kind of situations. (The screenshot
was taken using a totally light green, TR3-type horizon. The visual
range is little now, that's why the green horizon is seen in the
background, behind the non-drawn parts, 'melted' into the green distance
fog.)
In the
left screenshot, there are two portals on the wall in the background.
Both portals are textured by Toggle Opacity 2 method, placing
transparent texture tiles on them. Lara can see the right portal through
the blue fog bulb, but the left portal is farther from the fog bulb, so
she mustn't see the blue fog on the left portal.
You could have this kind of/similar kind of
troubles with all the transparent textures in your game (even with the
distance fog), whether those textures are on room surface elements or on
object faces.
To
solve the problem, type this entry into [Title] block (now the solution
is valid for the whole game) or type it into a [Level] block (now the
solution is valid only for the actual level):
Customize=
CUST_FIX_WATER_FOG_BUG, ENABLED
You can see the result in the
right screenshot.
10. You can use a trick to 'switch off' the
distance fog: if both its start point and end point has a bigger value
than visual range does.
(When we want to 'switch off' some bulbs, for
example, light bulbs, then it's a good trick to create a flipped room of
the room of the bulb, and then remove the bulb from the flipped room. -
Well, this trick won't work on fog bulbs.)
11. Some limits of fog
bulbs (if I understand my own experiences and information from Paolone
in the right way.):
- You could have maximum 80 fog bulbs placed
in the whole level.
- You could see maximum 32 fog bulbs working
properly at the same time.
- You could have maximum 32 bulbs (aggregated
amount of all the light, camera, fog, sink, sound bulbs) placed in a
room.
- See
'Effects: X of 768' in Info Box of Room Editor. X is the actual, 768 is
the maximum aggregated amount of the light and fog bulbs in the whole
level.
12. According to my experiences, the state of fog is
always 'fog bulbs disabled/the distance fog is enabled' in train levels.
13. The subject of the fog has nothing to do with you using Horizon
or Layer script commands or triggers, HORIZON object or outdoor/indoor
areas.
14. As the name says, this FLIPEFFECT trigger doesn't do
anything:
Weather. Fog. Enable Hardware Fog (removed, no more
effect)
General notes
1. You may have problems with some weather features if you use them
in title level.
2. You can make a weather feature more perfect,
if you use some proper lighting technique in your rooms.
For example: if the horizon is just 'dark
night' around Lara, then you should use dark ambience light there.
3. It seems cameras always work as if they were Lara, when a given
weather effect/visual range must be represented.
I.e., for example, if Lara must answer some
requirements to see rain around herself, then the just active fixed
camera must also answer the same requirements to see rain around itself.
4. Don't forget: a trigger won't do anything if there's nothing to
do. - For example, if Lara steps on a trigger that disables fog bulbs in
'the usual way', then nothing will happen if fog bulbs are just
disabled.
Okay,
maybe you think it is evident, but believe me, it's worth mentioning it
now.
Why? - See
this example:
In
fog section, at Item#7 I said, enabling fog bulbs in 'the usual way'
makes the distance fog to have the default range. But if you activate
that enabling trigger when fog bulbs are just enabled, then nothing will
happen - including the distance fog will not get its default range.
5. There are some old TR4 script commands about weather that don't
work in NGLE any longer or that have an unknown usability (for example:
StarField command). - See more about them in NG Center\References.
The weather and the variables
If you want to use some fields about weather of some memory zones in
variables, then these are your possibilities (at least, these are the
weather fields I could find and understand.):
1. Savegame Memory
Zone:
a, System. Fog Bulb Color (Long)' field:
It's only readable. The value of the field is
the actual color code of fog (whether the distance fog or fog bulbs just
have that) that is defined by an OldFlip or Weather color trigger. (So
the variable will always get Value 0 if you read this field into the
variable before activating any color trigger.)
An example:
This hexadecimal value will be the value of
the variable if you read the value of the field into it:
$F5C83C
(=16 107 580)
$F5= 245
$C8= 200
$3C= 60
So the color is RGB= 245, 200,
60.
2. Code Memory Zone:
a, 'Script Dat. Level Flags (Use
bit operation to read or change) (Short)' field:
Each just existent flag (command) of the
[Level] block (unless that flag is disabled in that block) has a value
in this field - if the flag is one of these flags:
1: YoungLara
2: Weather
4: Horizon
8: Layer1
16: Layer2
32: StarField
64: Lightning
128: Train
256: Pulse
512: ColAddHorizon
1024: ResetHUB
2048: LensFlare
4096: Timer
8192: Mirror
16384: RemoveAmulet
32768: NoLevel
You will see the
aggregated value of the flags in the field.
For example, with an existent Horizon= ENABLED
entry, an existent Layer1 entry and an existent LensFlare entry, but
without other entries of the list being existent, the value of the field
is: 4+8+2048= 2060.
If you change
the value of the field, using 'Variable' FLIPEFFECTs, then you are able
to enable a disabled script flag (or create a flag that was non-existent
so far, creating that in enabled state) or disable an enabled script
flag.
(It's not enough, if you
enable a flag that has other value than 'ENABLED'.
I mean, for example, if you use a semicolon to
disable a LensFlare entry in your script, then the game won't use the
values in that entry if you enable LensFlare now with this field. -
Unfortunately, adjusting LensFlare values is not possible in the game,
at the moment.)
b, 'Speed Layer1 (4th field of Layer1= script
command) (Byte)' field:
As the name says, this field shows the
scrolling speed of Layer1. (A writeable value.)
c, 'Speed Layer2
(4th field of Layer2= script command) (Byte)' field:
As the name says, this field shows the
scrolling speed of Layer2. (A writeable value.)
d, 'Test. Disable
Fog Bulbs (1 = disable) (Byte)' field:
If the value is 0 then fog bulbs are enabled,
or if it is 1, then fog bulbs are disabled. (A writeable value.)
Notes:
1. In the cases of some of these fields, you have an easier way to
change the value. (See for example: 'Weather. Sky, Set new <&>Speed for
(E)Layer1/2' FLIPEFFECT also changes the scrolling speed of Layer1. So
you don't need to make a variable to get a value and then place that
value into 'Speed Layer1 (4th field of Layer1= script command) (Byte)'
field to change the speed.)
But the fields are useful if we want use
conditions but we don't have a proper CONDITION trigger or
MULT_ENV_CONDITION case for that. (For example, now we don't have a
proper CONDITION or MULT_ENV_CONDITION to examine if fog bulbs are just
disabled or enabled. But we can place the value of 'Test. Disable Fog
Bulbs (1 = disable) (Byte)' field into a variable, and then we can use a
'Variable' CONDITION trigger to examine if the value is 0 or 1. If the
value is 0, then fog bulbs are just enabled, or if it is 1, then they
are just disabled.)
2. As you see, 'Script Dat. Level Flags (Use
bit operation to read or change) (Short)' field can do something that
none of the 'usual' FLIPEFFECTs can do now. - For example, you could
disable LensFlare during the game, for the whole level.
But, as you also see, the field can be useful
not only at weather effects:
I mean, see for example this case: you have a
train level, with Train= ENABLED flag. There are no triggers to
'start/stop the train' in the game, but 'the train will stop', if you
remove that flag, removing its value (128) from the aggregated value of
the field, giving a new value to the field.
(However, handle this field when you want to
write into it as an experimental case.)
Made using TRNG 1.2.2.6