WADmerger Intermediate Tutorial
by EssGee
and Jesse
This tutorial is based on a translation of a German tutorial written by Daniel at Lara's Levelbase. Bedazzled (Tomb Builder) provided the English translation of the original document. We have revised the document and updated it with a substantial amount of additional information. The document should be read in addition to reading the documentation provided by Michiel (TRWad) - the author of the program.
Chapter 1: Installation
and Introduction to Wadmerger
Chapter 2: The
First Steps in the Animation Editor
Chapter 3: The
MeshTree Editor and the Structure of Animations in Tomb Raider
Chapter 4: Advanced
animating - Animation Commands and StateIDs
Chapter 1: Installation and Introduction to Wadmerger
Before we begin, the general question 'what actually is Wadmerger?' should be answered. Wadmerger is an efficient tool for creating and working on your own Wads - the "object pack" of each TR level. With it, you can copy objects from one Wad into another, delete objects, and add textures to objects. But Wadmerger contains much more - among other things a complete animation studio; with which one can change object movements. In the course of this first chapter, we will concern ourselves with this and all other features, but this should be sufficient for an introduction. This guide relates to the newest Wadmerger version 1,9 revision 7 A2 unless indicated differently, which is available for download from TRSearch Engine (current beta 1.98 beta 3). You also need to download the required VB Runtimes.
NOTE: During the evolution of Wadmerger, there have been several released versions that perform certain functions better than others.
V 1.97.0.1002 and V1.98.0.103 handle extra statics slots.
V 1.97.0.102 handles collision problems properly.
V 1.96.0.1002 handles custom sound samples properly.
Nevertheless all lessons should be useable in previous versions starting from version 1.9 revision 5. Mostly they are updates with bugs fixed (programming errors removed). Also you need to download the example Snake Wad, and extract it to any folder, we'll use this wad later. Now let's get started.
First unzip the VB Runtime files to a temporary directory, and run the install program. Now create a directory named Wadmerger on your C: drive (or wherever you choose to place it), and extract the zipped Wadmerger files into it. Now run Wadmerger by opening this folder, and double clicking on the Wadmerger icon. When you start Wadmerger for the first time, the settings window will show. This only shows the first time, but you can access it by selecting Options (The spanner icon) in the main window.
Settings - Folders
Load WAD
You can set the default locations of your WAD folders. Use the browse buttons to point to the desired location.
Wad Folder: The default Save path
Original Wad Folder: The default Load path
Wadmerger can export objects from earlier TR Games. Here you can select the default location. There are 3 paths highlighted in red. These need to be set in order to make Wadmerger work properly if you are extracting moveables from TR1, 2,3, 5 wads:
Samples
folder
When saving objects from other
TR games, the samples must be saved too. This must point to
TRLE\sound\samples (where TRLE is the place where you installed the
level editor). The TR2 and TR3 sound file must point to the main.sfx
file location. If you want to use TR3 wads a lot, you must set this.
If you load levels from the CD, you can point it to the CD too. When
you click 'browse' a dialog will show that needs to load main.sfx.
It will be opened when saving TR2/3 levels. This file can be found
in the data folder on the game disc.
Example
If you have
the CD-ROM drive as D and you run TR2/3 from CD, insert the CD and
choose the browse button after the filename. Go to the cd and open
data\main.sfx. When you load a level, make sure the CD is in the
drive so it can be loaded. After loading you can remove the CD
safely.
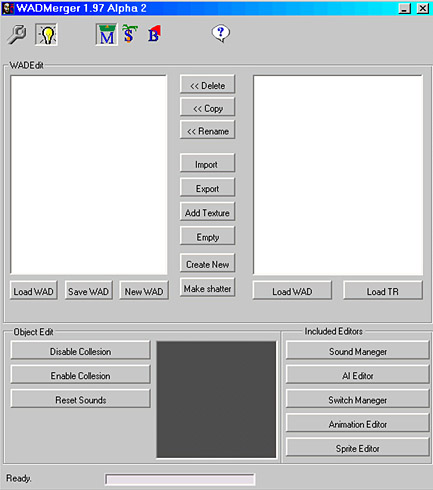
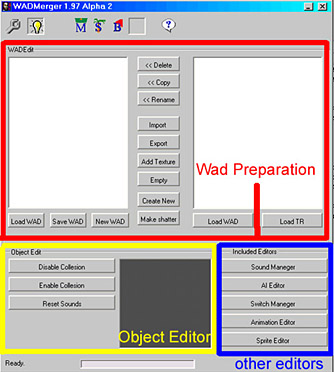
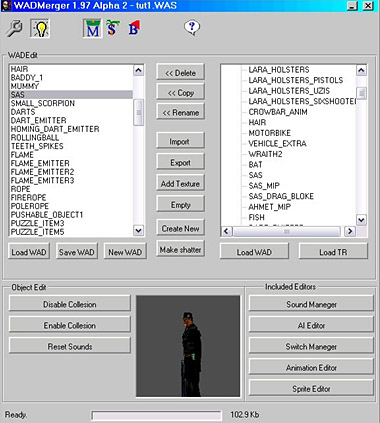
Now we can take a look at the Wadmerger user interface more closely. One can divide the interface essentially into three areas: The red and at the same time most important part is probably the Wad preparation area. The function of all Buttons for this part are described below.
Click this Button under the left window to load an existing WAD that you want to work on. Click the Load Button under the right window to load a WAD, from which you can copy objects.
Save WAD
With this Button you can save your edited WAD.
New WAD
Click on this Button, so that you can build a completely new WAD.
Load TR
With this Button one can load a TR level, (TR1-5). From which you can copy objects. NOTE: this function does not always work with custom TR4 Levels.
Delete
Deletes the selected moveable or static object in the WAD you are editing.
Copy
Copy the moveable, static or sprite you selected on the right to the left list. Should you already have the object in your WAD then you will be asked whether you want to overwrite it. Choose 'Yes' if you want to replace the object with the new one. Shift + Copy: With this Keystroke an object can be copied into another Slot. A dialog will ask you for the new slot name. Choose a new slot from the Drop-down list. Note: You cannot copy a static object into a Moveable slot using this function.
Rename
Use this button to rename an existing object into another Slot. A dialog will ask you for the new slot name. Choose a new slot from the Drop-down list. Note: You can only rename a Static object as another Static slot, or a Moveable into another Moveable slot using this function.
Import
Will show a dialog to load a moveable and add it. Theoretically the recognised file extensions are *.trwad, and *.mqo. but this function is not currently implemented.
Export
Will show a dialog to save the selected moveable to a file. Theoretically the recognised file extensions are *.trwad, and *.mqo. but this function is not currently implemented.
Add Texture
Will show a dialog to load an image file and add it to the texture data. You can use it in your own objects (with Strpix). Image size limit is 256x256 pixels.
Note: you can only add textures to a moveable object mesh in Wadmerger. If you want to add textures to a static object create a temporary wad with your static object and a dummy moveable item. Use the dummy item to add a texture and apply the texture(s) anywhere on the moveable. Save the wad, open it in Strpix, and then apply the new textures to your static object. Now save the wad in Strpix and transfer the static to your working wad.
Empty
Will make this moveable or static empty. It will be invisible in the game. You must use this on SKIN_JOINTS when using TR1-3 outfits else TR will crash.
Create new
Create a totally new Moveable object. You will be asked to select a new Object ID. Choose a suitable Object slot for your new object from the Drop-down list. After creating it, the object will be empty. In the animation editor you can add meshes to it (meshes can be created using Metasequoia and StrPix).
Make Shatter
Use this button to create a new shatter item. This function creates flat shatter walls and windows. Using the Shatter Wizard - select a suitable height for your object. Load a suitable texture to cover the chosen area. Click Build, and a new Shatter Item slot will be created in your Wad.
We will turn now to the Object Edit Section.
Object Edit Section
This consists of only a few Buttons. In the dark grey Preview window the selected object is displayed. You can rotate the object by holding click over the preview window. Use the Left and Right Arrow keys to rotate manually, and the Up and Down Arrow keys to zoom in and out. The following is an explanation of the four buttons in this section:
Disable Collision
This Button deactivates the collision of an object, so that Lara can travel through it.
Enable Collision
This Button activates the collision of a moveable object, so that Lara cannot travel through it. Hold Shift while pressing this button to recalculate collision on a static object.
Create Normals (Button not in current version)
This Button is deactivated and has no function; it may be used in one of the future versions.
Clear (Button not in current version)
With this Button an empty Mesh replaces a Mesh from the list.
We come now to the last part of the user interface, the included editors. The following is a short explanation of them:
0- Flame Emitter/ Underwater blood/ smoke
1- Flame Emitter / Underwater blood/ smoke
2- Flame Emitter /
Underwater blood/ smoke
3- Flame Emitter / Underwater blood/
smoke
4
5
6
7
8 - when lara jumps from a high point
in the water, this sprite appears as water
9 - when lara walks in
the water this sprite appears around her feet
10
11- Shiny,
glow of electricty arc
12
13- Underwater bubbles
14-
Underwater Dust
15
16- Rope
17- Jeep 'R' for Reverse
18-
Jeep 'D' for Drive
19- Unused, can be used for the Shadow Sprite
in conjunction with TREP
20- Unused, can be used for the Shadow
Sprite in conjunction with TREP
21- Unused, can be used for the
Shadow Sprite in conjunction with TREP
22- Unused, can be used
for the Shadow Sprite in conjunction with TREP
23- Unused, can be
used for the Shadow Sprite in conjunction with TREP
24- Unused,
can be used for the Shadow Sprite in conjunction with TREP
25-
Unused, can be used for the Shadow Sprite in conjunction with TREP
26- Unused, can
be used for the Shadow Sprite in conjunction with TREP
27-
Unused, can be used for the Shadow Sprite in conjunction with TREP
28- Flame_Emitter 3/Lightning Conductor Sprite. The colour of the
bolt depends on the amount of white in the sprite ie: very
light-very light blue...very dark, darker blue.
29
30
31-
Lensflare
32
33
Top Toolbar Section (listed in order from left to right)
Options
Displays Options screen. You can set-up the folders from TRLE and change skins in it.
Use Smartcopy
If it's checked SmartCopy is used. If it's unchecked, SmartCopy is ignored. SmartCopy will help you when you copy objects that can use more then 1 slot (like DOOR_TYPE1, DOOR_TYPE2). With smartcopy enabled, doors, switches, animatings, trapdoors, pushables and quest items are not copied to the edit wad with the same ObjectID. SmartCopy looks in the edit wad if there are any DOOR_TYPEx slots free. It will copy the object to the first free slot. If no slots are free, a message will warn you that you have reached the limit of available slots for that type of object. This makes it easier to build a WAD with doors and switches from many other wads since mostly DOOR_TYPE1 is the first one and you will always get messages if you want to replace it.
Turning off SmartCopy can be useful if you are adding static objects and wish to replace a current static slot with a new object.
Moveable
Displays the moveables in the list
Static
Displays the static meshes in the list
Sprites
Display the sprites in the list.
'A' button: Add Anim Button (unmarked but present in V1.97A2)(visible as 'A' button in Version 1.98.beta3)
Used in conjunction with wads that are created for exporting specific object animations. Displays the list of object animations that have been added for export from the wad. (see animation section for more detail)
About
Display the about dialog. It contains the names of the people working on Wadmerger (including the skins and documentation).
Exercise for you to try
We will now try editing a Wad in practice using the standard supplied editor wads.
Click the load wad button under the left hand window - a new window opens displaying a list of your wads (Program Files\Core Design\TRLE\Graphics\Wads). Click on the tut1.was listing. Now click load wad under the right hand window but select the city.was file. Expand the list by clicking on the small square with a + sign next to the city.was name Scroll down the city.was list and click on the SAS now click the <<COPY button you have copied the SAS object into the tut1 wad. Now click on the Teeth Spikes in the tut1.wad and click on "< < DELETE" and confirm if necessary. The Teeth Spikes should now be deleted from the Tut1 WAD. You see WAD editing is not so difficult after all. This should be sufficient as an introductory chapter, but you should practice copying, renaming, deleting and overwriting objects in a WAD, ready for the next chapter.
Chapter 2: The First Steps in the Animations Editor
We now move on to probably the most interesting, and difficult part of Wadmerger: the Animation Editor. Before we begin, it's important to clarify some fundamental ideas. These are the following:
Slot
A Slot designates a "container" specified in the program code of TR for objects, which possesses completely determined characteristics. For example: Altogether there are 525 Slots in TR, each slot stands here for an object from TR4. If you go through the objects in your Wad in the LE in the Object Window, the names of the objects are the names of the Slots they are in. In order to make the different characteristics clear, let's take the Harpy and the Crocodile Slots as examples. If you copy an opponent to the Harpy Slot, then the program code regards the opponent automatically as a Harpy and the opponent can in theory fly (however only in theory). If you copied it into the Crocodile Slot, then the opponent could swim under water.
NOTE: If you want to make an opponent or trap from another TR game function in the LE then it's best to look for a Slot, in which a TR4 opponent sits, which possesses the same and/or similar characteristics, to the object from the other TR game. If the opponent can poison, but not fly, then only the Scorpion Slot is applicable, since it and the Harpy in TR4 are the only opponents, who can poison. And an opponent would fly in the Harpy Slot, so only the Scorpion Slot remains. If you copy an object into another Slot, then only the "appearance" is exchanged; the object actually takes over automatically the characteristics of the opponent that was originally in the Slot, i.e. an eagle in the Harpy Slot is not exactly the same as when shot it dies like a Harpy. Unfortunatley you cannot change that, since the characteristics of the Slots are firmly integrated in the program code. With enemies from other TR games there is also an issue with different State Ids which affect the behaviour of the enemy, but that subject deserves a separate topic. In brief summary, you cannot simply copy an enemy from an earlier TR game into a wad for TR4 and expect the enemy to function properly as it did in its native game engine. StateIDs will be discussed in Chapter 4.
Mesh
A Mesh is a "part of the body" of an object. A Mesh consists of many polygons and is the "raw material", of which each object is composed. We can take Lara's head as an example, likewise her hands, legs, arms, and torso are all meshes. Objects consist in principle only of meshes, with each one having a number (Mesh 1, Mesh 2, Mesh 3...).
Animation
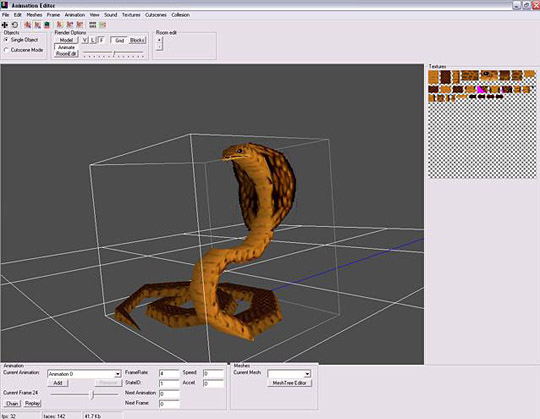
An animation is simply a series of slightly different pictures known as frames. The human eye can notice only pictures; if many pictures are played very fast one after the other, then it appears to us as movement. We will create a simple animation, which is nine frames long. In each frame a snake's head will turn 10 degrees further to the right, at the end we'll have an animation, in which the head turns 90 degrees to the right. At the beginning you downloaded a small Wad (Snake.wad). We are now going to work with this Wad. It contains the snake from the TR3 Temple level in the Scorpion Slot. Start Wadmerger and load the Wad in the left hand window. click on the object "Scorpion" and then on the Button "Animation Editor". If the camera is automatically rotating, click the Auto Rotate Button (3rd Button from the left) to stop the object from rotating, and then click on the Reset View Button (with the small camera) in order to centre the camera.
Now we'll look at this window more closely.
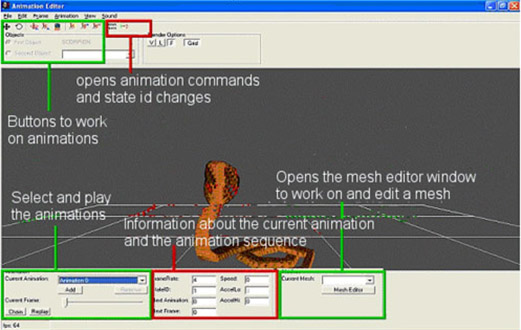
In the above diagram, the Buttons are divided into green and red Areas; everything within a green border has something to do with the generation of animations; all red on the other hand refers to the building of objects, and the possibility to rebuild objects from other TR games for our LE so that they function correctly. Let's start with the simpler part, namely the Animations.
First the Button explanation (the upper, green Toolbar Buttons), from left to right:
The square arrow (Move button)
With this Button, one can move the object in an animation forward, back (the z axis), to the left or to the right (the x axis), or up and down (the y axis). If no animation is selected; you can arrange the Meshes of an object and can push for example the head under the legs. 0.25 is equivalent to 1 click, so for example moving the object to 0.5 on the Z axis would move the object forward 2 clicks, making it appear on the edge of the square.
NOTE: The y axis is upside-down in the game engine. Thus as the y value grows more negative, the object is raised higher, not lower, and vice versa.
The move button only changes the visual position of the object, not the actual position. The actual position can only be updated by either using the speed/acceleration fields explained in Chapter 3, or with a set position command explained in Chapter 4.
The round arrow: (Rotate Button)
Clicking on this Button enables us to rotate a Mesh in all directions. Mainly with this Button, the illusion of a movement is produced.
The little man with the circle: (Auto Rotate Object Button)
This button stops/starts the object rotating in the viewing window.
The little man with the arrow in the hand: (Auto Animate Button)
A click on this Button plays the current animation, clicking again stops it.
The camera (Reset View)
Clicking it returns the camera to the default position.
The 2nd little man with an arrow (Animation Wizard Button)
Here one can start the Animation Wizard (animation assistant). Details further down.
The little man with a blue + (Add a new frame)
With this Button, one can extend the animation by a frame. It duplicates the frame currently selected.
The little man with the red X: (Delete current frame Button)
This Button deletes the currently selected frame.
Sub-section: Objects frame
This section allows you to view certain objects together. For example if you open the Lara Vehicle Extra animations you can also select te Motorbike from the drop-down list and view both objects animations being played together.
Sub-section: Render Options frame
By default the Animate button is selected for viewing animations. To edit textures click the Model button.
V button - to view mesh Vertices
L button - to view mesh Lines
F button - to view textured meshes
Grid button - to view floor grid
The upper red toolbar buttons will be explained in the next chapter.
Now a short description of the lower green area.
In the Current Animation Drop Down menu, you can see all the animations of the object listed. Select each one to view it.
With one click on Add an additional animation is added to the object. You cannot delete an Animation in Wadmerger. the 'Remove' is deactivated at present. An alternative to this is to go to the frames menu and select "delete all frames" to delete all frames in the selected animation.
The Button Chain Plays back all animations in a chain. If for example an object's animations are arranged such that after Anim 1 Anim 3 is played and after Anim 3 Anim 4, is played with one click on this Button, all three Anims are sequentially played back.
With one click on Replay the animation will loop upon playback.
We'll leave the Mesh editor and the red Buttons for now. Next we'll look at the functions of the mouse.
Mouse Functions
If you click with the right mouse button on a Mesh, it will select it.
Hold simultaneously ALT and the right mouse button - moving the mouse will zoom in & out.
By holding only the right mouse button pressed and moving the mouse, you can turn the object in any direction.
Finally one can shift the entire view by holding both the Shift key and the right mouse button.
To return again to the original view, click on the camera button.
Now, we venture into our first animation.
Making an animation
Using the Snake wad as an example, ensure that the camera is not revolving and press the camera button to get the original camera perspective back.
Select Animation 0. Pull the slider under the menu, in which you can select the animation number, all the way to the right in order to select the last frame. With this slider, frames of an Animation can be effortlessly selected. Now add an additional frame by clicking on the Add Frame Button (Button with the blue +).
Now click with the right mouse button on the head of the snake; the Head Mesh is now selected.
Now click on the round arrow and you should see three axis lines with coloured spheres at the ends also a little window, into which values for the "x, y, z" axes may be entered.
The three lines stand for the three axes, around which objects in the three-dimensional room can be moved. With the red sphere at the end of the red X axis you can turn a Mesh to the left or to the right; with the blue sphere at the end of the blue Z axis you can tilt a Mesh, with the green sphere at the end of the green Y axis, you can rotate a Mesh towards the top or bottom. Yes, very important, we said rotate and not move. With an animation there is a difference, whether one says, one moves a Mesh or one rotates a Mesh. If one moves a mesh, it "leaves" its original place, therefore it separates itself from the rest of the object and places itself some centimetres or metres away in any direction, from the remainder of the object. The moving of a single Mesh is not supported by the LE however (also it would look somewhat strange, if the head of an opponent removed itself). Therefore one can only move the total object (multiple meshes) with the movement Button ("Move button with the 4 arrows) and not single Meshes within that complex object.
NOTE: If an object consists only of one mesh, then it can be moved. If one rotates a Mesh on the other hand, it remains at its current place and "leans" itself only in the corresponding direction. We can rotate the Mesh directly by clicking and dragging one of the spheres with the mouse; it's more exact however with the new window. Here one can input the number of degrees behind X, Y or Z, which you want to turn the Mesh. Input 10 in X, and the mesh revolves around 10 degrees to the left.
NOTE: If you experience very slow or no movement using these toggle spheres, try going into your Options menu and adjust the Animation Editor Undo Buffer Size to 0.
Now input in Z 40 so that the head moves down some degrees. Now close the window and add a further frame. Repeat the procedure, only input 45 instead of 40 so that the head tilts further down. Add three more frames - enter successively in Z 50, 55 and 60. When the animation is viewed you should now see the snake move its head down at the end of the Animation. Congratulations, you have just generated your first custom animation!
Now perhaps you're thinking, longer animations with several hundred frames will be very complex to create in this manner. It can be achieved in an easier way with the Animation Wizard.
Delete the last 5 frames (the Button with the red X) and start the Animation Wizard.
Step 1 - Welcome to the Animation Wizard - Click once on Next
Step 2 - First frame of animation - move the window so that you can reach the Buttons. Select again the head and click on the Rotate Button. Input in Z a value of 45, click OK in this small window and click on Next in the Wizard. This step has generated the first frame of the animation,
Step 3 - Last Frame of animation - Now input in Z 60, click OK in small window and click again on Next. This step has generated the last frame of the animation.
Step 4 - Animation Length - Input 5 in the upper field; this tells the program that the animation should be 5 frames long. Enter 41 in the field; the original animation had 40 frames and we are adding an additional 5 frames to the end of the animation; our new Animation will start on frame 41.
Click on Finish and Wadmerger generates the animation automatically. To view it click the Auto Animate Button. The result is the same animation produced much more quickly.
Should you make a mistake, it can be undone with the Edit > Undo command (Ctrl+Z).
NOTE: The object's position can appear incorrectly while using the Animation Wizard. Here is a way to avoid this bug: Have both the first and last frames finished in the normal animation editor, and select frame >copy with the last frame selected. Then select the first frame and start the wizard. Click next twice and then select the main window and do Ctrl+V or use Frame > Paste (replace) to paste in the last frame. This way you have it use two frames that have been finished beforehand, so you know that they are correctly positioned. Click next and, because of this method, you need to add one more frame than you intend to use, and then click Finish.
Review the animation and remove any extra frames at the end of the sequence.
These are all the menu commands in the animation editor:
Toolbar Menu
File> Save Wad
File> Quit
Edit> Undo
Meshes> Move Center
Meshes> Scale
Frame> Copy
Frame> Paste (Replace)
Frame>
Paste (Insert)
Frame> Delete all frames
Frame> Set position
for all frames
Frame> Set rotation for all frames
Animation>
Add to AniFile
Animation> Copy
Animation> Paste (replace)
Animation> Paste (add to current)
Animation> Paste
(play)Animation> Export
Animation> Import (replace)
Animation>
Import (add to current)
Animation> Invert animation
View>
Frame calculating
Sound> Add sounds
Textures> Import
Cutscenes> Load cutscene
Collision> Disable collision (frame)
Collision> Calculate collision (frame)
Collision> Calculate
collision (animation)
Collision> Show Bounding Box
Collision>
Disable mesh sphere
Collision> Show mesh sphere
You can save your animation changes in your wad using the menu File > Save Wad. Alternatively, when you close the Animation Editor window (File> Quit) you will be asked if you want to save changes. If so, click Yes and then click the Save Wad button in the Main Wadmerger window to save the changes permanently. When creating animations, Edit> Undo (Ctrl+Z) will undo the previous animation you made.
Meshes> Move Center - This allows you to move the point of a "parent" mesh at which its "child" meshes connect. The relationships between meshes are explained in the next chapter.
Meshes> Scale - Use this function to resize an entire object. For example entering values of 0.5 in all three axes (x,y,z) will reduce the object size by half.
The Frame >Copy command will copy a frame and the Frame > Paste (add to current) command will insert the copied animation after the current one. The Paste>Replace command will replace the current frame by the one you copied. With Frame >Delete all frames you can remove all frames from the current animation. Both commands "Set position for all frames" and "Set rotation for all frames" are also quite useful. An object in an animation moved with the Move Button to a certain place and you want the object to remain there in each FRAME, simply select it and click' Set position for all frames" this places the object at the same place in each frame The same applies to the rotation, only that here it determines, that the head of the snake is for example turned 60 degrees to the right in all frames.
The Animation menu works similarly to the frame menu, except you can also export and import frames to/from external files. The "invert animation" option orders the frames in reverse order, so the animation is backwards from before. The collision menu allows you to have the program calculate the collision box for either the current frame or the current animation, as well as delete the collision box from the current frame. Newer WADMerger versions calculate the box more accurately than the version in which this feature was introduced. One last reference: When closing the Animation Editor a message appears "Save Changes?" click "Yes". Nevertheless click the 'SAVE WAD' Button because sometimes the changes are not stored.
Bug warning: If you are viewing an object from a WAD or TR file loaded on the right side of the WADMerger interface, clicking "Yes" for "Save changes?" may change the corresponding object on the left side.
Sound> Add sounds: allows you to add new sound samples to an object. The sounds can then be assigned using the Animation Commands.
Textures> Import: Allows you to add new textures to an object of any size up to 256 x 256 pixels.
Cutscenes> Load cutscene - Function not known.
Exercise for you to try
Use animation zero and generate a completely new animation in which the snake moves its head (Mesh 11) downward by 15 degrees then back up by 15 degrees and repeats these movements three times. Altogether the animation should have 30 frames. Keep a secure copy of your wad, so that it's the original for future chapters.
At the beginning we are going to return to the exercise set at the end of the previous chapter. A completely new animation was to be created, in which the snake over a period of 30 Frames should move it's head down 15 degrees then back up 15 degrees repeating these movements three times. There were two ways of doing this. The first and simpler possibility is to use the animation Wizard. But we need to employ a few fundamental considerations. Altogether the snake is to move its head six times (three times downward and three times upward). We know that we need to provide the animation Wizard with the first and last frames of an animation, and Wadmerger automatically calculates all frames between them to create the final animation. Since the head is to always move the same number of degrees), in the last frame of the animation it will be in exactly the position it started in. Therefore we cannot simply enter 30 frames as the animation length, since Frames 1 and 30 of the animation are identical the result would be no animation at all. How do we get around this problem? Now, we must use the animation Wizard in several places in the animation, exactly 6 times. If the 30 Frames must be divided into 6 head movements, how can this be achieved within one animation? 30� 6 = 5 i.e. each movement has five Frames.
We'll now do this step by step:
Select animation 0, then click Frame = > DELETE all Frames - this makes a completely empty animation available.
Start the animation Wizard.
The first frame is already correct, therefore click on "NEXT ". Now right click on Mesh 11 (the head), then on the Button with the round arrow. The axis window shows Z=34 and we now want to add 15 (the number of degrees we want the head to move), so change the value to 49 and click 'OK.' Now the snake lowers it's head by 15 degrees, click again on "NEXT'.
Enter 5 for the animation length, and 0 as the Startframe. Click on "finish" This gives us the first part of our animation.
Now the procedure is repeated starting from step 3, with the difference that we take 15 off, so that the head lifts up again by 15 degrees. Likewise the animation begins this time on Frame 5. Altogether the whole process is repeated six times, until our animation is completely finished. This was the easy way with the help of the animation wizard.
The second possibility consists of creating all 30 Frames by hand with the help of a pocket calculator to calculate how many degrees the head should move in each frame downward or upward. This method is far more time-consuming, however it's very suitable for practicing. We turn now to something new.
We have discussed creating our own animations, but now we need to learn the "structures" and characteristics of animations. It is very important to understand why for example a soldier in the SAS slot is not the same as another human enemy in Baddy 1 or 2 slots. For this purpose we are occupied now with the MeshTree Editor. You'll find the appropriate Button to open it in the lower right corner of the Animation Editor. After opening you should see this window:
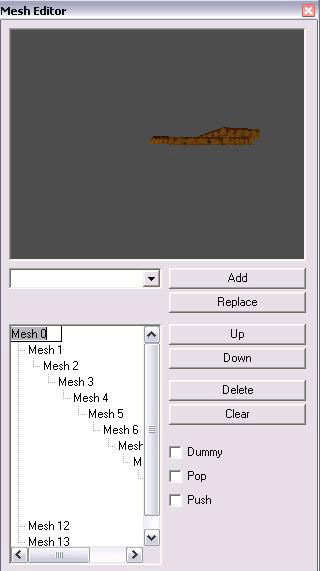
If you look more closely, at how the Meshes are connected, then this "list" will remind you of a 'Family Tree". Also, in the Mesh Editor you can specify, where each mesh stands in the relationship. This is very important for the animation, because if you rotate a mesh other meshes automatically also rotate. Also the logic behind it corresponds to a family tree. Beginning with Mesh 0 all other Meshes are connected amongst themselves. It's constructed like a genuine family tree with "children" and "parents". With the snake's mesh tree, Mesh 0 represents a "parent" to Mesh 1. Mesh 1 is therefore the "child". At the same time Mesh 1 is also again the parent of Mesh 2, which is again the child of Mesh 1. Thus it continues sequentially. Mesh 12 and 13 are finally again children of Mesh 0, they possess however no children. Why is this parent child relationship important?. Fundamentally a "child" always moves along and/or rotates with it's parent. In this case it would mean that all other Meshes move with movement and/or rotation of Mesh 0, because they are all "relatives' with Mesh 0, as one can recognize by the lines. If you rotated for example Mesh 7, the Meshes 8, 9, 10 and 11 also move, these are the "children", "grandchildren", "great-grandchildren" etc from Mesh 7 . All Meshes above Mesh 7 however do not move, since they are not children of Mesh 7, but "parents", "grandparents", "great-grandparents" etc.. Mesh 12, and 13 also do not move, they are related only to Mesh 0. It looks pretty complicated, but with time you'll be able to quickly move through a Mesh Tree. Altogether it is always advisable to study the Mesh Tree of an opponent before providing a new animation in order to understand better, which Meshes are to be connected and which not. In addition it is very important for authentic animations to provide a physically correct Mesh Tree. For example: you have a human opponent (Baddy etc.) and would like to raise its thigh. Now it is very importantly that the lower leg is a child of the thigh, otherwise it will not move. Likewise the foot must be a child of the lower leg, have you tried to lift your thigh while trying to keep your foot on the ground? It's impossible. The foot lifts up just like your thigh. Now, you know, what a Mesh Tree is and how it's constructed. However, how can you change it? Now the Buttons and check boxes at the edge come into the play. With the "ADD" Button you can add a further mesh to the object. This however is only used with Strpix. Therefore we'll leave this Button for now and come back to it later. The "Replace" Button doesn't appear to function as it usually crashes the program. With the "DELETE" button you can delete a selected mesh. With the "UP" Button one can shift a mesh in the family tree upward, and with the 'DOWN' Button " downward. Here it's important to note that not only the meshes in the list shift up and down, but also in the object itself. You will need to use the MOVE Button afterwards to put it back in the correct place. With the check boxes one can specify now whether a Mesh is a "child" or a "parent". Here one can ignore the Dummy Button. It allows Lara to have the dummy meshes in the LARA slot replaced with the correct meshes from the LARA_SKIN slot. If one would like to specify a Mesh as a "child", then leave the check boxes unmarked. If the Mesh should be marked as a "parent", then "Push" must be marked. The last box, "Pop", means return to parent level. If a mesh has a set of children, grandchildren etc and one now clicks the next mesh "Pop" on, then a line to Mesh 0 will form directly to this mesh. In the object this mesh will connect with mesh 0, if no other mesh above it in the mesh tree has the designation "Push". In order to clarify, open the Scorpion mip in the snake wad in the Animation Editor and open the Mesh editor. Click now on Mesh 19 and untick the "Push" box. Meshes 21, 22 and 23 aligned themselves previously with Mesh 19. Now Mesh 19 is no longer ticked in the "Push" box, the scissors of the Scorpion now align themselves with Mesh 17 because this is the next Mesh, which has push box ticked. Close the Mesh editor and view the result. Now use the 'Move'to reposition Meshes 21 and 24 back to the body. View one of the animations now, the Scorpion does not move correctly although we have the scissors attached again to the body. What has gone wrong? Now, we attached the scissors at the body again, but they depend on the animations of Mesh 17 because this is marked with "Push" and is the next "Push" Mesh-to-Mesh 21. You see therefore, it is not at all simple to generate a good mesh tree. Therefore you should always make yourself familiar with the original opponents if you intend to build a completely new opponent. The goal of this section was to explain, how the Meshes "react" with one another so that it can be taken into consideration during animating and so avoid unpleasant surprises. In theory there should be a balanced relationship whereby the number of 'Pop' meshes should equal the number of 'Push' meshes.
The other animation characteristics are not so complicated . Right beside the Frame selector you find a few fields (with the overview red borders). In addition, these are important for the building of opponents, as some have influence on the animation. So for example Speed: The number entered here determines the speed with which the object moves itself with the Animation playing. The higher the number, the faster the object moves. A good example is Lara. When normal running the speed value is 42. when sprinting it has a value of 82. The Acceleration field adds the given value to the object's speed for each frame of the animation. This is used for when objects start or stop moving (use a negative value to slow it down). Framerate value: The normal Framerate is 1. The higher the number, the more frames are calculated by the game engine between the defined frames (frames given in the animation editor). With 2 entered, the animation has 1 frame added between the defined frames, with 4 entered, the animation has 3 frames added between the defined frames, etc. You can use this to stretch the length of an animation. For example if you had a door that had an opening animation that lasted 1 second (30 frames), you could extend it to open more slowly by increasing the framerate to 4, The door would now take 4 seconds (120 frames to open). Make sure to adjust any existing animation commands and stateID changes (next section) when changing the framerate of the animation. The function of the stateID field will be discussed in the next chapter. The next animation field tells which animation the object will go to after the current animation, and the next frame field tells which frame the object will start with in that new animation.
Chapter 4: Advanced Animating - Animation Commands and StateIDs
It is time to learn about the red upper toolbar buttons, as well as the stateID numerical field near the bottom.
Animation commands can be used to perform the given functions below, during a specific animation. Each animation can have its own animation commands. You can access them by pressing the Edit Anim Commands Button (button with many 0's and 1's) in the upper toolbar. The dropdown menu on the left gives a function to select, and the fields on the right change depending on which function you choose. The possible functions are:
1. Set position - once the animation is complete, it moves the object by the specified values in the 3 fields, which are the x, y, and z axis, respectively. The values are the same as those given when you use the Move button on the object, except multiplied by 1000. This means 250 is equivalent to one click.
NOTE: Just like with moving objects, the y axis is upside down in the game engine. For example, to move the object up 4 clicks you would use the set position command (0,-1000,0).
IMPORTANT: Savegame files do not save occurrences of objects using set position commands except for those used by Lara, baddies, Von Croy or the guide. So for example, if you make a moving spike wall that uses this command it will reset at its original point whenever the level is reloaded.
2. Grab position - LARA object only. This sets up the curve of the jump for Lara, which is initiated once the animation is complete. The two fields are the height (y axis) and distance (z axis) respectively. Once again the y axis is upside down, so normally the height is a negative value.
It is difficult to determine how the height values work exactly. -100 is 6 clicks high and -110 is 7 clicks high, as these are used for Lara's current jumps. But 10 is not necessarily equivalent to a click. Using -70 still lets Lara grab ledges 4 clicks higher than her, as opposed to an expected 3 clicks of height if going by the values used above. The values might go by a mathematical function of a second degree or higher, meaning as we add clicks to Lara's height, less and less of an additional value would be needed to reach the next click. Either way, it will take some experimenting with this value to reach a desired height in terms of clicks.
For distance, the value 25 is equivalent to one square of a gap that Lara can cover, if she grabs the ledge of the opposite side. 50 is used for her standing jumps which cover 2 squares, and 75 is used for her running jump which covers 3 squares.
Make sure the animation using this command has the appropriate stateID, as noted under the stateID section.
3. Command 3 (unknown) - This command is actually known, at least for the LARA object. The game engine seems to keep track of whether Lara's guns are drawn or not, but sometimes this status gets buggy. Using this command, after the animation is complete Lara's gun status is restored so she can draw her guns. This command is missing from several TR4 animations, such as her pedestal pickup animations, her polejump animation, the animation where she gets off at the bottom of the pole, and her prizing objects off the wall animation. Notice that when you use these animations in-game, Lara can no longer grab ledges, crawl, etc. because the game thinks her guns are drawn (this was fixed in TRC). So if your animation has this bug occur, add command 3 to fix it.
4. Die - For baddies, it is for their death animation. It is, oddly enough, used for switches as well, to activate switch triggers when the animation completes.
5. Play Sound - this is used to make sounds heard when a certain frame in the animation is played. The first field specifies which frame makes the sound heard. The second field is a drop-down menu with the available sounds for the object. The third field is also a drop-down menu with these options:
a. Always - The sound is always played. You should choose this for any objects other than Lara.
b. On Land - The sound is only heard when Lara is on land.
c. On Water - the sound is only heard when Lara is walking/wading in a body of water.
NOTE 1: If the sound you wish to use is unavailable in the sounds list, add a sound by going to the Sound menu in the main editor window and selecting "add sounds". Check the sounds you wish to use and press "Add Selected".
NOTE 2: Sounds assigned to objects other than a few specially hardcoded slots (e.g. underwater door and switch) will not be heard if an object is used underwater (e.g. a standard door).
6. Play Effect - this is used to play a special effect when a certain frame in the animation is played. The first field specifies which frame plays the effect. The second field is both a text field and a dropdown menu, so you can either select from the given effects or type in your own custom effect number.
TIP: One such custom effect number to be aware of is effect #12, which is the same as the command 3 function noted above, except it occurs in the middle of the animation when the given frame is played. It is useful for Lara's pull-up animations.
TIP: The last two given effects - Play Step Sound for on land or on water - are used to play the texture sound (metal, sand, mud, etc.) that Lara is on, given that you have specified these sounds in the level editor.
If you have looked through any object's animations, you have probably noticed that each one has a stateID value assigned to it. A stateID is a value that asks the game engine to respond to the object's animations in a certain manner.
For the LARA object, a stateID can achieve multiple purposes, such as:
1. Allowing Lara to do what she does - applies to just about all stateIDs, the stateID tells the game engine what Lara is doing so that the game engine will let her do it. For example, stateID 71 (crouched) and stateIDs 80, 81, and 84-88 (for crawling maneuvers) all allow Lara to enter crawlspaces. Attempting to use a different stateID in a crawlspace causes Lara to glitch and get stuck standing up through the ceiling.
2. Manipulating the camera - some stateIDs change the camera angle to make things interesting. For example, stateID 25 for Lara's backjump makes the camera face Lara at an angle from the front instead of from the back, and stateIDs 36 and 37 for pushing and pulling blocks makes the camera move to the square on the left (if possible) to watch Lara. When you are making custom animations, you might want to consider manipulating the stateIDs to make some interesting camera angles for your animations, as long as they don't conflict with other stateID purposes.
3. Setting Lara's direction for jumps - The following stateIDs are for Lara's jumps: 3 for a forward jump, 25 for a backward jump, 26 for a jump to the right, 27 for a jump to the left, and 28 for a jump straight up. Each jump has two animations: the second one is the jump itself, while the first one is for setting the grab position command to create the curve of the jump. Whichever stateID this first animation has, determines the direction of the curve of the jump.
4. Determine how Lara reacts to the environment - most stateIDs have hardcoded behaviors that occur when Lara does certain things during a certain stateID. For example, stateID 1 for Lara's run allows her to fall off ledges, but stateIDs 0 (walking), 2 (approach standstill), 16 (walk backwards), and 21-22 (walk sideways) do not allow her to fall.
5. stateID changes - these are explained in detail below. Some stateIDs exist only to serve as stateID changes and not for any actual animations. An example of this is stateID 68 for when Lara flips from a forward to a backward jump or vice versa. In most other cases, the stateID associated with the target animation is used for the stateID change.
For other objects such as baddies and doors, the principle of stateIDs is the same, except points 2 and 3 above will never apply. Some objects (such as those in the ANIMATING slots) don't use different stateIDs, so the value is left at 0.
A list of Lara's stateIDs from TRs 1-4 is provided at the end of this chapter.
Some reactions during animations are hardcoded as noted above, but others are not. It seems that the object and the game engine hold a conversation of sorts using stateIDs. You now know how the object communicates to the game engine with its stateIDs. However, the game engine also sends stateIDs of its own for the object to respond to. This can happen for some of the changes in environment around the object, as well as, for the LARA object, almost all the button presses by the player. StateID changes are sets of values that allow the object to respond to these new stateIDs under specific parameters. Each animation can have its own set of stateID changes. You can see them in Wadmerger's animation editor when clicking on the State Change Editor Button ("1>2" button) in the upper toolbar. Each stateID change is structured of 5 values:
1. stateID - Sets which game engine's stateID for the object to respond to. See the IMPORTANT note below.
2. Low frame - Sets the lower boundary of the range of frames within which the object can respond to the new stateID. See the * note below.
3. High frame - sets the upper boundary of the range of frames within which the object can respond to the new stateID. See the * note below.
4. Next animation - The new animation for the object to use when responding.
5. Next frame - The frame to start on in the new animation.
IMPORTANT: The object's current stateID restricts which stateIDs the object can respond to. You cannot simply make up your own responses. For example, with the LARA object, pressing the sprint key while crawling does not generate any stateID from the game engine, so making a new stateID change with stateID 73 for her crouching animation would accomplish absolutely nothing. You would have to edit the game engine to make this work.
Some responses are even hardcoded for only certain animation slots. For example, notice how when Lara vaults a 2-click block, she can either start running from the vault or put her right foot down. This vaulting animation is stateID 2, but alas, if you try making another stateID 2 animation and allow her to optionally break into a run with a stateID change for stateID 1, it will not work. Animations 96 and 150 (grabbing thick and thin ledges or monkeyswing) seem to have hardcoded responses as well, they remain the same even if you delete them. Because of such things you have to keep an open mind and accept when a stateID change just doesn't work the way you want it to.
There are, however, some unused responses for some stateIDs and/or animation slots. For instance, Lara's standing still animation, anim #103 with stateID 2, can respond to stateID 73 for when the player holds the sprint key first before pushing forward. Notice that trying this sequence of keys in any official TR3-5 game brings no response at all from Lara, she is stuck because this stateID change is missing. So it might be worth a shot making a jump from one stateID to another even if you haven't seen it done before. Do not expect it to work, but if it does, then you've discovered a new stateID link.
*The low frame and high frame parameters typically cover the whole animation's frames, but they are more specific for any animation where an object switches from one foot to the other, such as walking or running. With these parameters you can make sure that, for example, when the object's animation is in the frames with his/her left foot on the ground, that his/her next animation is the one starting on the left foot, and not the one starting on the right foot. So this allows the animations to flow better.
When considering manipulating stateIDs and stateID changes, the best way to start is observing the already existing stateIDs and stateID changes in the object's animations so you can observe what the stateIDs do, and which stateIDs can lead to which new stateIDs. It is pretty safe to assume that the jumps from one stateID to the other that are used already are the only ones possible, but again there are some unused links you might find.
If you are going to make animations for your setup, you should hold off working on them until you know that your setup will work. Make some simple test animations with your stateIDs and stateID changes and give it a go in-game. You need to be able to experiment on your own to piece together a working setup, if one is possible for your intentions.
Here is a list of all of Lara's stateIDs from TRs 1-4 ("crouch" means her position on one knee, "crawl" means her position on both hands and both knees):
stateID 0 = walk forwards
stateID 1 = run (can
rotate left/right)
stateID 2 = stand still, or going into stand still
(player does not fall of edges)
stateID 3 = forward jump, or going
into forward jump (player can move left/right)
stateID 5 = hop
backwards
stateIDs 6 and 7 = turn in place
stateID 8 = death
stateID 9 = falling
stateID 10 = hanging onto ledge, or going up/down
ladder without feet
stateID 11 = mid-air grab (player does not bounce
off of walls)
stateID 13 = at a standstill underwater
stateID 14 =
letting go of rope in TR4? (not used)
stateID 15 = start a standing
jump
stateID 16 = walk backwards
stateID 17 = swimming
stateID
18 = Lara shooting through the water, Lara stops swimming
stateID 19
= pulling up (player cannot move; also used for start of death slide)
stateID 20 = turning? (not used)
stateIDs 21 and 22 = walk sideways
stateID 23 = roll in place
stateID 24 = slide foward
stateID 25 =
backwards jump
stateID 26 = side jump right
stateID 27 = side jump
left
stateID 28 = jump straight upwards
stateID 30 = shimmy left
stateID 31 = shimmy right
stateID 32 = sliding backwards
stateID
33 = swim on surface standstill
stateID 34 = swim on surface forward
stateID 35 = Jump into water
stateID 36 =
push forward
stateID 37 = pull backwards
stateID 38 = push/pull
standstill
stateID 39 = picking up an object
stateID 40 =
underwater switch, use lever switch, use push switch
stateID 41 =
reset lever switch
stateID 42 = key use
stateID 43 = puzzle use
stateID 44 = death underwater
stateID 45 = used for dive roll and
roll in place (not sure how it differs from 23)
stateID 46 = crushed
by boulder
stateID 47 = swim on surface backwards
stateID 48 =
swim on surface to left
stateID 49 = swim on surface to right
stateID 52 = swan dive or going into swan dive
stateID 53 = "death
mode" swandive (Lara can break her neck at this point), also used for
"swan flips" TR2 and on.
stateID 54 = handstand
stateID 55 = climb out of water, or go from wading to
standing in water
stateID 56 = standstill on ladder
stateID 57 =
climb up ladder
stateID 58 = climb left on ladder
stateID 60 =
climb right on ladder
stateID 61 = climb down ladder
stateID 65 =
wade forwards
stateID 66 = roll underwater
stateID 67 = pickup
flare, pickup underwater?, pickup in crouch? (there are duplicate pickup
animations that use both 39 and 67. Weird!)
stateID 68 = used for
player pressing roll during forward or backward jump (for reversing
direction)
stateID 70 = zipline
stateID 71 = crouched
stateID 72 = crouch roll
forward (not used)
stateID 73 = sprinting
stateID 74 = sprint roll
stateID 75 = grab paper-thin ledge, grab monkeyswing
stateID 76 =
monkeyswing forward
stateID 77 = monkeyswing shimmy left
stateID
78 = monkeyswing shimmy right
stateID 79 = monkeyswing turnaround?
(not used)
stateID 80 = crawl position
stateID 81 = crawl forwards
stateID 82 = rotate left monkeyswing
stateID 83 = rotate right
monkeyswing
stateID 84 = turn left in crawl position
stateID 85 =
turn right in crawl position
stateID 86 = crawl backwards
stateID
87 = pull up into crouch
stateID 88 = slip out from crawlspace
stateID 89 = used for many interactive objects in TR4
stateID 90 = rotate left rope, crowbar pickup
stateID 91 = rotate
right rope
stateID 92 = push giant button
stateID 93 = trapdoor
pull up
stateID 95 = use rotating switch (hypostyle hall)
stateID
96 = use cog switch
stateID 97 = use lever switch
stateID 98 =
reach-in-hole pickup
stateID 99 = standstill pole
stateID 100 =
climb up pole
stateID 101 = slide down pole
stateID 102 = rotate
left pole
stateID 103 = rotate right pole
stateID 104 = pull chain
switch
stateID 105 = turn left in crouched position
stateID 106 =
turn right in crouched position
stateID 107 = shimmy concave corner
to left (also with ladders)
stateID 108 = shimmy concave corner to
right (also with ladders)
stateID 109 = shimmy convex corner to left
(also with ladders)
stateID 110 = shimmy convex corner to right (also
with ladders)
stateID 111 = standstill rope
stateID 112 = climb up
rope
stateID 113 = swing rope
stateID 114 = start swinging rope
stateID 115 = go from ladder to shimmy position? (not used)
stateID
116 = Approach puzzle/pickup
stateID 117 = double doors
We have now covered all the essential elements of Wadmerger in this article. A better understanding can only be gained through use and experimentation with the tool.