NGLE New Buttons
by
Paolone
In General
Beta testing is perhaps the most important phase of any video game's
development. Whether you've spent a month or a few years on your
adventure, if you don't have it beta tested properly, all that work
could be ruined by one simple little gameplay killer. If you understand
the importance of beta testing, then read this tutorial carefully and
take it to heart. If you don't understand the importance of beta
testing, then read this tutorial carefully and take it to heart. I
cannot stress enough how important the beta testing phase is.
Room Type button
Room Type button is a multi-state button. Clicking it changes its function for the current room in the following manner:
Water - flooded/water room.
Snow - snow effect.
Rain - rain effect.
Q-Sand - quicksand effect. Lara can't swim nor breathe
DMG button
Damage button. Lara will lose health when she is in a Damage room.
Cold button
Cold button works in different ways according to the type of room set by the RoomType button. If the current room is a water room, Lara will lose health due to the cold like the Antarctica levels of TR3. In normal rooms Lara's breath will mist and be visible.
Move Lara Here button
This button moves Lara from any position in the map and places her on the selected square. Sometimes this can produce two Lara objects in your map but this is a rare occurrence. if it happens, simply delete one.
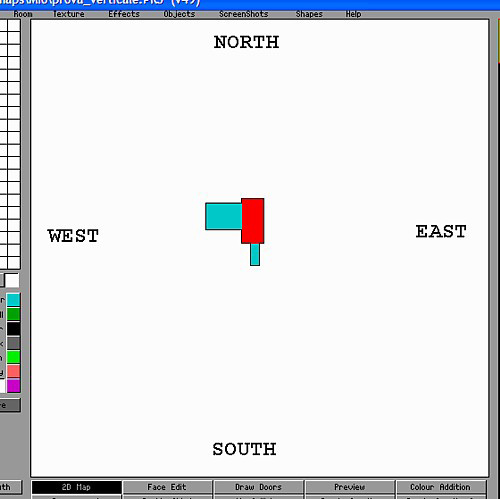
V2d Map button
V2d Map will show your level in different side elevations. When this button and default 2d Map button are pressed the background of the 3d panel will become yellow and you'll see the elevation of the rooms in your level.
In v2d mode you can move selected rooms, link rooms
and create portals. If the selected room (in red color) has doors you
can move all connected rooms using right mouse button and drag the group
to a new position.
If you perform a single click with right mouse
button, the rooms between the selected room and your viewpoint will
become transparent and you will be able to select a room using the left
mouse button behind any transparent rooms.

In the above illustration the selected room (red colour in figure A) is hidden behind other rooms. If you want to select a small room to the left of the current room which is not visible, right mouse click in the yellow (empty) zone of the 3d panel and all the rooms blocking your view will become transparent (Figure B). Now left mouse click on the small room to the left of the current room to select it (figure C).
Behavior of [+] [-] Room buttons in Vertical Map
When you work with vertical 2d map (yellow background in 3d panel) the behavior of [+]/[-] room buttons is different. Before explaining the new behavior, let's illustrate the old behavior.

If you click on [-] room button and the current room is linked to another room as above (fig A), you will get a step between the two rooms because only the current room is moved down (Figure B). In some circumstances this can be useful. However, when you want to move a group of connected rooms together, it can be quite tedious having to move them all separately and rejoin them again. Now with the NGLE you can use [+][-] room buttons to move a group of linked rooms by clicking on +/- room buttons when in vertical 2d map mode.
Cardinal Points button
To the right of the [V2d Map] button you'll find the button to change the cardinal view points of the vertical 2d map. The cardinal points are refered to as below.
Note that the above picture shows the common horizontal 2d map. The cardinal points button is a multi-state button which selects south, west, north and east in turn. For example, the map above will look like the following when viewed from the four cardinal points in V2d map view:

Exit & Play Button
This button automatically performs a very common
sequence of operations:
Saves current project and makes a silent
backup with filename starting BK_.
Performs an Output wad (to create
a TOM file for the current level)
Converts the Tom file to a TR4 file
Close Room Editor program
Start tomb4.exe to play the level.
This can save you a lot of time if you're constantly moving in and out of game during testing. When all the operations are complete, you'll hear the tomb raider music of your title level.
Hide Objects button
With Hide Object button you can remove temporarily
all items (moveables, statics and effects) from the current room. One
good use for this feature is to be able to texture without having to
work round a room full of objects. When you are done, always remember to
click this button again to show your objects.
Please note this
facility can cause problems by removing objects from your map if not
used properly. While objects are hidden using this feature, never add
new items in your current room or to any other room, never save
your project or output your WAD and never add
new triggers to the current room. Other problems can also arise if other
operations are attempted. The
only action you should contemplate doing while objects are hidden is to
add or change textures.
Advanced Search button
Clicking the Advanced Search button will bring up the Search window.
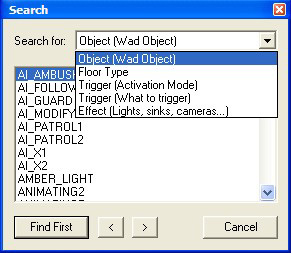
Select in the "Search for" combo list box for whatever category of item it is you're looking for and then select the specific item the main search window.
Previous (<) button
Search for a previous instance of any current item in
the project.
Following (>)
button
Search for a following instance of any current item
in the project.
Last Projects button
This shows a window with a list of your last edited project files. Project files will be sorted in chronological order but there is also an alphanumeric sorting facility which allows you to sort alphabetically. This feature makes locating previous saved projects a very simple task. You can use CTRL L as a shortcut for this feature.
Backup Project button
You can quickly save a backup of your current project with automatically applied progressive filenames. Project files will be saved in the same folder as the current project folder. Pleae note, the backup projects created with this button will be not inserted in the Last Projects list. For this reason it's not advisable to use this button to save primary project files but only for making quick and frequent backups while building.
Big Textures button
 Now
you can use bigger textures up to 256x256 pixels. To select a big
texture in the texture panel you must click on the Big Texture button.
When the Big Texture button is highlighted (with yellow or red color)
you can automatically select in the texture panel 128x128 textures and
manually select 256x256 textures using the right mouse button and
dragging to select.
Now
you can use bigger textures up to 256x256 pixels. To select a big
texture in the texture panel you must click on the Big Texture button.
When the Big Texture button is highlighted (with yellow or red color)
you can automatically select in the texture panel 128x128 textures and
manually select 256x256 textures using the right mouse button and
dragging to select.
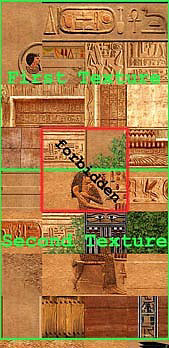
Note that the area where you select the texture is organized into grids of 256x256 pixels. Because of this you can't expand the selection to cover an area greater than 256x256 pixeld. You should see your texture map divided as in the left picture.
If you check the green boxes you can understand why you can't select a texture in the position shown by the red frame.
This makes it important to have an original tga map with a width of 256 pixels. The N WinRoomEdit works fine with tga maps with a width of 512 pixels, but if you have a 512 pixel wide tga map you'll have trouble adding big textures to the map because the original map will have been remapped to 256 pixels wide when you load it in WinRoomEdit.
In this instance, the texture rows will be interleaved in a different way in respect of the original tga file. To avoid this problem, you can reorganize your map to force a 256 pixel wide tga image in the original tga image. You can set this target using the MapConverter utility. See following paragraph.
Map Converter
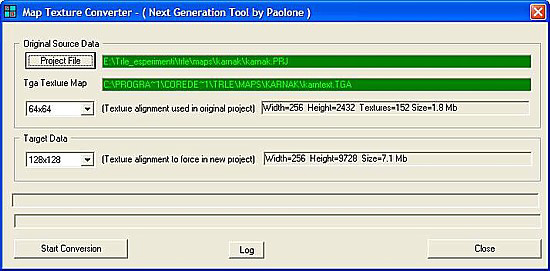
Map
converter is able to reorganize the texture map working directly on the
supplied project file.
You can use mapconverter to reach two
different targets:
Change ONLY the width of the tga map, preserving the project from position change of single textures
Resize all textures from 64 x 64 pixel to 128 x 128 pixels.
Change only size of tga file
If you want to change only the width of the tga file you have to select the value of 64x64 as Texture Alignment in Target data frame, exactly the same than Source alignment field. In this way the textures will remain with original size (64x64 pixels or less) but the tga file will be forced to 256 pixels wide.
Resize all textures to 128 x 128 size
To resize all textures, you set 64x64 pixel as source
and 128x128 as target. After this remapping your project will become a
v50 project (version 50). In v50 projects the default size for textures
is 128 x 128 pixels and it's possibile to have animated texture and
sound textures with this size and only this size (128x128 pixels).
Notes
It's not necessary to create a v50 project to use big textures. You can leave your project unmodified and add new big texture to other (previous) 64x64 textures. The advantage in using a v50 project is to force a default size for textures of 128x128 so you can have animated textures of that size. With v49 projects you can't animate big textures.
There is a bug in project remapping when creating a v50 project. When your tga map has already reached the max (old) size (256 textures, 64x64 pixels), the new tga map will reach the max height of 16383 pixels instead of reaching the correct size height of 16384 pixels. That last missing pixel row will be ignored. To correct the bug you have to load the tga map in your image editor (Photoshop, Paint shop pro etc) and add another pixel row to reach the height of 16384 pixels).
VERY IMPORTANT NOTE: if you want to create a v50 project (128x128 pixels for texture) it's not sufficient to simply use map converter to have new super defined textures! Mapconverter resize your old textures from 64x64 to 128x128 pixels but this operation doesn't increase the effective resolution of textures because each old pixel will become a 2x2 pixel frame with the same colour. To have an effective increase of resolution (and detail) you should load a new tga map and substitute the "fake" 128x128 pixel textures with new real 128x128 textures.
Rotate Object button
This button permits you to rotate any selected object in the map. This is an extremely useful feature because with smaller objects it can be difficult to select it with the mouse pointer and rotate it. You can also use the shortcut CTRL F to rotate objects.
Go Back Old Room button
In the NGLE there is a new method to quickly navigate between rooms. Everytime you edit a room, the index of that room will be saved in a circular list as a checkmark. To go to a previously edited room in the circular list just click this button (or use shortcut 'g'). The last 10 edited rooms will be stored. Other keys to handle this feature are:
CTRL G : go to following room in circular list. (while 'g' goes back to previous edited room)
'm' : Mark current room as edited room and insert it in circular list.
'u' : Unmark current room as edited room and remove it from circular list.
Screenshots Menu
From the Screenshots menu you can choose different
zones to capture from the NGLE screen. Screenshots will be saved in RLE8
(*) format, which is a very compact bitmap format. In many instances the
bmp files will be smaller than if they had been saved as jpg files.
The only case where the quality of this bmp format could be poor is
when you capture screenshots in the preview zone. For this reason there
is also a "Preview Zone RGB". The RGB bitmap has a bigger size and
colour quality will be perfect.
Using RLE8 bitmaps you can
directly access the screenshots to post them on forums or websites.
All screenshots in this html page have been created with screenshots
menu.
(*) RLE8: 256 palette colours, 8 bit with no loss of
compression.