
Von Croy
by
AkyV
1. The route of
Von Croy
2. OCB Codebits
3.
Cutscenes
4.
More than 1 Von Croy
5.
Memory zones
If you want to use Von Croy in your level, then you need the VON_CROY
object and his MESHSWAP1 in your WAD. You can find both in the original
WAD of the 'Angkor Wat' TRLR level.
But no, you don't need to use the young Lara in your level to use Von
Croy there. So that is not the same, compared to what you saw in 'Angkor
Wat'. I.e. the adult Lara and Von Croy will work perfectly together in
the same level. (But use a NEF_NON_TARGET flag on the immortal Von Croy
by an Enemy Script command or else the adult Lara will aim at him.)
Attention!
Von Croy's setup will
work properly only if your level is the first level of the game (i.e. if
it has the first [Level] block of the Script).
Note:
Maybe you think you can pretend that your non-first level is the first
level (so that you can use Von Croy there perfectly), if you force Value
1 in this Code Memory Zone field, till the next level jump: Current
Level number (more updated than savegame memory) (Byte). Unfortunately,
as my experiences indicate, this is not true.
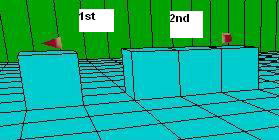
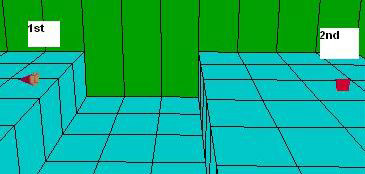
1. THE ROUTE OF VON CROY
It works the same way, as you've probably learned at the GUIDE:
I.e. place the VON_CROY object on a floor square that has an AI_FOLLOW
object. The AI_FOLLOW must have Value 0 in the window of its OCB panel.
- Then place another AI_FOLLOW object with Value 0, too. Then place
further AI_FOLLOW objects, having 1, 2, 3, 4 etc. numbers in their OCB
windows - only one AI_FOLLOW per number now, differently from the two 0
AI_FOLLOWs. (Place all the AI_FOLLOW's wherever you want.)
When we activate Von Croy then he will appear where he is placed,
drawing his knife at once. Then we will use F30 triggers to move him
between the AI_FOLLOW objects.
Each F30 is connected to the AI_FOLLOW that has the same number. This
number must be typed both in the Timer window of the trigger and the OCB
panel window of the AI_FOLLOW. Activating F30 having 0 in the Timer
window will send Von Croy from the first AI_FOLLOW having 0 in the OCB
window to the second AI FOLLOW having 0 in the OCB window, activating
F30 having 1 in the Timer window will send Von Croy from the second
AI_FOLLOW having 0 in the OCB window to the AI FOLLOW having 1 in the
OCB window etc.
This is what we need to know about Von Croy moving between two
AI_FOLLOW's:
1. Von Croy always tries to find the shortest way.
Notes:
a, If he can't find any way between two AI_FOLLOW's then he goes to
Lara, and wherever she goes, he will try to follow her tightly.
b, If the path between two AI_FOLLOW's is too complicated then Von Croy
may try to find some shorter way - even if that does not exist so he can
be stuck this way. Maybe he starts walking-running around a big part of
the map, seemingly without any purpose.
c, When Von Croy searches for the shortest path then he will detect Lara
as an obstacle in his way. He may stop in his tracks - temporarily -
when bumping to her.
d, Sometimes Von Croy can choose between two or more shortest ways if
there aren't big differences between the lengths of the paths. So, if
you play the level first then maybe he will choose Path A, but when you
play the level at the second time then maybe he will choose Path B.
e, When we say 'shortest' then that also includes the horizontal and the
vertical moves.
2. If the path or a part of it is short then Von Croy will walk. (So he
will walk between two AI_FOLLOW's if they are close to each other. Or,
for example, he will walk between two AI_FOLLOW's, if they are not so
close to each other, but there's a ledge between them on which Von Croy
have to climb up, and the distance between the ledge and any of those
AI_FOLLOW's is short.)
If the path or a part of it is longer, then Von Croy is always walking
first for a short time then starts running, and brakes when reaching the
'destination' AI_FOLLOW. - And that is the reason for the permanent walk
on short distances: Von Croy doesn't have enough space for a 'running
then braking' animation.
(Sometimes he 'brakes' later than it's needed, and stops a bit farther
from the AI_FOLLOW. It is not a problem, the game will fix it -
adjusting him to the AI_FOLLOW - if it is needed.
Though, it could be even a huge problem if the fixation is a bit
complex. For example, the AI_FOLLOW is on a ledge, but he will slide off
into the pit when braking. Now he'll probably climb back on the ledge -
but his movements will probably be distracted, so his route may be
broken.)
3. If he reaches the 'destination' AI_FOLLOW, Von Croy will always turn
towards Lara and waves to her to come.
4. You can change Von Croy's basic behavior (between two AI_FOLLOWs or
at the 'destination' AI_FOLLOW) to do some special activity, if you use
OCB codebits at the AI_FOLLOWs. (See more about it below.)
5. Von Croy will jump over gaps or shimmy or climb higher ledges
(on/off) or use switches if you use OCB codebits at AI_FOLLOW's.
6. Von Croy will cross ledges, if the vertical distance between two
adjacent ledges is not more than 4 clicks. If this distance is 1 click,
the he will step up on/down from that. If it is 2, 3 or 4 clicks then he
will climb up on/down from that.
7. Von Croy will go up/down slopes, if the vertical distance between the
lower and the higher point of the slope is maximum 2 clicks. (If the
slope is perpendicular to his route then this 2 clicks is also the
limit. - For example, if the slope lower end is 3 clicks higher than Von
Croy but the higher end is 5 clicks higher than him then 4=(3+5)/2, so
it is calculated as a 4 clicks height ledge, so Von Croy can climb on
it. But if the values are eg. 4 and 6, then he can't climb on it,
because it is calculated as a 5=(4+6)/2 clicks height ledge, though the
difference of the slope is still 2 clicks.)
8. Von Croy will use monkey bars if he is on a square that is marked by
the Monkey button, and you activate an F30 that will send him to another
AI_FOLLOW that is also on a square that is marked by the Monkey button.
So he will put away his knife, jump up, grab the bars, swing to the
'destination' AI_FOLLOW, fall there, and - not drawing his knife again -
starts waving to Lara to come. But only if
a, this is the shortest way between the two AI_FOLLOW's (or else he will
choose another path), and
b, all the squares of the way are marked by the Monkey button (or else
he can't use this path), and
c, the vertical distance between the floor square of the AI_FOLLOW and
the ceiling square above that must be exactly 6 clicks or else Von Croy
will be stuck at that AI_FOLLOW.
Notes:
a, He will swing from one ceiling to another even if the vertical
distance between them is huge. But that is illogical, of course.
b, If the gap is not too wide so it can be crossed by a jump, but you
set it up to cross it by monkey swinging then Von Croy may be stuck
there.
9. Von Croy won't climb ladders or won't crouch/go on all four or won't
swim.
10. Von Croy will step into water or quicksand pools (and get out of
them) if they are not deeper than 1 click.
11. Von Croy won't step into the areas that are marked by the grey Box
button.
12. Von Croy won't detect the collision of Moveable or Static objects.
(Definitely there are one or more exceptions. Doors are one of them.)
13. Either he's going between two AI_FOLLOWs or standing at an
AI_FOLLOW, Von Croy - interrupting his route - will attack enemies with
his knife if they are too close to him (I think, 'too close' is about 3
squares now, horizontally). Now Von Croy tries to keep this distance, so
if the enemy goes further from him, then he will follow the creature. If
he has killed the enemy then he goes back to his route.
Notes:
a, If he put away his knife before, because of the monkey swing, now he
will draw it again.
b, He will interrupt his route even if he can do it only in a
complicated way: for example, he will swing back on the monkey bars to
fall down at where jump up to the bars, to get the enemy.
c, If he loses the track of the creature then Von Croy will go back to
his route without hurting/killing him.
d, Let's suppose Von Croy is going to AI_FOLLOW having 8 or he is there.
If an enemy is near him, then he attacks that. If Lara activates now the
flipeffect that sends him to AI_FOLLOW having 9 then he will go to
AI_FOLLOW having 8 (!), leaving the enemy alone. After that two cases
are possible: one of them is Von Croy will come back to the creature to
kill that, then he will go to AI_FOLLOW having 9. Or, if he lost the
track of the creature, then he will just follow the order of the
flipeffect.
14. Von Croy will activate HEAVY type triggers at an AI_FOLLOW when he
just reaches that AI_FOLLOW. Or, he will activate any HEAVY type
triggers anywhere on his way, if you use a NEF_EASY_HEAVY_ENABLING flag
on him by an Enemy Script command.
However, it's highly recommended to use NEF_EASY_HEAVY_ENABLING, even if
you want to activate HEAVY triggers only at AI_FOLLOW's, otherwise
performing some special procedure of Von Croy may kill each HEAVY
trigger of him that haven't been activated yet.
15. Von Croy won't stop permanently at an AI_FOLLOW if you didn't use an
F30 for that AI_FOLLOW. I mean, if you skip an F30 for that AI_FOLLOW,
but use an F30 for the next AI_FOLLOW, then Von Croy will go permanently
to that next AI_FOLLOW, skipping the permanent stop at the AI_FOLLOW
that belongs to the skipped F30. (So, for example, Von Croy is at
AI_FOLLOW with 5. Lara activates an F30 with 7. Von Croy starts -
walking then running - and reaches AI_FOLLOW with 6 in the shortest way.
Then he starts at once - walking then running - and reaches AI_FOLLOW
with 7 and stops there till activating the next F30.)
By the way, 'skip' means either if you didn't place that F30 or if you
placed that but didn't activate that. (Or, maybe, if you activated that
but then you activate an F30 with a bigger number before Von Croy
reaching the AI_FOLLOW with the lower number.)
Let's see an example:
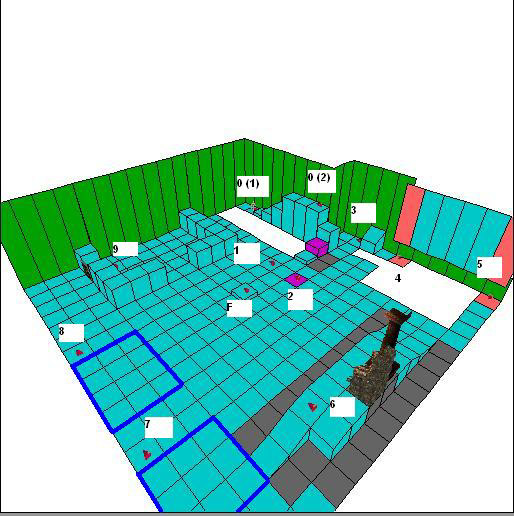
Von Croy is placed at the first AI_FOLLOW having 0. Lara triggers him so
he will appear there, drawing his knife at once.
Then Lara triggers an F30 having 0. At the left side of Von Croy there's
a wall, and at the right side of him there's a gap so he starts climbing
the ledges in front of him (because there is no other way) to reach the
second AI_FOLLOW having 0 on the top of the blocks. (He walked all the
way, because the path is divided into short parts because of the short
ledges.) He starts waving to Lara.
Then Lara triggers an F30 having 1. Von Croy climbs down the steps to
walk the AI_FOLLOW having 1 (so won't run at all because of the short
path parts), and starts waving to Lara there. Meanwhile he crosses the
magenta step, that is a HEAVY trigger, so - thanks to the
NEF_EASY_HEAVY_ENABLING flag - he will ignite a flame emitter (F). (We
want him to go down the steps all the way. But the shortest way - as I
experienced in the game - is if he climbs down aside from the magenta
step, and goes straightly to the AI_FOLLOW having 1, avoiding the last
step. That's why there are Box squares there: now he can't climb down
aside there, and won't avoid the last step to reach that AI_FOLLOW.)
Then Lara triggers an F30 having 4. First, Von Croy walks to the
AI_FOLLOW having 2. (Though, the path wasn't divided now, he didn't run
because the distance was too little to run and brake on this short
path.) There's a HEAVYANTITRIGGER at the AI_FOLLOW, to put out the
previous flame. (We don't need a NEF_EASY_HEAVY_ENABLING flag to
activate HEAVY triggers at AI objects, so Von Croy will activate that
trigger even if you don't use that flag.) He stops at that AI_FOLLOW
only for a moment, then continues his way (between the gap under the
monkey bars and the two Box squares) to the AI_FOLLOW having 3 - first
walking, then running. He stops there only for a moment, then climbs up
on the block in front of him. (The block is slanted, but the slope is
perpendicular to the path.) He climbs down on the other side, and walks
to the AI_FOLLOW having 4. He starts waving to Lara.
Then Lara triggers an F30 having 5. Von Croy puts away the knife, jumps
up to grab the monkey bars and, above the gap, swings to the other side,
where the AI_FOLLOW having 5 is. He falls down, and starts waving to
Lara. (He chose the monkey bars between these two AI_FOLLOW's because
the path around the gap would be longer.) (Note: the monkey bars above
the gap are marked on the floor of the gap.)
Then Lara triggers an F30 having 6. The AI_FOLLOW having 6 is on the
near ramp, so Von Croy walks then runs there. We want him to do that by
going all the way on the ramp. That's why we used those Box squares at
both side of the ramp: without them, Von Croy will go to one side of the
ramp, climb up, and go to that AI_FOLLOW. (The Box squares below the
objects on the ramp are necessary, or else Von Croy can cross them, not
detecting their collision.) He starts waving to Lara.
Then Lara triggers an F30 having 7. Von Croy starts walking (then
running) down the other end of the ramp, crosses the water pool (which
is only 1 click deep) to the AI_FOLLOW having 7. He starts waving to
Lara.
Then Lara triggers an F30 having 8. Von Croy starts walking (then
running), around the other pool that is 6 clicks deep, so he cannot
cross that. Reaching the AI_FOLLOW having 8, he starts waving to Lara.
Then Lara triggers an F30 having 9. Von Croy starts walking (then
running) towards the AI_FOLLOW having 9. The blocks around that are too
high (5 clicks), so he can't climb over them. He has two choices:
through the open part in the middle of the blocks or through the door
(which is next to that AI_FOLLOW). The shortest path is if he chooses
the door, so he will go towards there. Lara will open the door before
Von Croy reaching there, or else Von Croy will be stuck at the closed
door and will get through only if Lara opens the door after that.
Reaching the AI_FOLLOW having 9, he starts waving to Lara.
Special things to know:
1. You should place the AI_FOLLOW's exactly on the floor. Place them
anywhere else only if I say that in this tutorial.
2. Maybe you want to re-edit the route, saying, you don't need AI_FOLLOW
having 7 any more, so you'd like to remove it, sending Von Croy from
AI_FOLLOW having 6 straightly to AI_FOLLOW having 8. If you do like that
then Von Croy will go to Lara (after leaving AI_FOLLOW having 6) and
follows her tightly, whatever you do.
The only possibility to skip using an AI_FOLLOW between the adjacent
AI_FOLLOW ID's if you are using cutscenes - see more about it below.
(Don't misunderstand: in this tutorial 'AI_FOLLOW ID' never means the
object ID you can see between brackets. Now ID means the number you
typed in.)
3. Von Croy can leave his starting AI_FOLLOW without Lara activating an
F30 trigger having 0 in the Timer window. All that Lara must do for that
is to go close enough to him. ('Close enough' in this tutorial means
'maximum in five squares long distance horizontally'.) He will go to the
next AI_FOLLOW now, or - if that AI_FOLLOW is not close enough to him -
then just walks (never runs!) towards that till Lara is not close enough
to him. He will continue his route if Lara will get close enough to him
again. (If Von Croy starts this way from the starting AI_FOLLOW then
maybe he will go up to Lara and stop where she is just standing - if
Lara is closer than that newer AI_FOLLOW. He will probably stick to Lara
this way till he will get close enough to that newer AI_FOLLOW.)
When he's between (the way like that) the two AI_FOLLOW'S then use that
F30 to move him in the proper way to the AI_FOLLOW with 0 (or use
another F30 with a bigger number to move him further, skipping that
AI_FOLLOW).
4. If Von Croy reaches the second AI_FOLLOW with 0 in the OCB window
without triggering F30 with 0 in the Timer window, then he will not
present any activity there till we activate that F30. (Or activate an
F30 with a bigger number instead, moving him further.)
(So, as you see, if Von Croy reaches the new AI_FOLLOW without an F30
that doesn't mean actually he reached that AI_FOLLOW because he doesn't
act in a 'normal' way there. We need an F30 to that AI_FOLLOW so the
game will realize Von Croy is really there.)
5. Each F30 can be activated more than once. - If you want to know why
it is important then see the next remark. (So you should use 'One Shot'
if a problem appears because of this multiple usability.)
6. Be careful! If you activate an F30 that has a less ID number than the
F30 of the AI_FOLLOW at which Von Croy just is or for which he is just
heading, then this is what happens:
a, If he is at that AI_FOLLOW then he drops any activity until we
activate the F30 of the AI_FOLLOW (to accept the proper activity again)
or an F30 with a bigger number (to send him further).
b, If he is heading for that AI_FOLLOW then he will act exactly the way
he acts when we move him from the starting AI_FOLLOW with 0 without
activating an F30 trigger. Until we activate an F30 (to send him
further) that has a bigger number than any AI_FOLLOW's that he's left.
Now 'heading' means either if he is heading for there because of an F30
having sent him there or he's crossing this AI_FOLLOW though he has been
sent to the next AI_FOLLOW by an F30.
7. Von Croy will never move to an AI_FOLLOW if that has a less ID number
than the AI_FOLLOW where he is just located. - So eg. you can't send him
from AI_FOLLOW having 17 to AI_FOLLOW having 16.
But, when you send him from AI_FOLLOW having 15 to AI_FOLLOW having 17
but you activate F30 having 16 before Von Croy crosses AI_FOLLOW having
16, then he will stop permanently at AI_FOLLOW having 16, as if F30
having 17 hadn't been activated yet. - And it doesn't matter if F30
having 16 has been activated before or not.
8. At his starting AI_FOLLOW, Von Croy will face the way he has been
placed, independently of the direction in which the AI_FOLLOW below him
faces. And probably it doesn't really matter that in which direction the
other AI_FOLLOW objects are facing. I.e., for example, if he's reached
the AI_FOLLOW from southwest, facing northeast, then he remains facing
northeast everyway there - and then, he will turn to Lara to wave to
her. (But the facing of the AI_FOLLOW's could be important with the
special activities.)
9. It's hard to tell in which direction Von Croy will look. It is mostly
Lara, but in some special situations it could be the next AI_FOLLOW to
which he is just (or will be) approaching. Sometimes (I think if he
can't turn his head into the given direction) he's just looking
straightly forward or maybe towards the Room Editor position of Lara.
(And you should examine the special activities if you want to know in
which direction he will look, if he performs any of those activities.)
10. Activating an F30 before Von Croy coming to life, he will start to
go there at once (if it is the F30 you activated last) when coming to
life.
11. F30 triggers can be activated in any way: by directly Lara, by a
switch, by a HEAVY trigger etc.
12. If you want to see the timer on the top of the screen (just as in
the original TR4 level 'Race for the Iris') when Von Croy is moving,
then type this in the Script:
Timer= ENABLED
Then use F86 trigger to show/start the timer or turn it back into 0 (in
'show' mode) or stop/remove it (in 'hide' mode).
And you can find conditions (local or global triggers) to study the
value in this timer.
13. If your level is not the first level then probably I'm not wrong if
I say that's what Von Croy can do:
- He can be sent by F30 triggers from one AI_FOLLOW to another one.
- He will perform any animation (eg. even climbing up on blocks etc.)
that is needed to move him further.
- He will use OCB codebits correctly.
And that's what he cannot do:
- He won't wave to Lara.
- He won't react (i.e. move further) when Lara is near.
- His alignment is a bit ugly. (See when he must brake at AI_FOLLOW's.)
- He can't use cutscenes.
14. See TRNG features if you want Von Croy to do more than you read in
this tutorial. (For example, try to force an animation on him by ACTION
triggers, use special conditions on him etc.)
2. OCB CODEBITS
Notes:
1. You shouldn't switch on OCB codebits at an AI_FOLLOW if Von Croy
starts a special action there without OCB codebits on. (For example, if
he starts monkey swinging there.)
2. As I wrote above, sometimes the nearness of Lara is a condition to
define for Von Croy how to move.
As you'll see below, the 'nearness condition' (though, sometimes in
another format) also exists in other cases, for example, with OCB
codebits being switched on. If Von Croy won't react in the way I wrote
below (so if the 'nearness condition' won't move him, though it should)
then activate an F30 to move him.
(I don't really understand this bug. Sometimes it happened for me after
I launched the game at the first time, but didn't happen after I
launched the game at the second time. So this bug may occur,
independently of you re-edit your level or not.)
Codebit 1
If you place an AI_FOLLOW having OCB Codebit 1 on then Von Croy will
shimmy there. In fact, you need three AI_FOLLOW's there, in the way like
this:
Place the first AI_FOLLOW (having OCB Codebit 1 on) where he will jump
up to grab the ledge. - Conditions:
- The peak of the pyramid of AI_FOLLOW has to face in the opposite
direction, compared to where the wall of the ledge is.
- The ledge here has to be exactly 6 clicks higher than the floor from
which Von Croy will jump up. (All the path of the shimmying must be flat
and horizontal.)
The second AI_FOLLOW is also at the wall of this ledge, somewhere
farther. This AI_FOLLOW must be exactly at the same vertical position in
which the first one is. This AI_FOLLOW marks the point where Von Croy
stops shimmying and climbs up on the ledge. (The facing of the pyramid
is not important. And there's no codebit on now.)
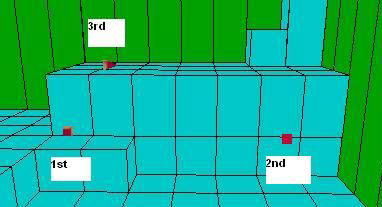
The third AI_FOLLOW could be anywhere on the ledge or near that. This is
the point to which Von Croy will go, having been climbed up on the
ledge. (The facing of the pyramid is not important. And there's no
codebit on now.)
So, Von Croy has arrived to the first AI_FOLLOW, by an F30. Till an F30
sends him further, he will just stand there, not really showing any
activity. (I mean, he will wave to Lara if she's closer to him
horizontally than 3 squares.) When an F30 to the second AI_FOLLOW has
been activated, he jumps up, grabs the ledge, and shimmies. Reaching the
second AI_FOLLOW, Von Croy will climb up on the ledge.
Now he will act exactly the way he acts when we move him from the
starting AI_FOLLOW with 0 without activating an F30 trigger. (So he will
move only if Lara is near.) But if we activate an F30 to send him to the
third AI_FOLLOW, then he'll go there and starts waving to Lara to come.
Note:
Experimenting with the direction and distance of the shimmying (i.e.
with the horizontal position of the second AI_FOLLOW along the wall) you
will experience that Von Croy can shimmy only rightwards (so he can't
leftwards) - without the ability of the shimmying around corners -, or,
placing the AI_FOLLOW exactly on the square of the first AI_FOLLOW, he
won't shimmy but grab the ledge and climb up right away.
Codebit 2
If you want Von Croy to climb off a ledge which is higher than 4 clicks
then you need to switch on Codebit 2 on the OCB panel of the AI_FOLLOW.
In fact, you need two AI_FOLLOW's there, in the way like this:
Place the first AI_FOLLOW (having OCB Codebit 2 on) where he will jump
off the ledge. - Conditions:
- The peak of the pyramid of AI_FOLLOW has to face in the opposite
direction, compared to where the edge of the ledge is.
- The floor of the gap where Von Croy will land have to be exactly 8
clicks under the floor from which he will fall down, or else he will
have some animation problem or malfunction.
The second AI_FOLLOW could be anywhere in the gap or near that. This is
the point to which Von Croy will go, having been fallen down into the
gap. (The facing of the pyramid is not important. And there's no codebit
on now.)
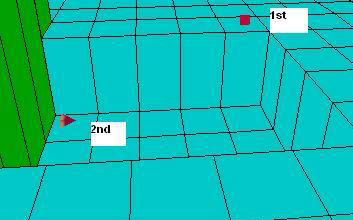
So, Von Croy has arrived to the first AI_FOLLOW, by an F30. He will face
the gap. While Lara is further from him than 3 squares horizontally he
doesn't perform any activity. If Lara is in the right distance, he will
fall down into the gap.
Now he will act exactly the way he acts when we move him from the
starting AI_FOLLOW with 0 without activating an F30 trigger. (So he will
move only if Lara is near.) But if we activate an F30 to send him to the
second AI_FOLLOW, then he'll go there and starts waving to Lara to come.
(If the second F30 is already active when Von Croy reaches the ledge,
then he will fall down automatically.)
Codebit 3
If you want Von Croy to use a switch then you need to switch on Codebit
3 on the OCB panel of the AI_FOLLOW. In fact, you need two AI_FOLLOW's
there, in the way like this:
Place the first AI_FOLLOW against the wall where he will use the switch.
The peak of the pyramid of AI_FOLLOW has to face in the opposite
direction, compared to where the wall is. - And place one HEAVY triggers
and one or more TRIGGERs below the AI_FOLLOW. Those triggers will be
activated when Von Croy uses the switch.
The second AI_FOLLOW could be anywhere near that. This is the point to
which Von Croy will go, having used the switch. (The facing of the
pyramid is not important. And there's no codebit on now.)
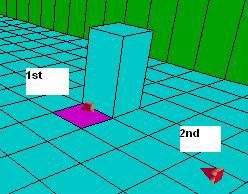
So, Von Croy has arrived to the AI_FOLLOW, by an F30. While Lara is
further from him than 3 squares horizontally he doesn't perform any
activity. If Lara is in the right distance, he will perform an 'I'm
using a switch' animation. - No, there is no switch in front of him, on
the wall, this time. Only the texture tile on the wall looks as if there
were a switch there.
Now he will act exactly the way he acts when we move him from the
starting AI_FOLLOW with 0 without activating an F30 trigger. (So he will
move only if Lara is near.) But if we activate an F30 to send him to the
second AI_FOLLOW, then he'll go there and starts waving to Lara to come.
(If the second F30 is already active when Von Croy reaches the 'switch',
then he will use it automatically and then continue his way to the
second AI_FOLLOW at once.)
But we have two problems with that setup:
1. As I said above, we probably need a NEF_EASY_HEAVY_ENABLING everyway
for Von Croy's HEAVY triggers. But if we do that he will activate the
HEAVY when he reaches the AI_FOLLOW, so before he performs the
switch-using animation.
2. Naturally this is a 'fake' switch. But what we can do to make him use
a 'real' switch? And if we also want Lara to use that?
We have the same solution for the two problems. (But, first of all,
let's suppose Von Croy's switching animation fits one switch at least -
and, for example, it is a switching-on animation for the classic lever
switch on the wall. Because, if you look at that thoughtfully then you
will see Von Croy's switching animation is special, none of the present
switches fits that. - Let's use the wall switch of Citadel Gate original
TR4 level this time.)
Let's suppose this time we have a door we want to open/close with that
switch, in any of these cases:
Case#1. Von Croy is the first at the switch. He switches that on, then
walks away. Later, Lara can go up to the switch to switch that off, and
(later or now) switch that on again etc.
Case#2. Lara is the first at the switch. She switches that on. But
(later or now) switches that off again, so when, more later, Von Croy
goes up to the switch, then he can switch that on again.
Preventing the setup from being disturbed, do not let Lara and Von Croy
be there at the switch at the same time!
And that's what we'll do now:
A, In WADMerger:
We'll have more or less problems, if we use a switch object as a 'real'
switch, that's why we will use an ANIMATING now (ANIMATING1) as the
switch object. So:
- we place the wall switch into ANIMATING1 slot, and
- we adjust all the StateID's at ANIMATING1 into 0.
B, Then, in Room Editor, re-editing the 'Codebit 3' setup:
Place the switch on the square of the AI_FOLLOW. Against the wall, where
the 'switch texture' should be. (But we don't need that texture this
time, we'll remove that.) All the switch codebits must be on, so the
switch will be 'active' when the level starts. (Nothing will happen, if
the switch is active when the level starts, because the starting
animation of all the ANIMATING objects is Animation0, and the Animation0
of this switch is a one framed loop animation, showing constantly the
non-triggered - 'switched-off' - state of the 'switch'. But we need to
trigger the ANIMATING now, because we force animations on the ANIMATING
later, but we couldn't force any animation if the object isn't
triggered.)
Then, delete all the triggers below the AI_FOLLOW.
Then place that door. (Without placing any triggers that opens or closes
it!)
(Let's suppose, Von Croy has ID137, the 'switch' has ID155 and the door
has ID150 now.)
C, And this is what goes to the Script:
GlobalTrigger= 1, IGNORE, GT_CONDITION_GROUP, IGNORE, 1, 2, IGNORE
TriggerGroup= 1, $5000, 137, $36, $2000, 256, $850, $2000, 256, $1851,
$8000, 80, $28, $8000, 81, $128
Parameters= PARAM_BIG_NUMBERS, 179, 21
TriggerGroup= 2, $5000, 155, $20F
GlobalTrigger= 2, IGNORE, GT_CONDITION_GROUP, IGNORE, 3, 4, IGNORE
TriggerGroup= 3, $9000, 155, $15
TriggerGroup= 4, $5000, 150, $2C
GlobalTrigger= 3, IGNORE, GT_CONDITION_GROUP, IGNORE, 5, 6, IGNORE
TriggerGroup= 5, $9000, 155, $115
TriggerGroup= 6, $5000, 150, $2B
GlobalTrigger= 4, IGNORE, GT_CONDITION_GROUP, IGNORE, 7, 8, IGNORE
TriggerGroup= 7, $8000, 1, $10, $9000, 155, $15, $8000, 8, $10D, $8000,
103, $1E
MultEnvCondition= 1, ENV_ITEM_TEST_POSITION, 1, IGNORE, ENV_FREE_HANDS,
IGNORE, IGNORE
TestPosition= 1, TPOS_TEST_ITEM_INDEX, 155, -100, 100, -100, 100, 320,
350, -2000, 2000, -200, 200, -200, 200
TriggerGroup= 8, $2000, 77, $3F, $5000, 155, $20F
GlobalTrigger= 5, IGNORE, GT_CONDITION_GROUP, IGNORE, 9, 10, IGNORE
TriggerGroup= 9, $8000, 1, $10, $9000, 155, $115, $8000, 8, $10D, $8000,
103, $1E
TriggerGroup= 10, $2000, 77, $40, $5000, 155, $30F
GlobalTrigger= 6, IGNORE, GT_CONDITION_GROUP, IGNORE, 11, 12, 13
TriggerGroup= 11, $8000, 63, $1E, $8000+TGROUP_OR, 64, $1E
TriggerGroup= 12, $2000, 51, $0
TriggerGroup= 13, $2000, 52, $0
The script has a part of Von Croy, a part of Lara, and a common part.
a, COMMON PART
GlobalTrigger= 3, IGNORE, GT_CONDITION_GROUP, IGNORE, 5, 6, IGNORE
TriggerGroup= 5, $9000, 155, $115
TriggerGroup= 6, $5000, 150, $2B
This GlobalTrigger says if the switch performs its Animation1 then the
door will open.
; Set Trigger Type - CONDITION 21
; Exporting: CONDITION(21:60) for OBJECT(155)
; <#> : ANIMATING1 ID 155
; <&> : Creature. Current animation of <#>creature is (E)animation
(0-31)
; (E) : Animation= 1
; Values to add in script command: $9000, 155, $115
; Set Trigger Type - ACTION 43
; Exporting: TRIGGER(43:0) for ACTION(150)
; <#> : DOOR_TYPE4 ID 150
; <&> : Trigger. (Moveable) Activate <#>Object with (E)Timer value
; (E) : Timer= +00
; Values to add in script command: $5000, 150, $2B
Animation1 is a one framed loop animation, showing constantly the
'switched-on' state of the 'switch'. So if the switch gets into 'on'
position - either by Lara or Von Croy - then the door will open.
b, VON CROY'S PART
GlobalTrigger= 1, IGNORE, GT_CONDITION_GROUP, IGNORE, 1, 2, IGNORE
TriggerGroup= 1, $5000, 137, $36, $2000, 256, $850, $2000, 256, $1851,
$8000, 80, $28, $8000, 81, $128
Parameters= PARAM_BIG_NUMBERS, 179, 21
TriggerGroup= 2, $5000, 155, $20F
; Set Trigger Type - ACTION 15
; Exporting: TRIGGER(527:0) for ACTION(155)
; <#> : ANIMATING1 ID 155
; <&> : Force (E) animation (0-31) for <#>object
; (E) : 2 Animation
; Values to add in script command: $5000, 155, $20F
So the switching-on animation (Animation2) of the switch will be
performed (as if Von Croy were just really using the switch) if some
conditions of Von Croy are true:
That Animation2 will be started if Von Croy reaches a given frame of his
switching-on animation, standing at the AI_FOLLOW at that 'switch'. (So
if he doesn't perform that animation, or if he does, but at another
'switch', then this switch won't perform its switching-on animation.)
To define all of that, we need Von Croy as the subject of Item Memory
Zone:
; Set Trigger Type - ACTION 54
; Exporting: TRIGGER(54:0) for ACTION(137)
; <#> : VON_CROY ID 137
; <&> : Variables. Set the index of <#>moveable as Selected Item
; (E) :
; Values to add in script command: $5000, 137, $36
We want to know two things about Von Croy in Item Memory Zone:
- the actual absolute frame of his animations, and
- the actual AI_FOLLOW where he is.
; Set Trigger Type - FLIPEFFECT 256
; Exporting: TRIGGER(2128:0) for FLIPEFFECT(256)
; <#> : Variables. Memory. Copy to <&> Numeric Variable the (E)Selected
Item Memory
; <&> : Local Short Alfa1
; (E) : Frame Now (warning it's an abs value) (Short)
; Values to add in script command: $2000, 256, $850
If you want to know what 'absolute animation frame' means, then read
about it in the Memory Zone tutorial on Skribblerz. As you see in
WADMerger Animation Editor, Von Croy's switching animation is
Animation3. Let's suppose its 16th frame
is the frame where he grabs the wall switch and starts using that. Let's
suppose this 16th frame
is the 179th absolute
frame, if you search that in the Animation Watcher of NG Center.
The trigger above puts the ID of the actual absolute animation frame
into Local Short Alfa1 variable.
; Set Trigger Type - FLIPEFFECT 256
; Exporting: TRIGGER(6225:0) for FLIPEFFECT(256)
; <#> : Variables. Memory. Copy to <&> Numeric Variable the (E)Selected
Item Memory
; <&> : Local Short Alfa2
; (E) : Custom_D (Different usage in according with type of item)
(Short)
; Values to add in script command: $2000, 256, $1851
In the case of Von Croy, Custom_D means the ID of the AI_FOLLOW at which
Von Croy is or for which he is just heading for. Let's suppose 21 is
typed in the OCB window of the AI_FOLLOW at that switch, so 21 is that
ID now. (Von Croy will never perform the switching animation when going
from one AI_FOLLOW to another, so in the present case Value 21 only
means 'if Von Croy is at AI_FOLLOW 21' and doesn't mean 'if Von Croy is
heading for AI_FOLLOW 21'.)
The trigger above puts the ID of the actual AI_FOLLOW into Local Short
Alfa2 variable.
; Set Trigger Type - CONDITION 40
; Exporting: CONDITION(40:62) for PARAMETER(80)
; <#> : Local Short Alfa1
; <&> : Variables. The <#>Numeric Variable is = than (E)Big Number value
; (E) : Value of Parameters=PARAM_BIG_NUMBERS at index= 0
; Values to add in script command: $8000, 80, $28
As you see, there are two numbers at PARAM_BIG_NUMBERS. The first number
(in Position0) is 179, the second number (in Position1) is 21.
The trigger above examines if the Local Short Alfa1 (i.e. the actual
absolute animation frame) is the required 179.
; Set Trigger Type - CONDITION 40
; Exporting: CONDITION(40:60) for PARAMETER(81)
; <#> : Local Short Alfa2
; <&> : Variables. The <#>Numeric Variable is = than (E)Big Number value
; (E) : Value of Parameters=PARAM_BIG_NUMBERS at index= 1
; Values to add in script command: $8000, 81, $128
The trigger above examines if the Local Short Alfa2 (i.e. the actual
AI_FOLLOW) is the required 21.
c, LARA'S PART
GlobalTrigger= 2, IGNORE, GT_CONDITION_GROUP, IGNORE, 3, 4, IGNORE
TriggerGroup= 3, $9000, 155, $15
TriggerGroup= 4, $5000, 150, $2C
GlobalTrigger= 4, IGNORE, GT_CONDITION_GROUP, IGNORE, 7, 8, IGNORE
TriggerGroup= 7, $8000, 1, $10, $9000, 155, $15, $8000, 8, $10D, $8000,
103, $1E
MultEnvCondition= 1, ENV_ITEM_TEST_POSITION, 1, IGNORE, ENV_FREE_HANDS,
IGNORE, IGNORE
TestPosition= 1, TPOS_TEST_ITEM_INDEX, 155, -100, 100, -100, 100, 320,
350, -2000, 2000, -200, 200, -200, 200
TriggerGroup= 8, $2000, 77, $3F, $5000, 155, $20F
GlobalTrigger= 5, IGNORE, GT_CONDITION_GROUP, IGNORE, 9, 10, IGNORE
TriggerGroup= 9, $8000, 1, $10, $9000, 155, $115, $8000, 8, $10D, $8000,
103, $1E
TriggerGroup= 10, $2000, 77, $40, $5000, 155, $30F
GlobalTrigger= 6, IGNORE, GT_CONDITION_GROUP, IGNORE, 11, 12, 13
TriggerGroup= 11, $8000, 63, $1E, $8000+TGROUP_OR, 64, $1E
TriggerGroup= 12, $2000, 51, $0
TriggerGroup= 13, $2000, 52, $0
GlobalTrigger2 says if the switch performs its Animation0 then the door
will close.
; Set Trigger Type - CONDITION 21
; Exporting: CONDITION(21:62) for OBJECT(155)
; <#> : ANIMATING1 ID 155
; <&> : Creature. Current animation of <#>creature is (E)animation
(0-31)
; (E) : Animation= 0
; Values to add in script command: $9000, 155, $15
; Set Trigger Type - ACTION 44
; Exporting: TRIGGER(44:0) for ACTION(150)
; <#> : DOOR_TYPE4 ID 150
; <&> : Trigger. (Moveable) Untrigger <#>Object with (E)Timer value
; (E) : Timer= +00
; Values to add in script command: $5000, 150, $2C
As I said above, Animation0 is showing constantly the 'switched-off'
state of the 'switch'. So if the switch gets into 'off' position -
always only by Lara this time - then the door will close.
GlobalTrigger4 says if lots of conditions are true, then Lara will
perform her 'I'm switching on a wall switch' animation (Animation63) and
the wall switch will perform its switching-on Animation2 ($5000, 155,
$20F) - as if Lara were just really using a real switch now.
; Set Trigger Type - FLIPEFFECT 77
; Exporting: TRIGGER(63:0) for FLIPEFFECT(77)
; <#> : Lara. (Animation) Force <&>Animation (0-255) of (E)slot for Lara
; <&> : 63 Animation
; (E) : SLOT_000 LARA
; Values to add in script command: $2000, 77, $3F
Those 'lots of' conditions are:
- if MultEnvCondition1 is true:
; Set Trigger Type - CONDITION 16
; Exporting: CONDITION(16:62) for PARAMETER(1)
; <#> : MultEnvCondition= 1
; <&> : Multiple condition of <#>MultEnvCondition script command in
(E)way
; (E) : In AND way. (All ENV conditions have to be true)
; Values to add in script command: $8000, 1, $10
- and, if the switch is in 'off' position, performing its Animation0
($9000, 155, $15),
- and, if the player is just using CTRL to use the switch:
; Set Trigger Type - CONDITION 13
; Exporting: CONDITION(13:60) for PARAMETER(8)
; <#> : Action (engage)
; <&> : Keyboard. <#>Command game is currently (E)
; (E) : ACTIVE (Single shot for positive condition)
; Values to add in script command: $8000, 8, $10D
- and if Lara is performing the proper animation (103) to use the
switch, i.e. she's standing and still:
; Set Trigger Type - CONDITION 30
; Exporting: CONDITION(30:0) for PARAMETER(103)
; <#> : Animation= 103
; <&> : Lara. (Animation) Lara is performing <#>animation
; (E) :
; Values to add in script command: $8000, 103, $1E
MultEnvCondition1 means these things:
- Lara's hands are empty (or at most she only has a flare): see
ENV_FREE_HANDS (because, naturally, weapons in her hand wouldn't be
logical now), and
- Lara is at the proper coordinates, compared to the switch, defined by
TestPosition1: see ENV_ITEM_TEST_POSITION. ('TPOS_TEST_ITEM_INDEX, 155'
defines ID155 object as the subject of TestPosition1.)
Notes:
1. Be careful with the coordinate values (-100, 100, -100, 100, 320,
350, -2000, 2000, -200, 200, -200, 200) in the TestPosition. I mean, we
have a TestPosition bug, so X and Z values are inverted. So now '-100,
100' are Z values and '320, 350' are X values.
2. With your switch you may have other TestPosition values, not these
ones.
GlobalTrigger5 says if lots of conditions are true, then Lara will
perform her 'I'm switching off a wall switch' animation (Animation64)
and the wall switch will perform its switching-off Animation3 - as if
Lara were just really using a real switch now.
; Set Trigger Type - FLIPEFFECT 77
; Exporting: TRIGGER(64:0) for FLIPEFFECT(77)
; <#> : Lara. (Animation) Force <&>Animation (0-255) of (E)slot for Lara
; <&> : 64 Animation
; (E) : SLOT_000 LARA
; Values to add in script command: $2000, 77, $40
; Set Trigger Type - ACTION 15
; Exporting: TRIGGER(783:0) for ACTION(155)
; <#> : ANIMATING1 ID 155
; <&> : Force (E) animation (0-31) for <#>object
; (E) : 3 Animation
; Values to add in script command: $5000, 155, $30F
Those 'lots of' conditions are:
- if MultEnvCondition1 is true ($8000, 1, $10),
- and, if the switch is in 'on' position, performing its Animation1
($9000, 155, $115),
- and, if the player is just using CTRL to use the switch ($8000, 8,
$10D),
- and if Lara is performing the proper animation (103) to use the
switch, i.e. she's standing and still ($8000, 103, $1E).
GlobalTrigger6 says if Lara is switching on the switch (performing her
Animation63) or switching off the switch (performing her Animation64),
then the player won't be able to perform any key command (for example,
to extract weapons), because, that would be naturally illogical:
; Set Trigger Type - CONDITION 30
; Exporting: CONDITION(30:0) for PARAMETER(63)
; <#> : Animation= 63
; <&> : Lara. (Animation) Lara is performing <#>animation
; (E) :
; Values to add in script command: $8000, 63, $1E
; Set Trigger Type - CONDITION 30
; Exporting: CONDITION(30:0) for PARAMETER(64)
; <#> : Animation= 64
; <&> : Lara. (Animation) Lara is performing <#>animation
; (E) :
; Values to add in script command: $8000, 64, $1E
; Set Trigger Type - FLIPEFFECT 51
; Exporting: TRIGGER(0:0) for FLIPEFFECT(51)
; <#> : Keyboard. Disable <&>keyboard command for (E) time
; <&> : All keyboard commands
; (E) : Forever (use other action/effect to disable it)
; Values to add in script command: $2000, 51, $0
; Set Trigger Type - FLIPEFFECT 52
; Exporting: TRIGGER(0:0) for FLIPEFFECT(52)
; <#> : Keyboard. Enable newly <&>keyboard command
; <&> : All keyboard commands
; (E) :
; Values to add in script command: $2000, 52, $0
Codebit 5
If the AI_FOLLOW has Codebit 5 on then Von Croy will act exactly the way
he acts when we move him from the starting AI_FOLLOW with 0 without
activating an F30 trigger. So, when he reaches AI_FOLLOW with Codebit 5
then he will move away a bit from here towards the next AI_FOLLOW, at
once. Then he will move further if Lara comes closer to him. To 'really'
send him to the next AI_FOLLOW, you need to activate an F30 that sends
him there.
Note:
See above Note#d about 'Von Croy killing the enemies'. If an AI_FOLLOW
has Codebit 5 and Lara activates an F30 that sends him to the next
AI_FOLLOW, then Von Croy won't leave the enemy till killing that. Then,
he will go the AI_FOLLOW to which that F30 sent him.
Codebit 1+3
If the AI_FOLLOW has Codebit 1 and Codebit 3 on then Von Croy will lean
forward and studying something (once) in front of him, from the left to
the right. We can explain it in different ways: 'he's studying the gap
in front of him, before he'll jump over it' or 'he's studying the traps
in front of him on the ground' etc.
However, if you want to use that action, then place two AI_FOLLOWs. When
Von Croy arrives (by an F30) to the first AI_FOLLOW (that has Codebit1+3
on) then he will face in the opposite direction, compared to where the
peak of the pyramid does. While Lara is further from him than 3 squares
horizontally he doesn't perform any activity. If Lara is in the right
distance, he will start waving to her. But if we activate an F30 to send
him to the second AI_FOLLOW (the facing of the pyramid is not important,
and there's no codebit on now), then he'll perform that 'studying
animation', then go at once to that AI_FOLLOW and start waving to Lara
to come. (If the second F30 is already active when Von Croy reaches the
first AI_FOLLOW, then he will study and go automatically.)
Codebit 2+3
If you want Von Croy to jump forward one square (whether that is a gap
or not) then you need to switch on Codebit 2 and Codebit 3 on the OCB
panel of the AI_FOLLOW. In fact, you need two AI_FOLLOW's there, in the
way like this:
Place the first AI_FOLLOW (having OCB Codebit 2+3 on) where he will jump
from. - Conditions:
- The peak of the pyramid of AI_FOLLOW has to face in the opposite
direction, compared to the direction of the jump.
- The place where he arrives after the jump must be exactly at the same
vertical position as where he jumps from. (Maybe you can try 1 click
higher for the arriving place.)
If it is higher, then he falls back to the gap.
If it is lower, then he lands on the air, at the vertical position of
where he jumps from, then sinks down to the floor.
The second AI_FOLLOW could be anywhere near the arriving place. This is
the point to which Von Croy will go, after jumping. (The facing of the
pyramid is not important. And there's no codebit on now.)
So, Von Croy has arrived to the first AI_FOLLOW, by an F30. He will face
the gap. While Lara is further from him than 3 squares horizontally he
doesn't perform any activity. If Lara is in the right distance, he will
start waving to her.
But if we activate an F30 to send him to the second AI_FOLLOW, then
he'll jump (standing) then go there and start waving to Lara to come.
(If the second F30 is already active when Von Croy reaches the first
AI_FOLLOW, then he will jump automatically.)
Note:
At AI_FOLLOW having 6, if you use Codebit 1+3 (!) then its meaning is
changed, because he won't study the floor now but performs a standing
jump - which is not one square but two squares long now.
Codebit 2+5
Switch on Codebit 2 and Codebit 5 at an AI_FOLLOW. While Lara is further
from him than 3 squares horizontally Von Croy doesn't perform any
activity there. If Lara is in the right distance, he will start waving
to her.
Codebit 3+5
If you want Von Croy to jump forward three squares (which is always a
gap being at least 5 clicks deep!) then you need to switch on Codebit 3
and Codebit 5 on the OCB panel of the AI_FOLLOW. In fact, you need two
AI_FOLLOW's there, in the way like this:
Place the first AI_FOLLOW (having OCB Codebit 3+5 on) where he will jump
from. - Conditions:
- The peak of the pyramid of AI_FOLLOW has to face in the opposite
direction, compared to the direction of the jump.
- The place where he arrives after the jump (grabbing the edge of the
ledge) must be exactly at the same vertical position as where he jumps
from.
The second AI_FOLLOW could be anywhere near the arriving place. This is
the point to which Von Croy will go, after jumping. (The facing of the
pyramid is not important. And there's no codebit on now.)
So, Von Croy has arrived to the first AI_FOLLOW, by an F30. He will face
the gap. While Lara is further from him than 3 squares horizontally he
doesn't perform any activity. If Lara is in the right distance, he will
start waving to her.
But if we activate an F30 to send him to the second AI_FOLLOW, then
he'll jump (running), grab the ledge, climb up on the ledge then go to
that AI_FOLLOW and start waving to Lara to come. (If the second F30 is
already active when Von Croy reaches the first AI_FOLLOW, then he will
jump automatically.)
Notes:
1. For the run of the jump, Von Croy will also use the square behind him
(skipping backwards before starting the run). So make sure he has enough
place to run.
2. The things will happen in the abovementioned way only if Von Croy
reaches the first AI_FOLLOW in a walking way. If he reaches that in a
running way then the things can be less controlled - for example, maybe
that will happen: if only the first F30 active, he will jump from the
first AI_FOLLOW at once, even if Lara is far away. Then he goes to the
second AI_FOLLOW, and doesn't show any activity. Activating the second
F30 now, he will start waving to Lara.
3.
CUTSCENES
I hope you remember the cutscenes during the 'Angkor Wat' level. I'm
talking about the short cutscenes when black strips appeared at the top
and the bottom of the screen (as if you were seeing a flyby camera
sequence) and you can hear Von Croy's advices to Lara.
You can reconstruct those cutscenes in your level, if you activate F45
triggers.
Attention!
This feature will work
properly only if you switched off the new sound engine in your game - so
if you typed this in the [Options] block of your Script:
NewSoundEngine= DISABLED
It means if you choose this option, then
lots of new TRNG sound features will not work in your entire game. (For
example, if the engine is disabled, then you can use both CD triggers
and Sound Flipeffect triggers to play audio files, but you have only one
audio channel etc.)
But what are these cutscenes, actually?
Well, first of all, you don't need to place a camera for these
cutscenes. The game will place them automatically: one camera per each
cutscene. This is a fix camera, somewhere a bit above and behind Lara,
shooting at Von Croy. (In fact, sometimes we can't reproduce all the
features of the cutscenes from TRLR. For example, in TRLR, sometimes the
camera was shooting at Lara, from behind Von Croy. Possibly is it
because of some hardcoded reasons I don't know?)
Lara is 'frozen' in these cutscenes, i.e. the player can't control her
and she can't move till the cutscene ends. Von Croy (looking at her and
mostly turned towards her) is gesticulating something automatically -
mostly he always does the same movements. (See below in the notes to
understand what the two 'mostly' words mean now.)
All of this means usually the really important in these cutscenes is not
what the player can see on the screen. The really important is what
(s)he can hear. Each cutscene has its own audio file - in a hardcoded
way attached to its cutscene (so Cutscene with ID A always has the audio
file with ID B. ). In each audio file is saved what the player will hear
during the given cutscene, seeing Von Croy's gesticulation. Naturally,
for example, if Von Croy is standing in front of a big gap,
gesticulating to Lara, then the proper audio file for this cutscene is
in which Von Croy is talking about Lara how to jump over a big gap. -
But, naturally, feel free to save what you want in the given audio.
If the activation of an F45 trigger starts a cutscene, then the camera
shots and the audio file will be started at once. (Each F45 can be
activated only once automatically, without 'One Shot' feature!) Usually
you should activate a cutscene when Von Croy is at the AI_FOLLOW that
has the same number. - So, for example, activate Cutscene ID3 when Von
Croy is standing at AI_FOLLOW having 3 in the OCB window.
See in some examples what happens if you activate Cutscene#3 in other
cases:
- Von Croy is just going from AI_FOLLOW having 2 to AI_FOLLOW having 3:
he will be transported to AI_FOLLOW having 3 at once, and the cutscene
starts at once. (It means if you placed an F45 to transport Von Croy to
an AI_FOLLOW then, if you want, you can skip placing an F30 that sends
him to that AI_FOLLOW because, as you see, that F30 is not necessary
under any circumstances!)
- Von Croy is just going from AI_FOLLOW having 1 to AI_FOLLOW having 2:
he will be transported to AI_FOLLOW having 3 at once, and the cutscene
starts at once.
- Von Croy is at AI_FOLLOW having 2: he will be transported to AI_FOLLOW
having 3 at once, and the cutscene starts at once.
- Von Croy has left AI_FOLLOW having 3 yet, moving between two
AI_FOLLOWs: the cutscene won't start. He will act exactly the way he
acts when we move him from the starting AI_FOLLOW with 0 without
activating an F30 trigger. So he stops at once if Lara is too far from
him, and starts again if Lara gets close enough to him. You need to
activate an F30 to send him to one of the further AI_FOLLOWs. (To make
him act this 'problematic' way you can activate that F45 any times. -
Even if that cutscene has been really played before.)
- Von Croy has left AI_FOLLOW having 3 yet, being at an AI_FOLLOW: the
cutscene won't start. He will drop his activity. (I mean, if he does
more here than simple waving then he will finish that special activity
and do just as above: start and go till Lara is close enough.) Activate
an F30 to send him further.
To set an F45 trigger, type the given number in the Timer window of the
trigger. So, for example, if you want an F45 trigger to play Cutscene#3
then type 3 in the Timer window of that trigger.
The cutscene will end if
- the audio file ends (the lengths of these audio files are not
hardcoded), or if
- you hit the look key to interrupt both the shots and the audio.
If a cutscene has ended/has been interrupted then Von Croy will leave
the AI_FOLLOW at once. He will act exactly the way he acts when we move
him from the starting AI_FOLLOW with 0 without activating an F30
trigger. So, he will move away only a bit from here towards the next
AI_FOLLOW. Then he will move further if Lara comes closer to him. To
'really' send him to the next AI_FOLLOW, you need to activate an F30
that sends him there.
Special things to know:
1. If Codebit 2 and Codebit 5 are switched on at an AI_FOLLOW having a
cutscene, then Von Croy will take his notebook out of his jacket, then
put it back, during the cutscene. (If you interrupt the cutscene, then
the book itself will disappear from his hand - though he will accomplish
all the movements.)
2. As you will see below, some number is not a valid Cutscene ID. So,
for example, you can't play Cutscene#2, which doesn't exist. (Never
activate an F45 trigger without a valid Cutscene ID!)
3. Be careful: possibly the game won't play some audio (WAV) files in
these cutscenes, even if they have the right format for the old sound
engine. Possibly the reason is the source of the WAV where you got that
from.
4. If Von Croy has a special activity at an AI_FOLLOW (with or without
OCB codebits: starting monkey swinging, jumping one square etc.) where a
cutscene plays then he will perform it (automatically) only if the
cutscene has ended/has been interrupted.
(He will start that activity even if you need an F30 to start that. For
example, without cutscene, you need an F30 for Von Croy to start
shimmying. But now, if the cutscene has been finished, he starts
shimmying and climbs up automatically, accomplishing the first part of
the shimmy setup. But now you need an F30 to send him to the third
AI_FOLLOW of the shimmy setup, to accomplish the whole setup.)
5. F45 triggers can be activated in any way: by directly Lara, by a
switch, by a HEAVY trigger etc.
6. Let's suppose Von Croy is heading for AI_FOLLOW having 8, because an
F30 sent him there. But he's only at AI_FOLLOW having 2 at the moment.
You activate an F45 to start Cutscene#3. Now Von Croy will be
transported to AI_FOLLOW having 3, and Cutscene#3 will start. The F30 to
AI_FOLLOW having 8 has been annulled, so Von Croy starts acting now as
if F30 to AI_FOLLOW having 3 had been the last F30 that was activated.
7. The only possibility to skip using an AI_FOLLOW if you use a cutscene
with that skipped ID. For example, Lara arrives to AI_FOLLOW having 6 by
an F30. But you don't have AI_FOLLOW having 7. So, if Von Croy leaves
AI_FOLLOW having 6 in any way (automatically after playing Cutscene#6 or
by an F30 that sends him to AI_FOLLOW having 7 or AI_FOLLOW having 8
etc.) then he goes to Lara and follows her tightly. This is the point
where you need to activate F45 having 7. Cutscene#7 starts (shooting at
Von Croy where he just is). After the cutscene, he starts towards
AI_FOLLOW having 8 (as if the cutscene had played at AI_FOLLOW having
7). Now you need to activate an F30 with 8 or a bigger ID to put Von
Croy back on the proper route.
(Please don't activate an F45 without an AI_FOLLOW with the same ID
before then it's needed because that may cause malfunction in Von Croy's
route!)
8. Don't activate an F45 before Von Croy coming to life.
9. Lara will always be turned to and look forward straightly at Von Croy
during the cutscene and remain the way like that after that - so even if
she didn't face the AI_FOLLOW where the cutscene plays just a moment
before the start of the cutscene.
10. At an AI_FOLLOW with a cutscene, it matters a bit more in which
direction the peak of the pyramid faces. I mean, for example, if the
next AI_FOLLOW is southwards from the AI_FOLLOW of the cutscene, and the
pyramid peak also faces southwards, then, just after the cutscene, Von
Croy wants to go in the opposite direction (northwards) first, but he
makes up his mind, and leaves the AI_FOLLOW southwards.
(Sometimes it seems he faces in the opposite direction during the
cutscene, compared to where the peak of the pyramid faces.)
11. Though, as you see above, you can use - with more or less success -
Von Croy in your level, if that is not the first level, it doesn't mean
you can use these cutscenes in your level with the new sound engine. I
mean, with the new sound engine, the cutscenes are pretty messy, just
bugs in the game, you can't have a chance for 'more or less success'
now.
The existent cutscene ID's, the audio ID number that will play (between
brackets), and other things about the given cutscene:
0 (31) - It is for the second AI_FOLLOW having 0, of course.
1 (62)
3 (30)
4 (24)
6 (17)
7 (44)
9 (46)
11 (11)
12 (10) - Though Lara is turned during the cutscene to face Von Croy (as
usual), the camera will shoot at something else, not him. (Probably it's
the northeastern corner of the room where the cutscene camera is.)
13 (45) - The same thing as with Cutscene#12.
14 (13) - The cutsene starts with Von Croy climbing up on an edge (in
the opposite direction, compared to where the peak of the pyramid faces)
which is 6 clicks higher than the floor square of the AI_FOLLOW. In the
other part of the cutscene he will be just standing on the ledge. (He
will do that without any OCB codebits on at that AI_FOLLOW, and
independently of that climb being a part of the shimmy setup or not.)
16 (39)
18 (66)
19 (34)
24 (70)
25 (28) - The same thing as with Cutscene#12.
34 (68) - Almost the same thing as with Cutscene#12. But this time
probably the southeastern corner is being shot.
35 (26)
36 (43)
43 (37, or 38 if you accomplished the secret puzzle) - You can't
interrupt it by the look key.
46 (36)
47 (21)
48 (25)
49 (23)
53 (38) - You can't interrupt it by the look key.
56 (36)
57 (21)
58 (25)
59 (23)
The highest Cutscene#ID I examined was 60 (this is the highest AI_FOLLOW
ID in 'Angkor Wat' level).
F45 triggers will also work with ID 8, 10, 15. But don't use them, they
seem buggy.
The secret puzzle
As you definitely remember from 'Angkor Wat' level, Von Croy chose Path
A if Lara found all the eight secrets of the level, but chose Path B if
she did not. If you want to reproduce then do this:
1. Send Von Croy to AI_FOLLOW having 43, by an F30 or by an F45. (Use
here a 2+5 codebit for the book, if you want, but don't use other
codebits.)
2. If you haven't started Cutscene#43 by an F45, then start it now.
3. After the cutscene, Von Croy goes to AI_FOLLOW having 44 if Lara
didn't find all the secrets, but goes to AI_FOLLOW having 54 if Lara
found all the secrets.
4. Reaching to the new AI_FOLLOW, he waves to Lara, even if she is
farther. (So he will do as if we sent him there by an F30. But we did
not, and we cannot use that F30 even later!) - You can use OCB codebits
now, if you want.
5. Activate F30 having 45 (46, 47 etc.) or 55 (56, 57 etc.) to send him
further, as usual.
4. MORE THAN ONE VON CROY
You don't need to start the AI_FOLLOW sequence of Von Croy from 0.
I.e. for example you can use this sequence:
23, 23, 24, 25, 26, 27, 28, 29, 30, 31, 32
instead of this sequence:
0, 0, 1, 2, 3, 4, 5, 6, 7, 8, 9
And it's good to know because it means you have two (or more) Von Croys
in the same level (having different routes, of course). One of your Von
Croys will use a lower sequence and the other one will use a higher
sequence.
But be careful:
- The sequences can't have common numbers. (But eg. if the lower
sequence ends at 28, then you can start the higher sequence immediately
at 29, if you want.)
- Von Croy with the lower sequence must be 'dead' when you activate the
first F30 of Von Croy with the higher sequence. Or else Von Croy with
the lower sequence will be distracted: he will go on the whole route of
his at once, then go up to Lara (or somewhere else). ('Dead' means you
can't activate him - if he's still not alive - or you must kill him. To
kill him, I suggest A14 trigger, in 'Remove immediately' mode.)
- As I said above you can have problems if you activate an F30 that has
a less number than the AI_FOLLOW at which Von Croy is. It is also true,
if that F30 is not the part of the actual setup. So, for example, when
you're just controlling Von Croy with the higher sequence but you
accidentally activate an F30 that belongs to Von Croy (already dead)
with the lower sequence, then that disturbs the active Von Croy.
And all of this is also true if you use more than one object (VON_CROY,
GUIDE, ENEMY_JEEP, HORSE+HORSEMAN) in a level with AI_FOLLOW's. I mean,
eg. if you use (and 'kill') a Von Croy first, then you can use a guide
after that, if they all have their own sequences. - So eg. if a Von Croy
has a sequence from 0 to 15 then a guide can have a sequence from 20 to
32.
Two notes:
- An ENEMY_JEEP is a bit else. Its sequence always starts from -2. (-2,
-2, -1, 0, 1, 2, 3 etc.) So, eg. if you want a Von Croy before the jeep,
then use Von Croy with an AI_FOLLOW sequence having only negative
numbers - for example from -20 to -5 - then kill Von Croy, then use the
jeep. (Please note that probably is not always a good idea to use
negative sequence for them. For example, according to my experiences,
Von Croy will work with a sequence like that but the guide will not.)
- You can use HORSE+HORSEMAN together with Von Croy, the guide or the
jeep at the same time, because the setup of the horseman doesn't have an
F30. But don't forget: Von Croy and the guide can attack enemies,
including the horseman on the horse.
And it's also a good method if you have them in more than one level. I
mean, eg. if you use a lower sequence for a Von Croy in the first level,
then you'll use a higher sequence for a guide in the second level.
Why? Because the game won't forget if you eg. used F30 triggers from 0
to 10 to send Von Croy on the first level. I mean, if you jump to the
second level after that, and activate the guide, then he will act as if
F30 triggers from 0 to 10 had been activated yet in the second level.
(If you want the game to forget the activated F30 triggers in a previous
level then use a ResetHUB Script command.)
5. MEMORY ZONES
If you want to know what variables or memory zones are then see the
variable tutorial of Paolone or the Memory Zones tutorial on Skribblerz.
You can use those memory zone fields even with Von Croy, naturally.
But now I will show you how the Item Memory Zone fields that are
customized for each object will work on Von Croy:
- Custom_A and Custom_B fields are not useful with Von Croy.
- Custom_C field - the values are:
1: He waves to Lara. (Some part of his 'looking around' animation before
the waving is also included.)
2: He's doing his cutscene movements after the cutscene. - For example:
a, He stops the usual gesticulation just at the first frame after the
cutscene.
b, You've interrupted the cutscene but he's still studying his book.
- Custom_D field - the value is the AI_FOLLOW ID number at which Von
Croy is or for which he is just heading for. (See more about it above at
the description of Codebit 3.)
Made using TRNG 1.2.2.6