
The Monkey Switch
by
Fluen
This setup makes a friendly baboon pull a switch, Lara can't reach herself.
It requires two
objects from the Mastabas-WAD:
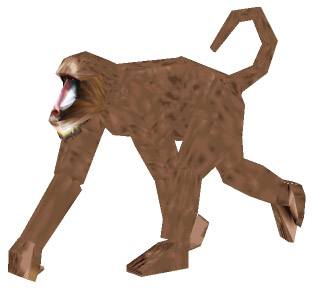
BABOON_NORMAL
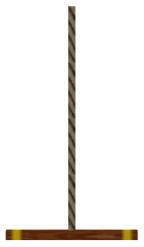
and ANIMATING13
(the switch, the baboon pulls)
This object can occupy any
animating-slot and for further reference, I will call it the 'switch'.
The baboon is made to climb a 9 clicks tall block (that is the height the baboon's animation is made for). The ceiling above the block must be 6-7 clicks. Lower than 6 clicks and the baboon will reach through the ceiling, higher than 7 clicks and the 'switch' will be pulled out of the ceiling.

It doesn't matter, if you choose to make it
all in one room or use several stacked rooms.
And this setup
works only when turned east
(the default direction for all placed objects) in the editor window
(north in game).
Setup:
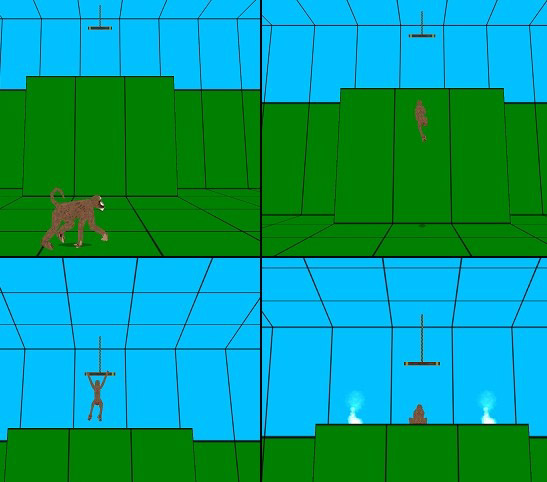
1. Place the BABOON_NORMAL and a trigger for
it.
2. Place the 'switch'. It's easier to find the correct height for
it, if you place it on the ceiling.
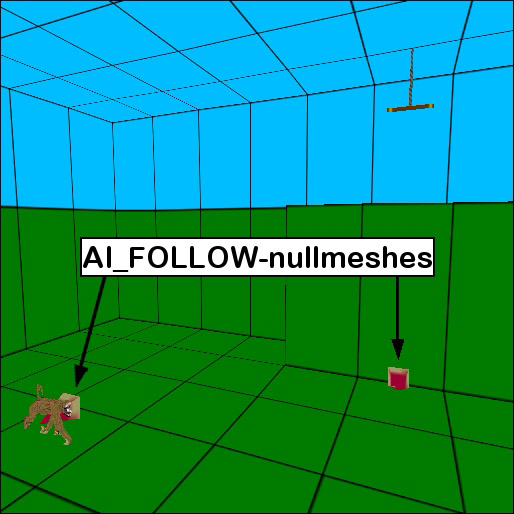
3. Place two
AI_FOLLOW-nullmeshes, one on the same block as the baboon and one on the
block in front of the ledge, where the 'switch' is placed. It's of no
significance what direction the nullmeshes point in - the baboon knows
what it's supposed to do.
4. Place a heavy
trigger for the 'switch' on the same block as the second
AI_FOLLOW-nullmesh. This is necessary, because its animation is timed to
fit this setup.
5. All other things you want the baboon to trigger
must be placed on the block right below the 'switch'. And you also need
to make this (set of) trigger(s) heavy.
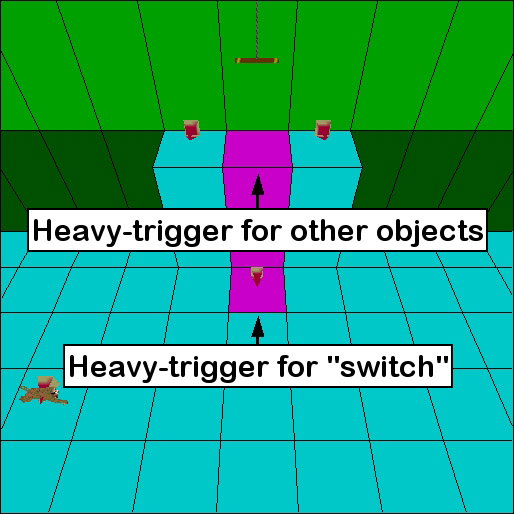
In the above picture the objects, the baboon
is supposed to trigger, are the two FLAME_EMITTER2's on either side of
the 'switch'.
6. For the sake of the gameplay you better limit
the area, the baboon is able to roam, with boxes (the grey button),
because it will
roam, and it may easily spend several minutes doing so, which is certain
to be a gamekiller. Either the player will think, he/she has encountered
a bug, or simply loose patience. In either case he/she will bin your
level.
Just one minute waiting for the baboon, when
there is nothing else to do, feels like a long time.
This setup
is stable, and you can use more of them in a single level. But make sure
the different baboons and their 'switches' are isolated by boxes,
because they tend to be distracted by AI_FOLLOW-nullmeshes belonging to
other setups (also setups of other kinds) and are very reluctant about
returning to their own business.
Note:
- Once the baboon has pulled its 'switch', it
will constantly activate the trigger for the desired object(s). This
means, that if you later want to deactivate it (close the door, the
baboon opened, or turn out the fire, the baboon lit), the object will
re-activate a few moments later (the door opens again, the fire lights
again).
To prevent this you must use flipeffect 46 (kill all enemies) to get rid of the baboon, before you anti-trigger the object(s), the baboon triggered. It is the only way to get rid of the baboon, because in most other ways the baboon is considered 'dead' by the game engine (Lara is unable to autoaim at it and doesn't hurt it, when she shoots at it).
- Be very
careful about how and where you place the triggers for a flipeffect 46.
If Lara or another character kills the baboon, it can be revived, if
Lara is still able to activate the trigger for it. But if a flipeffect
46 has removed it, nothing can bring it back. So if a flipeffect 46
trigger has been triggered, while the baboon was alive and before it had
pulled its assigned 'switch', the setup is effectively ruined and Lara
is stuck.
- If you have placed a CROWBAR_SWITCH in the same room
as a BABOON_NORMAL, it will not work once the baboon has been triggered
and as long as it's alive. CROWBAR_SWITCH'es in other rooms will work
normally.