The Keypad
by
Bedazzled
Download the Keypad
object here
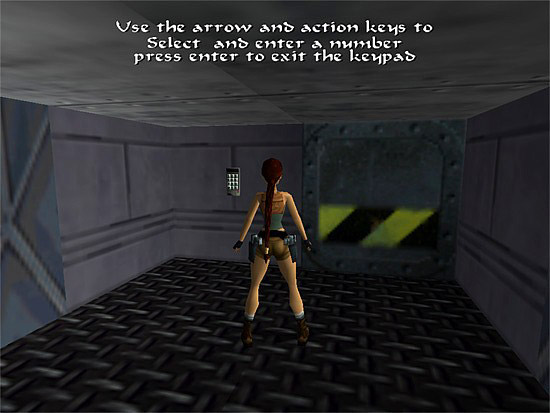
This tutorial shows how to use the TR5 keypad as a coded switch in base type levels with the option of on screen instructions being given to the player.

I have tested it and found it to work in
switch slots 1 - 4. When adding it to your wad there is no need to use
WadMergers switch manager; just copy the keypad into a switch slot. Also
ensure you are using one of the revised wads.
By default Lara
will perform the small push switch animation when using the keypad, but
this and the animation she does on exiting the keypad can be changed
along with the sound the keypad emits when a button is pressed.
The secret to its operation is the OCB code which takes this form 16384
+ the desired 4 digit code number. For example if you want a user code
of 1234 the OCB code for the keypad would be 17618.
After placing
the keypad and entering the correct OCB code, place a switch trigger
beneath it as you would for a normal switch, along with the trigger for
the object to be triggered.
Adding
the instructions
To give the player
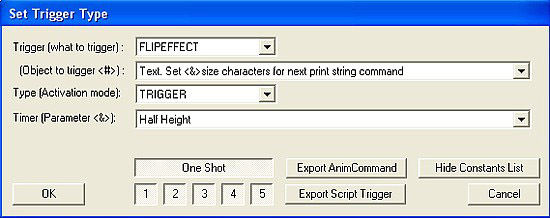
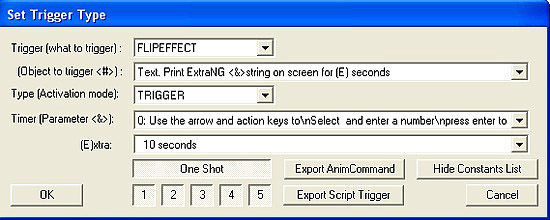
on screen instructions the two flipeffects shown below are used. The
first sets size of the text and the second determines what is printed
and how long it�s displayed for.
They should be arranged so that
as Lara approaches the keypad they will be triggered in the order they
are shown here.


The text you want displayed must be added to
the English.txt file as an additional string. This can be done manually
but to avoid errors use the NGScripter as described in this tutorial.
Either way the finished English.txt file will contain extra lines
similar to these.
[ExtraNG]
0: Use the arrow and action keys
to\nSelect and enter a number\npress enter to exit the keypad
Creating the text to display
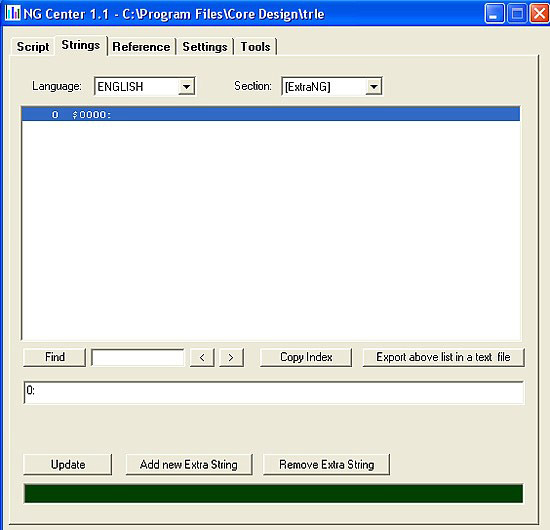
Open the NGScripter and from the Strings tab select the [ExtraNG]
option from the section drop down box; then click the Add new Extra
String button. A new entry will be started and the cursor will be
positioned in the text box near the bottom of the window; this is where
you will enter your text.

Enter your text into the box at the bottom of
the window, when you want to start a new line enter \n into the text. If
you're using half height characters as I did try to limit each line of
the on screen text to a maximum length of 32 characters.
This is
the line of text I used for the first screenshot, which you can just
copy & paste:
Use the arrow and action keys to\nSelect and enter a number\npress enter to exit the keypad
After entering your text, press the Update button to transfer it into the top window. Click on the script tab and find the level section of your script. You now need to set the colour, position on screen and the size of your printed text.
This is the command I used to have white, size10 text at the top centre of the screen.
[Level]
Name=
Playable Tutorial Level
Horizon= ENABLED
Layer1= 160,160,192,7
TextFormat= CL_WHITE,FT_TOP_CENTER,IGNORE, 10
The colour, position on screen and the size are set using the command:
TextFormat=
Syntax: TextFormat=Color, FormatFlags(FT_..), BlinkTime, SizeCharacter
(SC_..)
To be used in the title or level sections of the script.
A complete explanation of the arguments used with this command can be found under the Reference Tab of the NGScripter, in the Show SCRIPT NEW commands window.
The values which can be used for all of these arguments can be found under the Reference Tab of the NGScripter, in the Show _ MNEMONIC CONSTANTS for new script command window.