
Strpix - Light Editor
by
Stranger1992
The light editor in stripix is a useful tool to light static objects. The reason for this is because statics do not have control of the lights around them and are not affected by them either. Therefore you can create your own lights and shadows to simulate some sort of light behaviour.
In the tutorial I will
show you how to light the Tr3 shiva statues correctly.
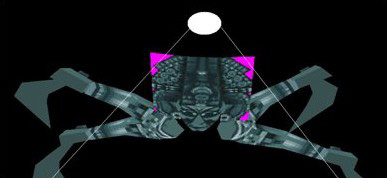
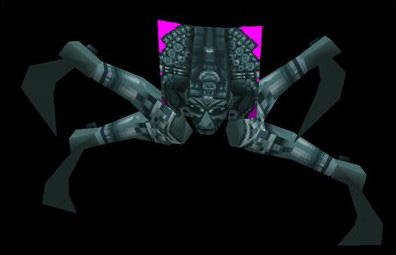
1. Take a
look at your object. You need to decide where the light is coming from
and where it will be blocked off to create shadows. The best direction
of light is to presume that the object has its light source above it:
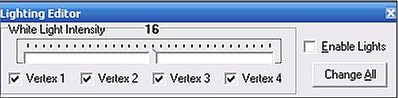
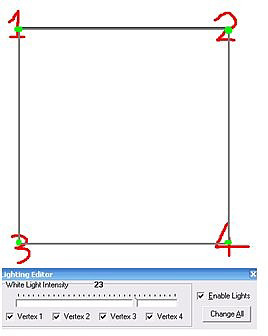
2. With this in mind you can begin to light it. Open your WAD in stripix and press 'CTRL+L'. You will get a panel like this:
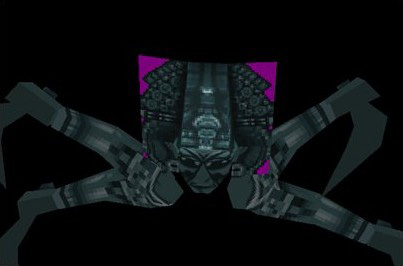
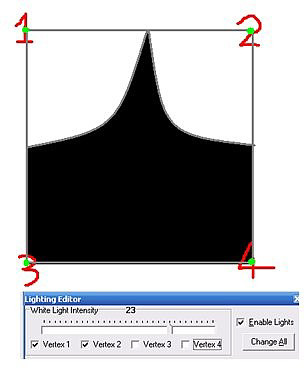
3. Tick the 'Enable lights button' and then press 'change all'. You will notice the object changes contrast. That means the lights will now work at it. Now you can move the slider to add shadows and highlights. To do so start off by moving the slider to the left so it reads '0' and then click on the head. It will go lighter like so:
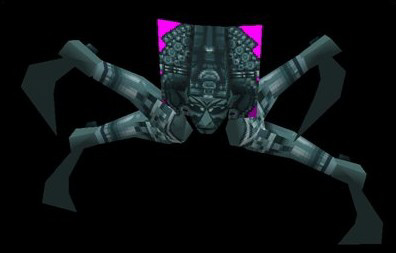
4. This now means that that face will be lighter then the rest of the object. Finish off texturing where you imagine the light sections would be until you have something that looks like this:
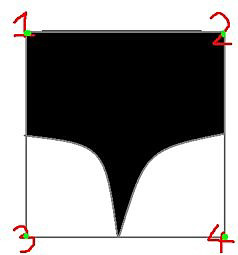
5. It is looking better already. However without light there is no shadow so now we need some shadows. Set your slider to 23 and again, click on the areas (usually the reverse of where you clicked for light) to add some shadows. 23 is not the highest but 31 tends to look too strong in game.
6. Now it is looking much nicer and much more realistic. Now simply save your WAD and test it in game.
Advanced Light
Editor
The light editor is
rather complex and actually very advanced at stages. You may be
wondering what the 4 'vertex' buttons mean at the bottom of the light
editor. What they do is tell the light which vertices to affect on the
face you have selected. It is hard to tell verbally so here is a
diagram:

Basically unchecking some of the boxes in the light editor means that the light you are trying to apply won't affect that vertex.
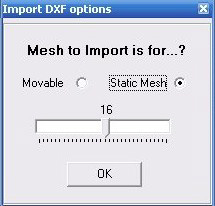
Also, you may be wondering why, even though you applied lighting to your object and saved it all correctly why the lights you added didn't show and your pistol light did. Simple; you have imported it wrongly. Any static needs to be imported as a static mesh so the lighting editor works on it:
Also, it is important to note that if you decide to retexture/re-import something after changing it the lighting will not be saved. It is advised to do the lighting on the static object at the very last stage of the object, when it is perfect and is not needed for change.
How to Find the
Vertex Corner
Thanks to Sapper and Kikiloco for this information
Replace solid.bmp in the stripix2 folder with one like this. Backup your original. Then when you view in solid mode you can tell what vertex is what.

For quads (4 vertex polygons) red is vertex 1. Then you go clockwise so pink is 2, green 3 and blue 4.
For triangles blue is vertex 1. Then again you go clockwise so red is 2 and green is 3. Looks like the pink corner isn't used.'
Vertice1,vertice2,vertice3 and vertice4 DOSENT MEAN the same corner in
every face in your model; at least not from the point of view you
usually see in all faces. They point to the order of the corner used in
the face WHEN IT WAS DRAW IN THE CAD TOOL.
In strpix3 (and sister
program pixstr2) faces are defined in clockwise order; it work for
rectangles and triangles; vertex1 mean the first vertex DEFINED in the
CAD program for start drawing the face, vertex2 mean the 2th vertex
DEFINED and so on.
for example, if in your CAD program you draw a
rectangle defining the 1st, 2nd, 3rd and 4th vertex in this order:
1--------2
I-------- I
I-------- I
4--------3
Then
the texture applied to it will be seen as normal and the light editor
will light the corners like in the diagram.
But in a CAD program
a rectangle could have been draw in next way:
2--------3
I---------I
I---------I
1--------4
When you see it in
strpix3 it is just a rectangle like the first one, however it was drawn
starting from the bottom left corner; the texture will be seen rotated
and the light editor will light the corners like in the diagram order.
If in meta you draw all rectangle and triangles starting from the
upper left corner then the texture when applied in strpix3 will be seen
as normal and the light editor will light the corner like in the
diagram.
I am talking here about CAD tool that allow you to draw
faces defining vertex by vertex; some others tools have a shortcut where
you just mark a block with the mouse and they will generate the
primitive (boxes, cylinder, rectangles') but those are just shortcut,
all faces indeed have a vertex order when they are draw.