Savegame Panels
by
KurtisandLara
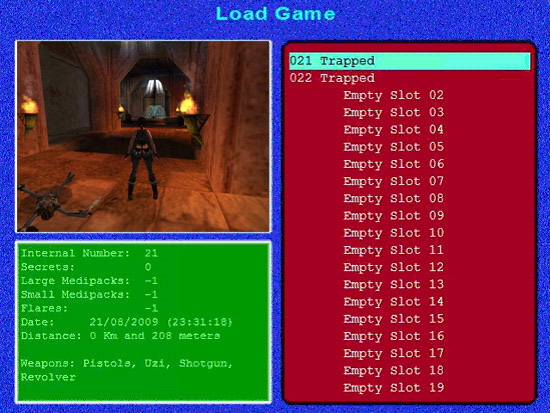
In the picture below the green box shows statistics, like which weapons you have, how many flares and medipacks are in your inventory, and also how far you've travelled. The Pinkish - reddish box shows the savegame you've highlighted.

Since version 1.2.0.8 the TRNG is capable of
supporting this new Savegame Panel when loading or saving the game. You
have to use the script command SavegamePanel to choose background image
and layout to use.
With the new savegame panel you have differing
advantages:
1) You can have an image for each savegame selected
to make things easier for players to find specific savegames.
2)
You can have more than 15 savegame slots and you can even choose the
number of savegames manageable at the same time (max 100 savegame
slots).
3) For each selected savegame the player may see
information about internal values of that savegame, such as number of
medipacks, available weapons, secrets etc.
4) You can create your
own custom background image and choose between 7 different layouts,
where for layout we mean the disposition of different zones: savegame
list, savegame image and (optional) savegame information.
In the
illustration you can see some of the available layouts.
If you choose
a layout where the info savegame frame is missing, you can use that
empty zone to draw a logo for your adventure or some other image of your
choosing.
To start with, download everything you're going to need by downloading the Savegame Panel project files by Paolone, which is an 8.8 Mb zipped file.
Now unzip the file and open the NG Center. Locate the tab called "Strings". Find the dropdown named "Strings". In the Section dropdown menu click on ExtraNG. Now click on Add new extra strings 4 times.
Update these four new strings to look like this:
0: @Format_Savegames.txt
1: Arial
2: Courier
3: New Courier
Now go to the file you just downloaded and go into the scripts
folder. Copy the file named "Format_Savegames"and paste into the scripts
folder of the main TRLE folder. Go back to the scripts folder in the
downloaded file and open the Script.txt, text file.
In there copy the section of script shown below (or
just copy the script below) and paste it in the Title section of
your script.
ColorRGB= 1, 0,255,255 ;yellow: color for panel
title
ColorRGB= 2, 255,255,255 ;white: color for savegame list
ColorRGB= 3, 128,255,128 ;light green: color for savegame Infos
;font used for the title of panel ("load game" or "Save game")
WindowsFont= 1, Arial, WFF_BOLD+WFF_CENTER_ALIGN, 40, 1, IGNORE
;font used for info text
WindowsFont= 2, Courier,
WFF_LEFT_ALIGN+WFF_FORCE_FIXED_PITCH, 25, 3, IGNORE
;font for
savegame list
WindowsFont= 3, New Courier,
WFF_LEFT_ALIGN+WFF_FORCE_FIXED_PITCH, 28, 2, IGNORE
SavegamePanel= SPF_PRELOAD_BKG_IMAGE, 7, 30,9, SPL_CENTRAL_IMAGE,
IGNORE, 3, 2, 1
;-------- end STUFF for savegame panel
-----------
;enable saving screenshot in savegames for all levels
Customize= CUST_INNER_SCREENSHOT, QSF_SIZE_320x240+QSF_TRUE_COLOR
Now in the level section of the script put this:
; ------ STUFF for SavegamePanel -----------
ColorRGB= 1,
0,255,255 ;yellow: color for panel title
ColorRGB= 2, 255,255,255
;white: color for savegame list
ColorRGB= 3, 128,255,128 ;light
green: color for savegame Infos
;font used for the title of panel
("load game" or "Save game")
WindowsFont= 1, Arial,
WFF_BOLD+WFF_CENTER_ALIGN, 40, 1, IGNORE
;font used for info
text
WindowsFont= 2, Courier, WFF_LEFT_ALIGN+WFF_FORCE_FIXED_PITCH,
25, 3, IGNORE
;font for savegame list
WindowsFont= 3, New
Courier, WFF_LEFT_ALIGN+WFF_FORCE_FIXED_PITCH, 28, 2, IGNORE
SavegamePanel= SPF_NO_TIME_IN_LIST +SPF_PRELOAD_BKG_IMAGE, 2, 30,20,
SPL_LEFT_IMAGE_BOTTOM_INFO, @Format_Savegames.txt, 3, 2, 1
;-------- end STUFF for savegame panel -----------
Now go build
your script, you shouldn't get any error messages.
Now go back to
that downloaded file. And open the folder named "PIX". In there double
click on the convertor then find Image2. and copy it, go to your main
TRLE folder and create a a new folder named PIX. Open the new folder and
paste the copied Image2.
Now build your title level with
NG_Tom2PC and go in game. Go to any level or even on the title screen,
go to load game and you should see the new savegame panel.