Animations - Creating Custom Animations
by
Titak and SSJ6Wolf
There are many animation programs around. Not all of
them can import and export TR compatible files though.
The two
most important programs to create custom animations for custom Tomb
Raider levels are WADMerger Animation Editor and 3D Studio Max.
Both programs are capable of creating smooth animations for objects,
including Lara.
This tutorial includes:
- WADMerger Animation
Editor by Titak
- 3D Studio Max by Titak
- StateID's and stateID
changes explained by SSJ6Wolf
- Step by Step: Creating a sprint jump
for Lara by SSJ6Wolf
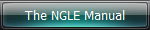
WADMerger Animation Editor
1. Open WADMerger and load your wad.
2. Select the object you want to animate.
3.
Open Animation Editor.
4. Select the animation you want to
change/create in the Current Animation box.
5. Create the
animation.
The basics:
- Select mesh: right mouse click.
- You can rotate or move the mesh after clicking the Move
 or Rotate
  buttons, right below the File and Edit dropdown menus. Three coloured
arrows representing the X, Y and Z axis will appear. Pull these to move
or rotate the mesh.
buttons, right below the File and Edit dropdown menus. Three coloured
arrows representing the X, Y and Z axis will appear. Pull these to move
or rotate the mesh.
- You can add extra animations by clicking
the Add button.
- You can delete frames using the
 button.
- The
 button lets you add effects to the
animation, such as sounds.
button lets you add effects to the
animation, such as sounds.
- Frame rate determines the
speed of the animation: the higher the number, the slower the animation.
- If you want to link several animations into one long one you can
put the number of the Next Animation in this box. Also put in a Next
Frame.
Copy and paste frames or entire animations using the
Frame and Animation dropdown menus.
6. Save the changes
and save your wad.
7. Check out your new animation.
Animation Editor also has an Animation Wizard  feature. This feature allows you to create the first frame, then the
last frame and the Wizard will then calculate the frames in between.
Saves time and makes the animation smoother.
feature. This feature allows you to create the first frame, then the
last frame and the Wizard will then calculate the frames in between.
Saves time and makes the animation smoother.
The WADMerger
download comes with a readme file describing more features. It is best
to also read that.
Creating animations isn't as easy as it
looks. But practice makes perfect.
3d
Studio Max
I'm using 3D Studio Max 6. The
buttons and layout of the window may look different in another version.
Other programs needed when creating animations in 3D Studio Max are:
Wadmerger
to create the wad, to copy animations from one
wad to another and to add State-ID's, effects and sounds to an
animation.
TRViewer
to export the animation to .3ds format.
FexAnim
to fix
to collisionbox of the new animation (WADMerger also has a feature like
this).
TRUpdate
to transfer the new animation data from
the TR4 file to the wad.
1. Create a dummy wad, containing
at least the animating object you want to change.
2. Convert
the wad into a dummy level (tr4)
3. Open TRViewer and
open your dummy tr4.
4. Select the animating object you want
to change in 3d Studio Max .
5. Export into 3ds
format.
-If the animating object has more than one animation you can
select which animation you want to export with the object.
-If you
want to change one of Lara's animations you first need to export the
skin meshes (select skin meshes and export into TRMVB format) and
then import them again in the Lara object.
After that you can export
the Lara object with one animation.
6. Import the object with
animation into 3d Studio Max and create the animation.
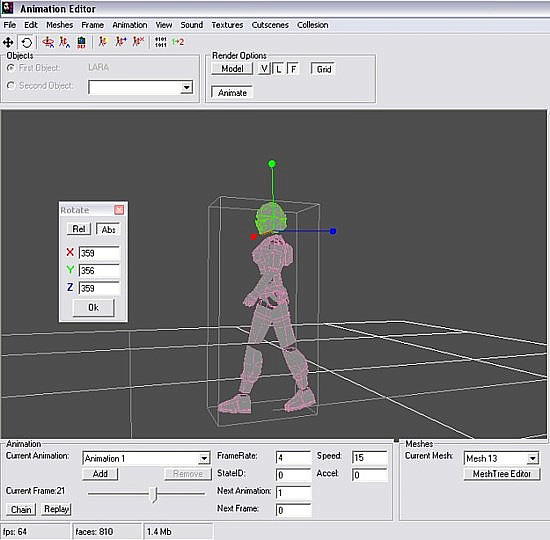
Here is a full screenshot of the 3d Studio Max 6 window.
- Use import instead of open.
-
Click the Auto button before starting to animate the object.
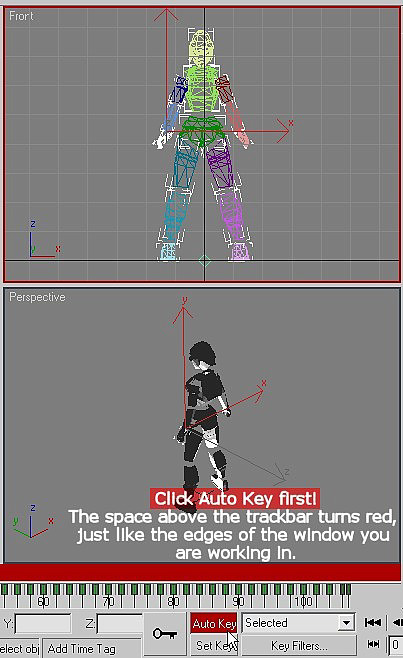
- Set the first key (=frame), move the strackbar
thingy and create the next key. 3D Studio Max will calculate the frames
in between.
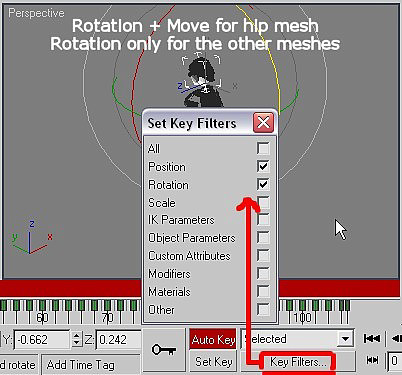
- Use the Move feature only on Lara's hip mesh
when animating Lara!
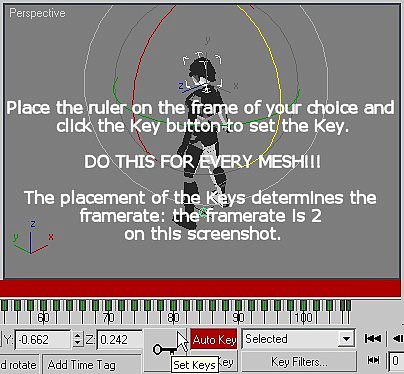
- After you have finished the animation you need
to set keys to every frame and to every mesh, depending on the frame
rate you want. In the screenshot the animation will have frame rate 2.
Make sure the animation range to ends with a key!!!! (Even if you have
set keys every other frame. You can see it in the below screenshot)
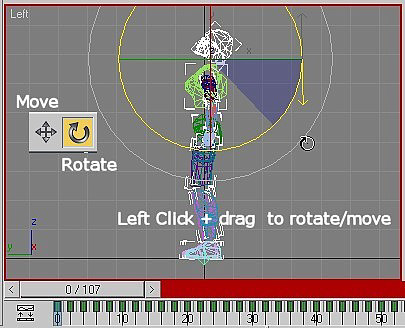
Info about assigning keys:
In the bottom right hand corner
of the 3D MAX window is a Key filters button which has to
do with the keys that can be assigned to a frame/animation. When you
click on this button a dropdown menu will appear with the key types
listed. For LE related animations it is enough to only have rotation and position keys
checked.
- To assign rotate keys only you need to uncheck
the position key in this dropdown menu. Now you can assign the rotate key
to each frame of each mesh by pressing the K button, or by
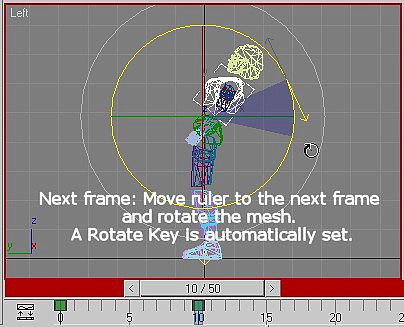
clicking on the set key button. You can use the . button on your
keyboard or drag the trackbar ruler to go to the next frame.
- For
the hipmesh you need to have both rotate and position checked
in the key filters dropdownmenu.
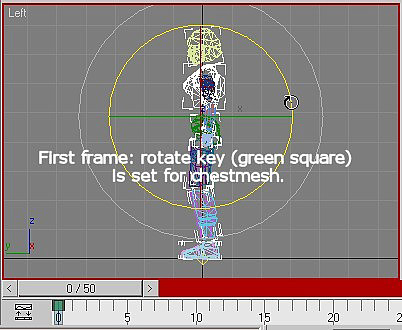
When you assign the keys
to the frames with the K button (on your keyboard) or with the Set
Key button, a green rectangle should appear beneath the frame
number. (you can see those green rectangles in the below screenshot,
right below the red border.)
If you assign both Rotate and Position keys
to the frames the rectangle will be red and green.
7. Export the object.
8. Open Trviewer and
open the dummy tr4.
9. Right-click o the Lara movable in TRViewer and
select 'import from 3DS'. Check the circle in front of 'animation' and
then check 'replace this animation...' and select an animation.
Like in the screenshot below.
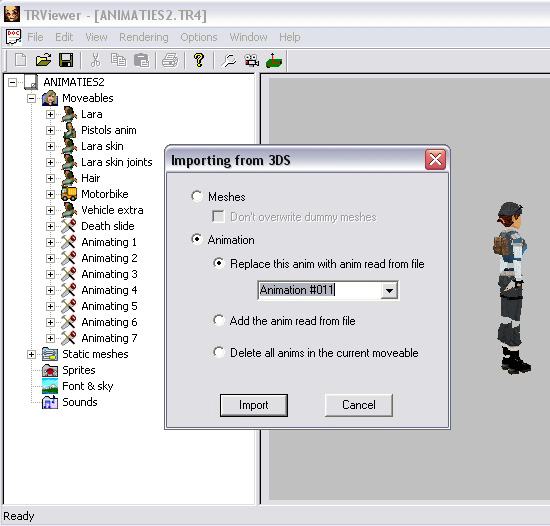
Then you can save the .tr4 file with the new
animation.
10. Open FEXanim and select the object.
Fix the collision and save the tr4 again.
11. Open Trupdate and
run the program to transfer the new animation data to the dummy wad.
(make sure you press the Update button before saving the wad!!!!)
12. Open WADMerger and load the dummy wad. Select the
object and open AnimationEditor .
13. Select the new
animation from the animation list and copy the entire animation ( animation
dropdown menu - copy )
14. Close AnimationEditor and
load your level wad. Select the object that needs the new animation and
open AnimationEditor again.
15. Paste the new animation
into the right animation slot. ( animation - copy (replace) )
NOTE: I tried to copy and paste the entire object with the new animation
into the levelwad using WADMerger but that caused bugs in the
animation ingame. That's why I only copy and paste the animation.
16. Save the changes and save the wad. Convert the wad and check
out your new animation ingame!
Note:
I've had cases in which the animation looked good in 3D Studio Max but
after importing it with TRViewer it looked all messed up. I then
exported the animation again in 3D Studio Max and imported it again in
TRViewer. It was okay the second time. I have no idea what causes this
and I have the problem more often with objects other than Lara.
StateID and stateID changes
StateID
A stateID is a number that the game engine
uses to determine what a given object is doing. For example, for Lara
this number decides what buttons the player can press, how Lara reacts
to the environment, and how objects react to Lara. Each animation has
its own stateID assigned to it, and each object has its own set of
stateIDs.
StateID changes
These reactions are often stateID
changes. A stateID change is when a new stateID is generated by the
engine, either by a button press or an environmental change (or for
baddies, the AI makes a decision). When these changes occur and to what
animation they go, is determined by the stateID change editor. The
editor is set up as a series of five numbers, each in a column:
StateID, low frame, high frame, next animation, next frame.
1. StateID is the new number that the engine has generated.
2 and 3. Low frame and High frame set the boundaries for when the
change occurs. For example if low frame is 4 and high frame is 6, then
the change will only occur between frames 4 and 6.
4. Next
animation is the new animation the object will go to.
5. Next
frame is the starting frame within the new animation.
When making
custom animations, it is important to remember that you can only change
between stateIDs if the change already occurs; you cannot make up your
own. For example you cannot have the jump button do anything during
Lara's monkeyswing because that stateID change was never put into the
engine. It is very important that you investigate the existing
animations and compare them to the new ones you are to make. What
stateIDs are used? Which ones do they use to get to new animations?
Also, stateIDs have some hardcoded effects as well. For example,
stateID 3 which is Lara's foward jump, lets the player use left and
right to rotate her, and this will also apply to any custom animations
with stateID 3.
Moving an object about
Now, about
moving the object about. I'll use Lara for simplicity's sake.
There are three ways that Lara can move in the game:
1. Using
the speed and acceleration fields at the bottom of the editor will move
Lara forward or backward in a given animation. Positive numbers
typically move her foward, but some stateIDs use negative numbers to
move her foward...just test your animation in-game and you'll see if you
got it right or not. This is used typically for running animations.
Speed = the initial speed of the animation. Without acceleration, it
sets the constant speed. 47 is running pace and 87 is sprinting pace, to
give you an idea of what number to use.
Acceleration = the value
that is added to the current speed, each frame. For example if the speed
is 1 and acceleration is 2, then each frame Lara will go from 1, to 3,
to 5, etc. until the animation ends.
NOTE: Do NOT use
acceleration for looping animations, because Lara will drop back to the
initial speed each time the animation starts over, which looks and feels
very bad to the player.
2. When an animation has Lara end
at a different spot (like one square to the left), a set position command
can be used to shift her over to that spot. This command can be set in
the animcommands window. Set position commands occur AFTER the animation
finishes. Set position uses coordinates (x, y, z) with 1000 being a
tile. (so 250 is one click, etc.) Negative numbers may be used. The Y
axis is upside-down here. Use negative numbers to move her up and
vise-versa.
NOTE: The "move" function in the editor uses
these same values except divided by 1000. So 1 is a tile, 0.25 is 1
click, etc. Knowing this will let you move Lara precisely.
3. When
Lara jumps, a grab position command forms a parabolic path for
her to fly through, also set in the animcommands window. The grab
position command also occurs AFTER the animation finishes. Its
coordinates are (y,z) and check with the original animations for the
values, and experiment with them. For example animation 76 sets the
command for Lara's standing forward jump. You need a stateID that is
used for a jump (3, 25, 26, or 27). The y value should always be
negative and the z value should always be positive no matter which
stateID is being used, unless you truly want the opposite effect to
occur.
NOTE: As far as I know, only the Lara object uses
this command.
Command 3
Also, I should mention Command
3. If, after a certain animation, Lara has trouble doing a mid-air
grab, or crawling, or drawing her guns, place command 3 in the animation
and the problem should be fixed.
Play effect 12
If you play
effect 12 during an animation, it serves the same purpose as command
3 except that Lara will be able to draw her guns during the animation,
starting at the frame when the effect is played. This is used typically
for pull-up animations.
NOTE: Effect 12 does not
appear in the drop-down menu for effects. Instead of using the drop-down
menu, just type in 12 instead.
Addition by Titak:
StateID
89
When you have created a custom animation for Lara (a new move
or a cutscene animation) you can add StateID 89 to the animation to
disable Lara control. Lara won't do anything during the animation, no
matter what button you press, includign the look button.
This
way you'll make sure that the animation won't get interrupted, even if
you are already using a flyby sequence with look button disabled.
Step by Step: Creating a sprint jump for Lara
This tutorial is intended to increase understanding
of the animation editor as you create a sprint jump for Lara. Please PM
me if you have any questions!
Prerequisites:
WADMerger
(preferably 1.96 or later so you can calculate collision)
A WAD
you're ready to experiment with.
Patience!
Read the "creating
custom animations" thread to understand these terms, that will be used
in this tutorial:
-Speed and acceleration
-Grab position
-StateID
-StateID change
-stateID change editor
and how it works
Objectives:
1. Enable the
player to cross a gap of four squares when they press "jump" while
sprinting - a sprint jump.
2. Enable the player to grab ledges
during this sprint jump.
3. Reassign the diving roll move to
be used when "shift" and "jump" are used together while sprinting.
Part 1 - Gathering information
Open WADMerger, and load a
WAD. I found it fitting to use tut1.was but you can choose any WAD with
Lara in it. Select Lara and click the "animation editor" button.
There are 444 animations for Lara in Tomb Raider 4 - that's a lot! But
the more time you spend here, the easier it will be to find a specific
animation.
When you want to make a custom animation you need to
make sure you know how it will be used in-game. In this case you most
likely know beforehand that the jump button may be used while sprinting
to perform a diving roll, so it is therefore possible to use this button
for a new animation.
What you need to do is find reference
animations so you know what kinds of commands to use for our dash jump.
Wouldn't it make sense to find the running jump animations? On your own
you would have to keep scrolling until you spotted your reference
animations, but this time it wouldn't have taken long - Lara's running
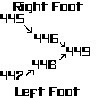
jump is found in animations 16, 17, 18, and 19.
Looking at the
"next animation" field, notice that these animations come in pairs.
Animation 16 goes to animation 17 and animation 18 goes to animation 19.
Both 17 and 19 lead to animation 77 (a continuation of the jump). Also
notice that animations 16 and 17 jump off of the right foot, and
animations 18 and 19 jump off the left foot. Making a flow chart will be
helpful here. Like this:
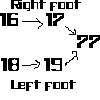
This tells you that you will actually need 5
animations for the sprint jump. Now let's gather information about the
individual animations. The most important things to find for each
animation are:
1. StateID (the number that tells the game
engine what Lara's doing)
2. Speed and Acceleration, if any
(moves Lara back and forth)
3. Animation commands (click the
button with all the 0's and 1's, this is for playing sounds and other
special commands, more on this later)
4. StateID changes
(click the button that looks like 1->2, this is for changing what Lara
is doing)
On your own you should write this stuff down. All of
the animations have stateID 3. Animations 16 and 18 have a speed of 47,
Lara's running pace. In the animcommands window, animations 16 and 18
both have a GRAB POSITION command (-100,75). Don't worry about the sound
commands, they're not fundamental right now and you will insert them of
your own accord later on in the tutorial. In the stateID change editor,
animations 16 and 18 go to animation 133 for stateID 8. If you find
animation 133 you'll see this is for if Lara dies before she can take
off.
Animations 17 and 19 do not have any speed settings or
animation commands, but they do have a lot of stateID changes. If you
track down all of the animations these lead to, you should form a list
like this:
StateID 1 (animation 92) = Lara lands and continues
running
StateID 2 (animation 82) = Lara lands and stops moving
StateID 11 (animation 251) = Lara does a mid-air grab
StateID 52
(animation 157) = Lara goes into a swan dive
StateID 68 (animation
207) = Lara turns to face the opposite direction
Animation 77 is
essentially the same as 17 and 19, except it has another stateID,
stateID 9. Tracking it down to animation 45 you see it is for when Lara
starts to fall straight downwards. Animation 77 also has a bunch of
different animations stemming off of stateID 11. This is because Lara
needs to be able to grab when her arms are at different angles, as the
animation progresses. Don't worry about copying all the grabbing
animations' numbers down, we'll be making our own anyway.
Part
2 - Letting Lara Launch
You might think it would make sense to
replace the diving roll animations with your new ones, but it is wise to
keep them for later. (You will use them for the third objective).
Instead we will add new slots.
Click the "add" button under the
animation drop-down menu. You have just created a new slot, numbered
445. Click the add button 4 more times. Now we have slots 445-449 to
work with for our 5 animations. You want to follow the existing running
jump animations as closely as possible, so write down a list matching
your new animations to the running jump animations (or just keep it in
your memory).
Animation 445 -> Animation 16
Animation 446 ->
Animation 17
Animation 447 -> Animation 18
Animation 448 ->
Animation 19
Animation 449 -> Animation 77
The flow chart for
your new animations then looks like this:
To make a good animation, you need a good starting
frame. Animations 445 and 447 will stem off of the sprinting animation,
so let's copy over your starting frames from there. The sprinting
animation is 223. Animations 16 and 18 start just before the foot hits
the ground, so you will start there as well. Go to animation 223 and
select frame 12, when the right foot is about to hit the ground. Under
the frame menu at the top, choose "copy". Now go to animation 445 and
under the frame menu choose "paste (replace)" to replace the only frame
there. Go back to animation 223 and copy frame 2, and paste (replace)
447's only frame.
Let's save here. Select file menu -> save
wad.
NOTE: This
OVERWRITES your current Wad. If you want to save it under a different
name or in a different place, close the animation editor (say 'yes' to
the save changes dialog) and use the "save WAD" button instead.
Start with animation 445. The animation it is based off of, animation
16, has Lara push off of her right foot to jump, so animation 445 will
do the same. Press the button with the blue plus sign near the top of
the editor to duplicate the frame. (Don't worry about the collision box
yet.) In this frame, have Lara push on her foot.
Press the move
button and change the Y value to -0.314 to lower her. Select mesh 4 and
press the rotate button. Change the X value to 90 to raise the leg.
Select mesh 5 and press the rotate button. Change the X value to 270 to
bend the knee. Select mesh 7 and change its x value to 320 to make Lara
bend over more. Select mesh 1 and change its x value to 20 to pull that
leg in more. Now compare this frame to the first frame and yeah, it
looks like she's ready to leap!
Go back to frame 1 (frame 1 is
the second frame, frame 0 is the first frame. Confusing, I know) and
duplicate it. In this new frame, move Lara up to -0.414 again. Move Mesh
1's x value to 40 and Mesh 4's value to 45. Move mesh 5's x value to
310. Move mesh 7's x value to 310 so she bends even further down.
Duplicate frame 2 and in the new frame. change mesh 4's x value to
320 and mesh 5's x value to 0. Change mesh 7's x value to 0. Change Mesh
1's x value to 90.
Select collision -> calculate collision
(animation) to fix the collision box. This helps generate Lara's
shadow accurately and it tells the camera where to look.
To
smooth this animation out, highlight the number 1 and press "2" to
change the framerate to 2. You CANNOT delete this number or the editor
crashes. You have to replace it like I instructed. Now press the auto
animate object button to play your new animation. It is hard to see
since it goes by fast, but you made your first animation!
NOTE: Notice how the frame numbers change when you change the
framerate. This is because frames are actually CALCULATED by the game
engine in between the frames you made. Now frame 1 is frame 2, frame 2
is frame 4, etc.
Now create animation 447 the exact same way,
except the legs are switched. So do with Mesh 1 what you did with mesh 4
last time, and do with mesh 2 what you did with mesh 5 last time, and
vice versa.
Now that you've made two animations, here is how
rotating meshes works for when you do it by yourself:
The x value moves the mesh up and down
The y
value twists the mesh in place
The z value moves the mesh
side-to-side
The values are in degrees, from 0 to 360. So 180
is halfway...etc.
It takes LOTS of experimentation when you
rotate meshes, so don't get discouraged! Just keep trying until you get
the meshes facing the way you want.
Oh yeah, you might have
noticed that when moving Lara with the y value, the smaller the number,
the higher Lara goes. This is because y-axis is upside down.
Now,
remember those four important things we found earlier about animations
16 and 18? Animations 16 and 18 have the same things: StateID 3. A
stateID change for stateID 8, low frame 0 high frame 7 next animation
133. Speed 47. Grab position command (-100,75).
Let's put these
same things into animations 445 and 447 - however we should change two
of these things. The speed should be 87, because Lara is dashing. And
grab position command should be (-100,100) because the sprint jump will
cover another square (when you do the math, 25 is the equivalent of a
square).
Set animation 445's "next animation" field to 446
(remember the flow chart!) and 447's "next animation" field to 448.
Last but certainly not least, we need to enable these animations.
First take a look at animation 0, Lara's running animation. The stateID
change editor has these lines:
3, 0, 11, 18, 0
3, 11, 22, 16,
0
Essentially, the guys at Core Design split this animation in
half, one half when Lara steps on the left foot, another half for when
she steps on her right foot.
Let's apply this same principle to
the sprinting animation. So go to animation 223 and open the stateID
change editor. On your own you would track all of these animations down
to find out what they do, but I can just tell you that stateID 74 is for
when the jump button is pressed. Delete the current lines with stateID
74 and add these instead:
74, 0, 9, 447, 0
74, 9, 18, 445, 0
Now you have split up the sprinting animation so Lara can get to the
sprint jump animations.
Part 3 - Continuing the jump
Now on to animations 446 and 448. These are the equivalents of
animations 17 and 19. Animations 17 and 19 are 5 frames, but have a
framerate of 2 so they really have 10 frames each.
Copy the last
frame of animation 445, then paste (replace) it over 446's single frame.
Then copy the last frame of 447 and paste (replace) it over 448's single
frame. I am leaving these animations up to you. Make five frames like
before and then make the framerate 2. These animations are when Lara has
jumped forward. Be creative! Will Lara fling her arms upward and then
drop them to her sides? Or will she fold them across her chest and then
fling them outward like an eagle? It's up to you! Make sure animations
446 and 448 end with the same frame, because these animations will both
lead to a common, looping animation. Don't forget to calculate the
collision!
When you're done, put the four important things in for
animations 446 and 448. In this case it's simply stateID 3 and the
stateID changes. But the stateID changes will be different. The change
for stateID 1 and stateID 2 should both go to animation 82, where Lara
lands and stops, because I feel it is too extravagant that Lara could
continue running after jumping with such momentum. For the same reason I
did not include the StateID 68 change. And the stateID 52 change will be
used for objective #3, so don't include that either. The changes need
low frame 0 and high frame 8, except for stateID 11 which has low frame
5. In the end your stateID change editor should look like this for
animations 446 and 448:
1, 0, 8, 82, 0
2, 0, 8, 82, 0
11,
5, 8, 251, 0
Then complete your animation flow chart by setting
both of their "next animation" fields to animation 449.
On to
animation 449. Copy the last frame from either 446 or 448 and paste it
over 449's single frame. Again I encourage creativity here. This is a
looping animation so I have Lara flailing her arms about like she does
in TR6. Make the animation 11 frames long and then give it framerate 2.
Don't forget it's looping so have the last frame match the first frame.
NOTE: If you don't want the animation to loop, set the "next frame"
field to the number of the last frame (22) so that the last frame keeps
playing until a stateID change kicks in.
Now to add the four
important things. StateID 3. The same stateID changes will get deleted,
except now you have stateID 9, so the stateID change editor should look
like this (each number indicates a new column)
1, 0, 22, 82, 0
2, 0, 22, 82, 0
9, 0, 22, 45, 0
Notice I left out stateID 11,
because now you're going to make some grabbing animations with the
Animation Wizard.
Objective 1 complete.
Part 4 -
Letting Lara Grab
Since animation 449 is long, you should use 3
different grabbing animations to cover it.
Click the add button,
and now you're at animation 450. Copy frame 0 from 449 and paste
(replace) it over 450's single frame. Duplicate it. Now go to animation
95 - this is where Lara is going. So copy 95's frame and paste it over
450's second frame. Now you should have the beginning and end of the
animation. That's just what you need for the animation wizard. Copy the
last frame again (you'll need it in a second). Go to the first frame,
then click the animation wizard button.
The first step of the
animation wizard is just introduction. Read it then press next. The
second step asks you to make the first frame. It is already there, so
press next. The third step asks for the last frame. Click on the
animation editor and press ctrl+v to paste the last frame there. Then
click next in the animation wizard. The fourth step asks for the length
(the number of frames) and the start (the starting frame) Let's make the
length 6, and the start should be 0.
Now look at your animation.
Lara goes smoothly from the first to frame 5. However the wizard made an
extra frame - frame 6. And what is now frame 7 is what I asked you to
paste in to see that it would be the end frame. These frames are no
longer needed, so delete them. Now you should have frames 0-5 that make
a smooth grabbing animation. It's kind of short so make the framerate 2.
Set the stateID to 11 and next animation to 95. Calculate the collision
for the animation and you're done!
Isn't that easy? Now, make 2
more grabbing animations just like 450, except for animation 451 use
animation 449's frame 8 as the first frame, and for animation 452 use
animation 449's frame 16 as the first frame.
Now to enable these
animations. Go back to animation 449 and open the stateID change editor.
Add these three lines:
11, 0, 7, 450, 0
11, 8, 15, 451, 0
11, 16, 22, 452, 0
Now Lara will use three animations for
grabbing depending on when you press action. More animations = Lara
flows better.
Objective 2 complete.
Part 5 - Enabling
the Diving Roll
What if Lara still wants to do the diving roll?
You know that the shift key can be used during a forward jump, so the
diving roll can be used for shift + jump while sprinting.
Go to
animation 445 and add this line in the stateID change editor:
52, 0,
7, 308, 0
Go to animation 447 and add this line in the stateID change
editor:
52, 0, 7, 230, 0
Objective 3 complete.
Now we
should add some sounds. Go to animation 445 and open the animcommands
window. To add a sound, select the "play sound" command in the dropdown
menu. The next box sets the frame at which the sound plays, then the
next dropdown menu lets you choose the sound. The last dropdown menu
lets you choose "land" "water" or "always".
Land = sounds for when moving on dry land only.
Water = sounds for when moving in water only.
Always = Always!
You'll probably want to add a Lara_jump in animation 445. Make it
"always" since whether it's dry land or not doesn't matter with that
sound. Then do the same with animation 447. Add any other sounds you
wish.
Now, save, convert the level and test the sprint jump and
diving roll in-game. Congratulations, your tutorial is complete!
I followed along with the tutorial and this is how my sprint jump turned
out (yep, that's my tutorial level):