
Flyby Cameras - the Basics
by
Uvavoo
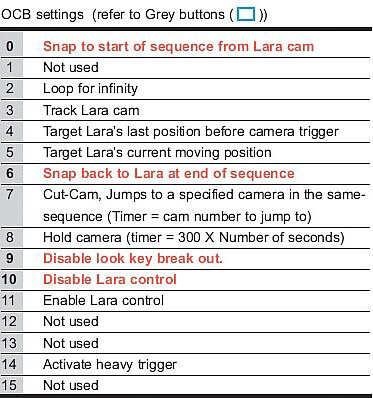
These are the OCB settings available for flyby cameras.

To Create a Simple Flyby Camera Sequence
1. From the effects menu select flyby camera and place it in your scene.
You will notice the small 'cone' in front of the camera showing which
direction it is pointing in. You can change the direction by holding the
alt key down and using the cursor keys. Holding the Alt + Shift keys
increases the increment the camera turns.
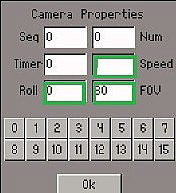
2. Select this camera and click on 'O' to get the OCB window up.
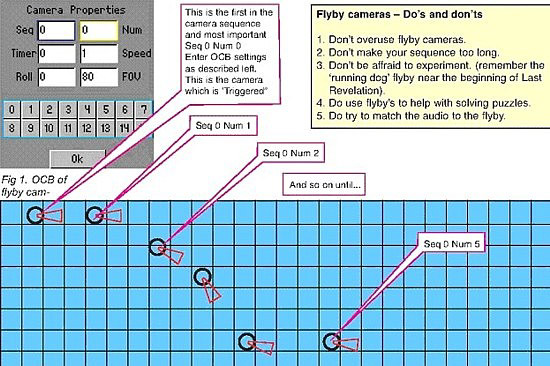
Fig 2. Simple flyby sequence
In the OCB settings chart above I have highlighted in red the buttons
which are pressed for most flyby sequences. They need only be pressed
for the FIRST camera in the sequence.
3. You now need to enter the sequence number. You may have up to 7
sequences in one level.
4. Enter the camera number. Each camera in the sequence must increment
by 1.
5. Leave the other settings as the defaults for now.
6. The next step is to add your other cameras. Refer to Fig 2 to
complete your simple flyby sequence.
To trigger your flyby, you simply trigger the first camera in the
sequence.
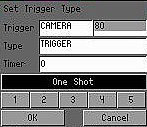
Fig 3. Trigger set up
In the trigger type window make sure the trigger is set to CAMERA. Don't
forget to click the ONE SHOT button to prevent the sequence from
looping.
Ok Spielberg, test it out in game and check out your flyby.
FLYBY CAMERAS - some more advanced techniques
I have repeated the ocb table here for convenience.
First we are going to deal with the other OCB settings, namely Speed, Roll and FOV.
Speed
The higher the number, the faster the speed. Sounds obvious, but it is
not as simple as it sounds. Personally I never change the speed. Because
the game engine uses the distance between the cameras to interpret the
speed (in a linear fashion) I use this to change the speed of the camera
and do not further complicate things by changing the speed in the OCB.
See fig 4.

Fig 4. Changing the speed of the camera by changing the distance between
the cameras rather than using the speed setting in the OCB. In this
sequence the camera will start off slowly and increase speed towards the
end.
Roll
This is quite a nice feature. Enter the number in the roll field
(degrees) and the camera will roll (bank) by that amount. Nice to bank
the camera when going round corners for example.
FOV
Field of view. A higher number in here causes the field of view to
increase, like widening the angle of the lens.
* All
the above OCB's need to be applied to the camera it relates to.
Heavy Trigger
The flyby camera can trigger a heavy trigger. Simply open the OCB on the
camera you wish to trigger the heavy trigger and click on the 14 button
(activate heavy trigger). Place a heavy trigger under this camera to
trigger, say, a door opening. A whole sequence of events can be
triggered this way, rather like the 'rolling ball' trick.
Cut Cams
This is a very elegant and much underused feature in the level editor
mainly because of the difficulties in getting it to work properly. I
have found that by using 'dummy' cameras this technique works every
time. Basically what a cut cam does is jump to another camera in the
sequence. This can be done many times in one sequence and you can cut
between rooms if you wish. This is the technique I use.
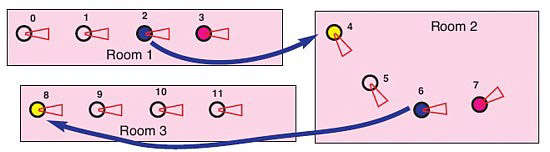
Fig 2
In this example the camera will 'Cut' between 3 different rooms (doesn't
have to be different rooms can be all in the same room). The blue
cameras are the cutcams, the yellow cameras
are the cameras the cutcam jumps to, and the magenta are
the dummy cameras. To set up this sequence proceed as follows. 1. Set up
your camera sequene in the usual way. 2. Click on Camera 2 and open its
OCB, click on the grey 7 button in the timer filed enter the number 4,
because you want the camera to jump to this camera. Repeat the operation
with camera 6, typing 8 in the timer field. When in game the camera will
smoothly fly between camera 0 and 2 then cut to camera 4, smoothly fly
to camera 6 then cut again to camera 8 and finally smoothly fly on to
the end, camera 11.