NG Triggers
by
Paolone
Important: Since version 1.1 of the NGLE was released in January 2008, a number of new kinds of triggers have been introduced. For this reason you MUST use the new Objects.h file released with the TRNG engine. This is because this objects.h file updates these new trigger names. All other settings for slot and floor type remains the same as in the past.
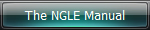
ACTION trigger
Action trigger works in
a similar way to the OBJECT trigger in that both triggers require a
moveable like argument. However, the ACTION trigger allows you to
perform differing actions on the moveable other than what the simple
OBJECT trigger would permit. For example, with ACTION you can rotate an
item or move it in different ways. You can also remove an item or kill a
baddie in different ways.
CONDITION trigger
The CONDITION trigger
is a trigger of trigger-type group, i.e. those triggers which set when
you enable a trigger. Other old triggers of this group are for example;
HEAVY, SWITCH, COMBAT, PAD, etc.
All triggers in this group are
like a condition: for example COMBAT activates a trigger only when Lara
Extracts Weapons. A HEAVY trigger is the condition that something other
than Lara activates it, for example, a pushable block.
The CONDITION trigger, like its name implies, is another condition but in this case you can choose between a lot of conditions. This list will grow with future versions.
One example of the new CONDITION triggers is that Lara can trigger an event only if she owns a particular object in her inventory. Another is that Lara has to be performing a specific move in order to activate a trigger.
There are some conditions that even permit triggers to be set smaller than a 1x1 tile. These condition triggers are called fragmented triggersand allow you to set a fragment of the current sector as a trigger zone.
Another condition is that you can set vertical triggers, where you can set a trigger at a specific height, for example, that will only trigger when Lara reaches a certain height when climbing a ladder.
PARAMETER trigger
This trigger works
together with CONDITION triggers to set what action a condition will
perform. The PARAMETER trigger is in the what-to-trigger group, along
with OBJECT, FLIPMAP, FLYBY, SINK etc.
If the CONDITION is set on
a moveable, for example, when the condition is if
that enemy is living, the condition will work together with an
OBJECT trigger, but when the condition is on an item other than a
moveable, for example, on an inventory item, then you'll have to use
PARAMETER together with CONDITION to set whatever number you choose for
the condition.
TIMER_FIELD trigger
This trigger is in
the group of what-to-trigger group (like OBJECT, FLIPMAP ect) and it's
not always necessary to use it. However, it's important to understand
when you have to use this trigger and when you don't have to use it.
When you have to set a timer value for your trigger to delay the
activation of some object, for example a rollingball 3 seconds after the
trigger has been triggered, or when you set the duration of some
activity, like a timed door, in some circumstances you have to use the
TIMER_FIELD to set the value in seconds, positive or negative, instead
of typing that value in the Timer field of the trigger window.
The reason for this is because new triggers, in particular the CONDITION trigger, use many parameters and some of these are saved in the old timer field. So when you place a Condition trigger and you then attach another trigger to open, say, a door for a limited time, you have to place another trigger of the TIMER_FIELD type and set the number of seconds in the field named Object to trigger <#>. In this setup, do not set a value in the timer field.
This complication is a bit tedious in that it adds to your work, but in the vast scheme of things, the powerful new features of the TRNG more than make up for it. Additionally, with this new setup you can set timers for far longer periods than you could in the old engine. Timer field values have been increased from 255 to 1024 and a timed door with this value will remain open for about 17 minutes!
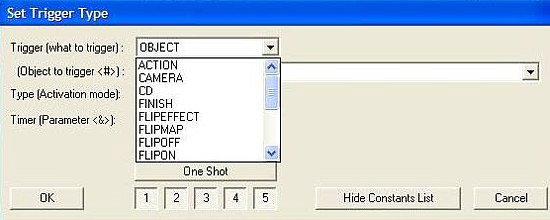
FLIPEFFECT triggers
In reality, the
FLIPEFFECT trigger is an old trigger, but merged with next generation
flipeffect this permits you to set more parameters than a simple timer
value. Thanks to these enhancements you can now get a lot of targets
using new ng flipeffects.
If you're concerned about when you should look for some feature in the ACTION group or in the FLIPEFFECT group, the general rule is: if your target is to change something regarding a moveable object other than Lara, then you should use ACTION, while in all other cases you will find what you need in the FLIPEFFECT group.
FMV trigger
The FMV trigger is also not
new; it existed in The Last Revelation Level Editor but was removed
before the Level Editor was released. With the NG, it's back!
If
you want have a real movie in your level, simply place an FMV trigger
and set in the Object to
trigger # field the
number of the fmv you wish to play. You can play movies in wmv, mpg and
other well-known formats. For more information about the setting of
fmvs, please see the section dealing with fmvs in the Scripts section of
this manual.
Overview about some new NG Triggers
In the new Set Type Trigger window you can find not only the short name of new triggers but also a brief-description of each trigger. For this reason there is no need for full explanations of each trigger. The following tips and tricks about some of these triggers should suffice.
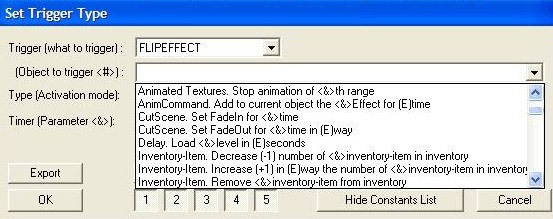
CONDITION with Fragmented triggers
To see a fragmented trigger example, see this tutorial by Cook.
In the old TRLE you were able to set interactive zones when placing a trigger on squares in your map. When Lara or some enemy or object touched any part of this zone, the set triggers were engaged. Now there are some new features.
If you use CONDITION with a fragmented zone you can set a trigger so that it will only be activated when Lara walks over that fragmented trigger, for example, on a quarter of a tile.
Once you set this small trigger zone using a CONDITION trigger with fragmented settings, you'll have to add to that zone the trigger for whatever you wish to activate in game. The first CONDITION trigger you place will be used only to set the active part of the tile while any other trigger will activate whatever event you wish to place.
At first glance, the trigger window for condition with fragments appears rather complicated, so we'll illustrate an example so you understand how it works.
As a first step, you have to choose a grid to divide the zone. You can choose between three different grid types from the Timer parameterfield:
Fragmented trigger. Check in (E) way if lara
is in <#>fragment of 2x2 sector grid
Fragmented trigger. Check in (E)
way if lara is in <#>fragment of 3x3 sector grid
Fragmented trigger.
Check in (E) way if lara is in <#>fragment of 4x4 sector grid
The three grids, 2x2, 3x3 and 4x4 correspond to the following illustration:
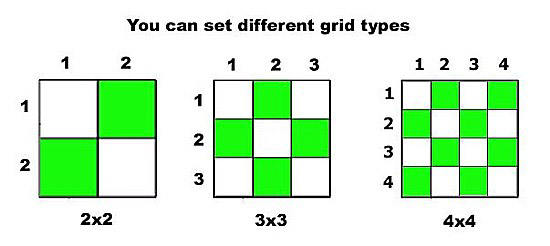
If you choose a 2x2 grid, the standard block of the level editor will be seen divided into four little sections. When you choose the grid type you also have to choose which mini-sector of this grid you want to use as the sensor zone for triggers. You find a lot of choices in the Object to trigger field of Trigger windows.
Square Fragment: (x,y)
Square fragment is the easiest as there is a single fragment for the sensor zone for triggers.
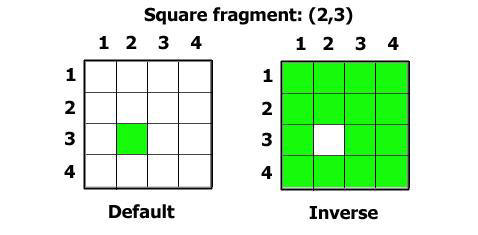
In the above illustration we have used a 4x4 grid and
we chose a fragment in position (2,3) of the grid. Any grid or cell you
choose can always be set in an Inverse mode by selecting the Inverse
voice in (E)xtra field
of the Trigger window. When you set Inverse, the sensor zone (coloured
by green in the above image) will become the opposite of the chosen
state.
With some fragmented triggers you can create very
irregular trigger sensor zones over a single tile in the game.
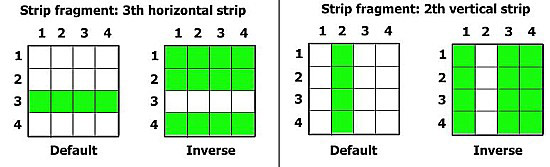
Strip Fragment: Nth horizontal or Vertical strip
If you choose a strip of fragments you get a sensor line of micro trigger zones.
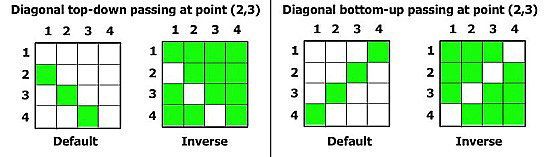
Strip Fragment: Diagonal strips, top-down or bottom-up
You can create a sensor line diagonally, but in this case you also have to choose whether the diagonal runs top left to bottom right or vice versa. In the list you have to choose the single micro sector where the diagonal runs.
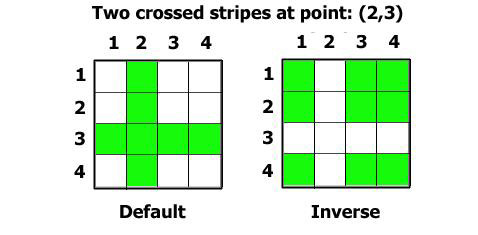
Fragments: two crossed strips at point (x,y)
Crossed strips are two strips, one vertical and the other horizontal, which pass through the named cell in the grid.
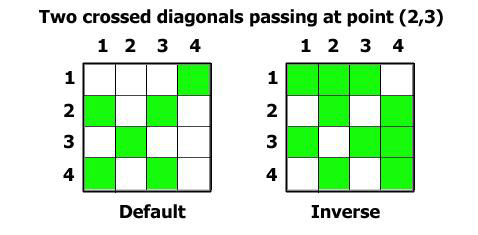
Fragments: two crossed diagonals passing at point (x,y)
This mode works like above, but in this case the lines are diagonals.
Tips & Tricks about Fragmented Triggers
You can use some fragmented triggers to simulate laser sensory alarms. Just fill the floor of the room with fragmented triggers using a grid shape to create a regular grid of sensory lines. To achieve this effect, you need to also set in the (E)xtra field of the Trigger window the settingPAD or PAD and inverse. In this way, Lara will be able to avoid any sensors by jumping. However, please note that this operation will be difficult if you use a grid like 3x3 or, even worse, 4x4.
To complete your sensory alarms, make static objects with no collision applied with waterfall textures to simulate blinking laser rays. Take care to place these statics very close to the floor.
You can create very small objects, like statics or animatings, and then place them in a position where it's exacltly within a single micro-cell of fragment. Now by placing a fragment trigger for that micro-sector you can add some dynamic property to that object. For example, if you add a trigger that damages Lara, the object could be a little blade that shoots up from the floor.
If you use a waterfall to simulate a shower, you can place a trigger to remove fire from Lara but only where the waterfall object falls.
If you place a very thin laser to simulate a mysterious light beam, you can place a fragmented trigger where the light beam falls to teleport Lara to another room.