Textures - Animating basics
by
Bedazzled
Note: This tutorial applies only to the new game engine which has opened up a whole new world of possibilities for using animating textures in levels. The setting up of animation ranges is also far easier than ever before. All the TR3 waterfalls have been compiled into one TGA set for your convenience should you need them - download here (249 Kb).
The main points are listed below.
~ It is now possible to have multiple UvRotate ranges each scrolling with a different speed and or direction, alongside one or more TR3 style waterfalls.
~ The textures can now be placed anywhere in the texture map providing that all of the textures to be used in each range are grouped together.
~ There is no longer a requirement for the UvRotate = line in the script; everything is setup from within the Animating Texture window of the editor.
~ A previously built V49 project with all animating ranges set and working correctly can be converted to a V50 project simply by using the map converter. And the new project will continue to work correctly without the need to reset the animation ranges.
As the title suggests this tutorial covers only the basics; a second tutorial will cover more advanced techniques requiring use of new triggers and script changes.
I will first describe how to setup the various types of animating textures and then show the correct way to convert a V49 project to a V50 project.
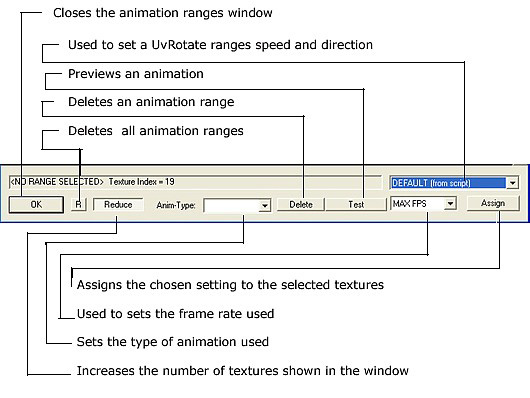
Description of the animation range window dropdown boxes and buttons
Notes
~ The Reduce button only appears if a V50 project is being used.
~ Before setting the very first range get into the habit of clicking the 'R' button to clear any existing ranges.
~ The Anim-type dropdown box contains several options, two of which, the P-Frames and River-Rotate options, are covered in the advanced animating textures tutorial.
Basic water textures
These are the simplest to setup. Select the required textures by clicking and dragging and leave all settings at their default values as shown here.
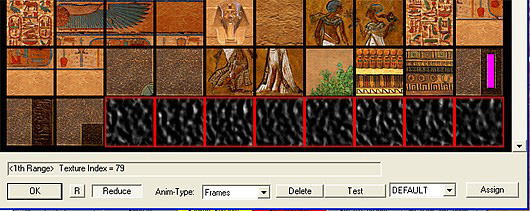
Now click the Assign button followed by the Ok button. To check the range has been assigned open the Animation Range window again. The range should now be surrounded by a green line. Click ok to close the window.

It should be noted that the range settings will not be shown. However clicking on a range will put a red border around them and bring up the settings assigned to that animation range. This is very useful when you have several scrolling ranges set and want to check their speed and direction. As long as you don't click the assign button again their settings will remain unchanged.
Scrolling Textures
These are the waterfall textures used in the Angkor Wat level of TR4 and also the falling sand and Lava textures used in TR4. These are setup in a similar way to normal water textures but this time you must set the anim type, the frame rate and the animation speed.
Begin by selecting the range as before and apply the following settings.
~ Anim Type = Full Rotate.
~ Frame Rate = Max FPS.
~ UvRotate = 8 ( this was the default value used in the script ) a higher value will increase the animation speed and a lower value will reduce it. A negative value can also be chosen which will reverse the direction of the animation.

Click the Assign button and close the window. Additional scrolling texture ranges can be setup in the same way and different animation speeds can be applied to them.
If you want to adjust the speed of a previously set animation range simply click on it. A red border will surround it and then set the new UvRotate value and click the Assign button.
TR3 Waterfalls
I'm going to show how to make TR3 type
waterfalls animate inV49 and V50 projects when using TRNG. Forget the
old technique of applying all the textures in a small hidden room, that
no longer works with the TRNG MK4 installer and possibly some previous
dll versions as well.
You will need a graphics program which is
capable of displaying a grid and also has a snap to grid feature. If you
don't have a suitable graphics program, GIMP will fit the bill and is
free to download and use.
All TR3 waterfalls consist of a block
of 8 texture tiles as shown below, these will not be used in the levels
tga set and we only need any 1 of those tiles to work with. If you use
T-Builder you can simply copy 1 tile into a new tga and save it as your
temporary working tile.
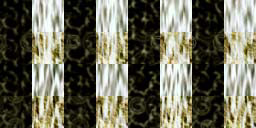
Load your temporary working texture into your graphics program and display a grid showing lines every 16 pixels and enable the programs snap to grid feature. Using the programs select tool select the 32 x 32 pixel section of the texture you want to use.
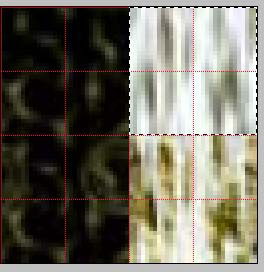
Copy the selection and paste into a
new image which will become your new tile to work with. This new 32 x 32
tile now needs to be resized to 64 x 64 if using a V49 prj or 128 x 128
if using a V50 prj for your level. The texture is almost ready for use
but not quite.
If this texture was used you would see a
horizontal line as the texture scrolled, this is because the top and
bottom of the texture is different. To fix this select the top half of
your texture and paste it as a new image, flip this image vertically and
again copy it. Now paste this copied segment onto the lower half of our
resized image, combine the layers and save your new final texture.
The images below show the texture before and after correction.
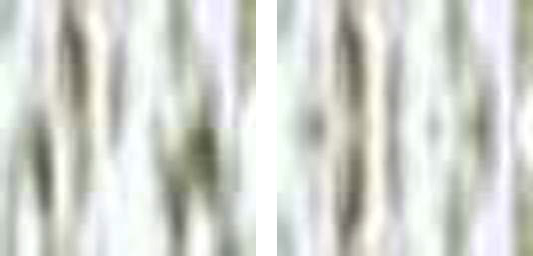
Once corrected the texture can be added to your tga in any position, The setting shown in fig 5 should be used in the animation ranges window, the UVRotate setting will determine the speed and vertical direction of the scrolling.
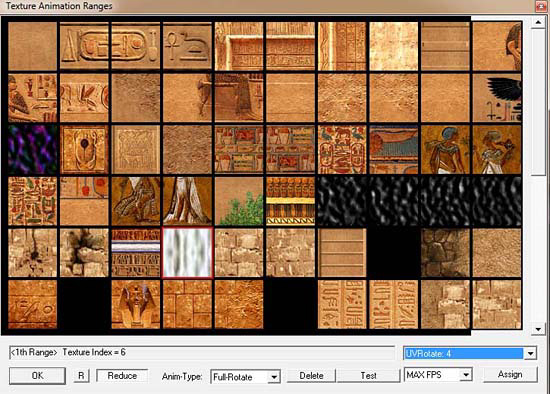
V49 and V50 prj's
The texture can be applied to a wall
as a normal texture and allowed to stretch where it will animate at the
speed set in the texture animation panel. If however you apply it to a
portal with the editors transparent and double sided buttons on, you
must also apply it as a normal texture to a hidden tile in your level
before it will animate.
Converting a V49 project to a V50 project
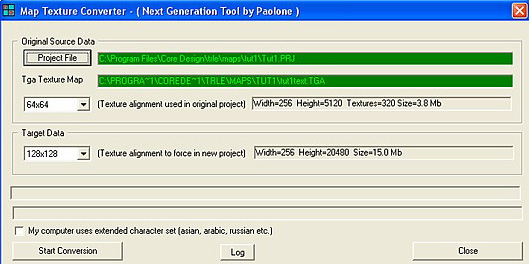
It make no difference if your V49 project consists of only 64 x 64 pixel textures or a mixture of 64 x 64 and 128 x128 pixel textures the conversion method is the same.
The texture alignment used in original prj box should be set to 64 x 64 and the target data should be set to 128 x 128. But you should be aware that any 128 x 128 textures which were in your V49 map will be resized to 256 x 256 during the conversion process.
