
Flipmaps - the Basics
by
Uvavoo
Flipmaps are a great way to create puzzles. They are quite easy to produce but can be confusing at first. Put simply, a flipped room is a duplicate of an existing room which you can then make changes to and trigger in game. Here are the steps needed to make a flipmapped room:
1. Ensure the room you are going to flip is fully textured and all connections (doors) are created.
2. When you are happy click on the F button and type in a number next to it (start at 1).
3. You will see the background of the LE window turn black. This is an indication that you are now working in the flipped room (alt+F returns to the normal room).
4. Make changes to the room. Examples of changes are:
a ) You can change from a dry to a water room.
b ) You can retexture any part of or all of the room.
c ) You can
change the room geometry.
d ) You can change the lighting (using the
existing lightsand ambient light).
e ) Toggle the opacity of
connected doors.
5. That's it. All you need do now is set a trigger for the flipmap. Set the object type to FLIPMAP in the trigger window and put the number of the flipmap in the top right window. When triggered the room will immediately change to the flipped room.
General rules and warnings
1. In the level editor press alt+F to flip between the flipped and normal room (look out for the black background).
2. Avoid flipping very large areas or areas containing many objects.
3. Avoid triggering baddies in flipped rooms, they behave very unpredictably.
4. If you wish to trigger something from the flipped room you must set up the triggers IN the flipped room. They will only trigger from the flipped room.
5. Clicking the F button again deletes the flipped room.
6. Flipmap bug. It is possible when using a flipmap that if the player saves and reloads after the flipmap is triggered the flipmap can revert to its unflipped state. It is not known why this happens but if not too many flipmaps are used and they are not overly complex rooms, then this bug doesn't tend to show itself. Test flipmaps very carefully.
Examples of the use of flipmaps
The most obvious use it so change a dry room to a water room. Remember the clever puzzles in the TR1 level 'The Cistern'.
You could trigger an 'earthquake'. When returning to the room the geometry changes and you can access different areas, get to doors you couldn't reach before.
Use a switch in a darkened room to turn on the lights using a flipmap.
Use 'death' squares in the flipped room (water changes to acid for example).
Blow a hole in a wall, changing the opacity and textures of a 'door'.
Flipon Flipoff
You can also use the flipon and flipoff operators to alternate the flipped room to normal and back again. You must trigger the flipmap first though as described earlier.
Multiple flipmaps
You can trigger many flipmaps at once. The diagram below shows how this is done.
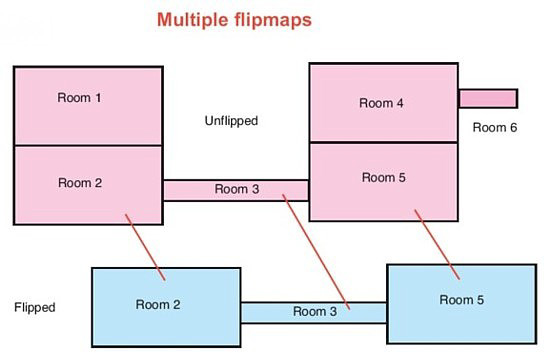
Imagine you are in room 4 but you cannot get to room 5 and progress further because the drop is too high. In this example we are going to change rooms 2, 3 and 5 to water rooms to allow player to progress further. First complete all rooms and texture them and make all connections. Now in turn, click on each of the rooms and click on the F button and put the SAME NUMBER in the space next to the F for all the rooms (lets say 1 in this example). Change each room to a 'Water' room. Don't forget to texture the surface of the water and to change the ambient light to a more bluey water colour. Set a trigger in room 6 for FLIPMAP 1 and all the rooms will change to water at once thus allowing you to swim from room 5 to room 2 and gain access to room 1. You could of course use the FLIPOFF trigger to switch it back to dry land to further complicate the puzzle (eg a lever switch needs to be pulled in Room 2). Rooms 1 and 4 would also have to be flipped in order to texture the surfaces of the newly flipped rooms 2 and 5.