WADmerger - Advanced tutorial
by
EssGee
Download
door WAD -
Download
pdf version
This tutorial is an important supplement to the Wadmerger Tutorial as it brings together many of the concepts that you've learned in previous tutes all in the one package.
As previously noted, unfortunately there is currently no one Wadmerger version that does everything we want to do in a single package. You may have to switch between a couple of different versions of Wadmerger. This is noted during the tute.
In the tute we are going to make a pair of sliding doors that cover a space of 3 grid squares wide by 3 blocks high.
Extracting an object and sounds from a TR2 or TR3 game
Open Wadmerger.
Make sure you have set in your Options menu a location to find the TR2
Main.sfx file.
We're going to extract one of the slamming doors
from TR2. The monastery level has a set which is supplied as an attached
download.
Create a folder called Sliding Door.
In the
Options menu assign the Samples folder location as the Sliding Door
folder you just created.
Click Load TR to load the
monastery.tr2 file from your TR2 CD. Copy the Slamming Door object from
your monastery.TR2 data file into a new wad. Use Shift+Copy to rename
the object as Door_Type1.
Save the wad as slidingdoor.was in the
Sliding door Folder. You will see in the folder the five wad files and
four TR2 sound samples. Note that these are currently in the wav format
16 bit mono 11025Hz. We will attend to these in a moment.
NOTE: The above step shows you how to correctly extract an object from TR2 and TR3 data files. The unmodified object and sounds are supplied as an attached download (door.zip), in case you don't have the files to extract this object. You are going to use to it to work on with this tute. Keep a backup of this original just in case.
The wav files you extracted from the Main.sfx are currently named TR2 Sound 127-0.wav, TR2 Sound 128-0.wav, TR2 Sound 224-0.wav, TR2 Sound 226-0.wav
Open each of the sound samples in your favourite sound editing program and save them as 16 bit mono 22050Hz samples renaming them as slidor_1.wav, slidor_2.wav, slidor_3.wav, slidor_4.wav respectively.
Copy these four new wav files and place them in your TRLE Sound/ Samples folder.
We'll return to these samples later in the tute to correctly assign sounds to the object.
Animation, Moving Meshes and Collision
Animations and StateIDs
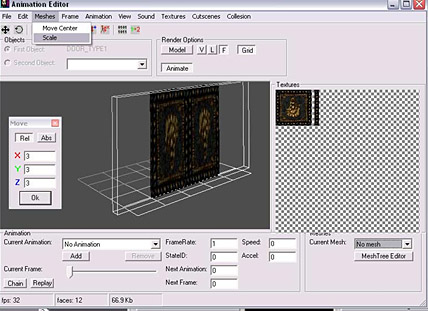
Return to Wadmerger. Select the slamming doors (Door_Type1) and open them in the Animation Editor. Note that the doors currently span 1 TR block on the grid. Also note that although in TR3 these slamming doors were a trap and harmed Lara, they will now function simply as a door because they are placed in the Door_Type Slot.
Go to Meshes> Scale. A small Move window will open. Change the value of all 3 axes (x,y,z) to 3 and click OK. The size of the doors will increase so that they span 3 standard TR blocks on the grid.
Go to Animation 0 - the 'Doors open' anim. Go Collision > Disable Collision (Frame). A message will ask you if you want to remove the collision. Say Yes. The white collision frame is now removed from the doors on this animation. This will allow Lara to move freely through the doors when they are open.
Now click on one of the door meshes to select the object. Next click on the Move Button (4 arrows). The entire object should now be selected. Usually you would see the coloured toggle spheres used to manipulate the object meshes. But where is it? It's actually there but it's way off in the horizon. Rotate the object on the grid and you'll see it off in the distance. That's because this is the pivot point that the two doors work off. But we don't need it for this exercise.
With Animation 0 selected, Go Animation > Copy. Then press the Add New Animation button to create Animation 3.
Select Animation 3 and go Animation > Paste (replace) to move the 'Open Door' animation to this animation slot.
Go to Animation 2 and select the first frame where the doors are in a closed position. Go Frame > Copy.
Select Animation 0 and go Frame > Paste (Replace) to give us the 'Closed Door' animation. Next, select the doors so they are highlighted and go Collision > Calculate Collision (animation) to ensure that Lara cannot walk through the door mesh.
NOTE: you need V 1.97.0.102 to perform this function properly.
We have 4 animations in total:
Animation 0 - door closed
Animation 1 - door closing
Animation 2 - door opening
Animation 3 - door open
We are now going to make sure that the StateIDs are correct. Set all the animation parameters as follows:

Next we have to add State Change instructions. Select Animation 0 and click the State Change Editor Button. When the State Change window opens you will see one state change already in there. To edit it, highlight the current state change. Its values will be added to the edit field at the bottom of this window. Compare the values with the chart below and change the values if necessary in the edit field and then click Change to apply to the selected State Change. Then close the State Change Editor. Now select Animation 3, and open the State Change Editor again. There are no State Changes currently in this animation. Add the values listed below to the edit fields and then click Add, Now close the State Change Editor and save your wad.
We want the following values:

NOTE: It's crucial to close the State Change Editor before moving to another animation. Otherwise the State Changes from the previous animation will be applied to the next animation you go to and overwrite any existing State Changes in the newly selected animation.
Let's review what these numbers mean to get a better understanding of the process.
First we set the correct StateIDs, so that the door closed is StateID 0 and the Door open and the opening/closing animations are StateID 1.
We told Animation 0 to keep the door closed by nominating the Next Anim also as 0 so the animation loops on itself. It only opens if a State Change is sent from the game engine. When a trigger for the door is activated, the engine sends a State change of 1 to the door. The door looks up this Change in the State Changes and sees that yes � now that the StateID has changed to 1 it must move to the next animation 2. Then Animation 2 runs to open the door. It's Next Animation instruction is go next to Animation 3 (it doesn't have any State Changes added). The door remains open because Animation 3 has instructions to go next also to Animation 3 to loop on itself (it has a State Change listed but the condition has not yet been met). The door remains open until it receives a further State Change instruction in the form of an Anti-trigger for the door. Once the anti-trigger is activated then the engine searches the State Changes for Animation 3 and sees the correct StateID 0 for the Anti-trigger, which tells it to go next to Animation 1 � the closing door animation. Once it has run through this animation, the next animation instruction is - go to Animation 0. Now we have gone the full cycle and are back where we started with a closed door. We're almost done with the animations, but next we need to move all the meshes.
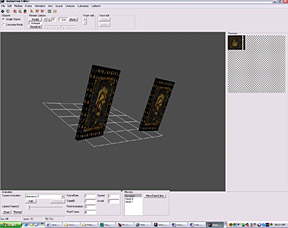
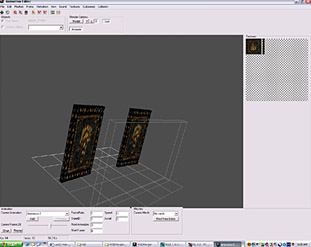
Looking at the object in the Animation Editor you'll notice that the meshes are currently located along three grid squares that are distant from the central grid square (the square that has a line terminating in it marking the (0,0,0) grid point). For some objects this would not matter and we could happily place it in our level now and it would be fine. However for doors, they must be placed on the boundary square of a portal between two rooms, or else you get problems with an invisible collision block in game. So we need to relocate the door meshes to this central grid square.
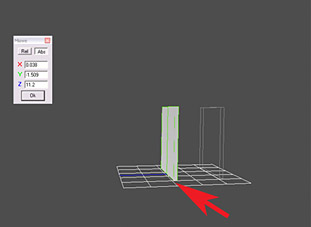
Select Animation 0, and click on the Move (4 arrows) button. The whole object should now be highlighted. Change the Z value from 13.154 to 11.2 and click OK (Fig.3). The doors are now located along the edge of the central grid square. So why did we choose 11.2 as the value? That was done through trial and error experimentation. There were two considerations:
1. That we needed to locate the doors somewhere close to the edge of the central grid square.
2. That we needed to allow for the doors opening. They have a slight arc in their opening animation. And we don't want them being ugly and protruding through the wall in game. So the position chosen is slightly back from the edge of the grid square.
We now need to do a similar thing for the other animations.
Select Animation 1 and move the frame slider to Frame 1. Your Move window should still be open and the Z value set at 11.2. Click OK again and the first frame should move to the new centred location. Repeat this action for all 14 frames of the animation, advancing a frame at a time by right-clicking on the frame slider and using the Right Arrow key to move forward one frame. This is a tedious process, but it has to be done.
When you've completed the above changes, select Animation 2 and perform the same task for all 36 frames of the animation. Ho hum� tedious isn't it, but it won't take too long and you need the practice.
Finally Select Animation 3 and perform the same task on the one frame of this animation. Save at this point! You don't want to have to repeat this boring task due to an accidental crash of the program. In fact it's good to save after each animation to minimise the pain.
As we've relocated all the meshes to the central grid square, you'll notice that although the object has moved, the white bordered Collision Box has remained in its original position. We need to fix that.
NOTE: you again need to be using V 1.97.0.102 for this exercise.
Select Animation 0 and go Collision > Calculate Collision (animation).
The white box will now be neatly bordering the object.

Repeat this action for Animation 1 and 2, but NOT Animation 3. Recall that Animation 3 is the 'Door Open' animation so we don't want any collision on it.
We could leave it here, but for completeness let's fine tune the collision a bit more.
Select Animation 1 and move the frame slider to Frame 0. Go Collision > Disable Collision (frame). The white collision box is removed from this frame only. Repeat this action for frames 1-4. Leave the remaining frames in tact. What we've done here is made the collision so that Lara can walk through the door whilst it is mostly open but cannot pass through it once it is about three-quarters shut.
Select Animation 2 and perform a similar action as above removing the collision from each frame for Frames 22-36 only. Save your wad.
Your 3x3 sliding door animations are now complete. But there is one thing that still needs to be done.
Assigning Sounds
Remember back at the start , we resampled and renamed the 4 sound sample wav files. We need to assign them properly.
There are three things we are going to do:
1. We will re-assign the Sound bank names to use Sound bank slots that are in the TR4 engine.
2. Assign the new custom samples to these sound banks.
3. Get rid of the TR2 Sound banks from the wad files.
NOTE: If you look at your sound bank list in Sound Manager, you'll notice at the bottom of the list the two TR2 sound banks. Sometimes, depending on the complexity of your wad, you can get away with leaving these sound banks as they are, and using the resampled sound samples with their original names. However my experience is that generally once you introduce these extra rows of sound banks from earlier games, it is the guaranteed source of classic wad sound problems (e.g. missing sounds from other objects or Lara, water-gurgling gun sounds etc). I guess this is because it conflicts with the original Sounds.txt list, by adding these extra rows to the list. Bottom line is there are several ways you might approach this problem. I'll just tell you the way I deal with the problem, which I know gives me 100% success.
First we're going to add 4 x TR4 sound banks to replace the existing TR2 banks. Go Sound > Add sounds, and from the drop-down list tick banks 278,279, 280 and 282. I've chosen these because I am not likely to be using these sound banks with other objects. Click Add Selected.
Now select Animation 0 and click the Edit Anim Commands Button. There are no sound instructions for this animation. Next select Animation 1. There are three sound instructions. Select the first one, and in the third Edit window change the sound bank from TR2 Sound 127 to 278_ Small_Door_Subway, by selecting it from the drop-down list. Click the Change Button. Now select the next sound instruction and change it from TR2 Sound 128 to 279-Train_Door_Open. Do the same for the third instruction. Each time clicking the Change Button to apply the change.
Now move to Animation 2. It also has three sound instructions. Change the first one from TR2 Sound 224 to 280_Train_Door_Close, the second from TR2 Sound 127 to 278, and the third from TR2 Sound 226 to 282_Train_Unlink_Break.
Save your wad.
If you open your wad in Wadmerger 1.96 alpha 2 and open the Sound Manager you will observe two things:
1. That both the TR4 and TR2 sound banks are still checked in the list.
2. For the TR4 sound banks, the standard samples are still assigned to these banks.
To solve part 1, open the door wad in the right window of Wadmerger. Create a new wad in the left hand window, then copy the door object to the new wad and save it over the old wad.
To assign the custom sound samples correctly you need to use pcwadsx or Screamer.
To do this in Screamer:
Open Screamer by clicking on Screamer.bat file.
Make Wad Name field: door
Make Associations field: Do
Then go Associations > Clear All except
Scroll down the sound bank list to 278 and select it.
Change Sample field to slidor_1; Pitch to 0; Radius 15 and click Add button.
Do the same for 279, 280 and 282, changing the sample name to slidor_2, slidor_3 and slidor_4 respectively. Click the Add button each time to add the sound banks.
Then go Task > Output wad. Look in the Screamer/Output folder and copy the door. sam and door.sfx files and replace these in your wad folder. If you want to check you've created the files correctly, open the door.sam file in Notepad and check that only the 4 slidor wav files are listed in the text list.
Check by opening up the wad (in V1.96 alpha 2) and open the Sound Manager. The 4 sound banks should now show that the custom sound samples are attached to their relevant sound banks.
Now copy your new door into your work wad and test it out.
Review:
In this tute, you've learned to:
1. Extract TR2 objects and sounds
2. Scale objects
3. Move meshes
4. Add new animations
5. Fix Collision on an object
6. Assign StateID's and State Changes
7. Assign new Sound Banks and
Sound Samples
8. Clean up messy sam and sfx files to prevent sound
problems