
TR4 - EXPERIMENT 2
Author: Bojrkraider
Download: Here ....
WALKTHROUGH BY DUTCHY
Originally posted at: trle.net
The Forgotten Cave. (part one)
The level starts in a very dark tunnel, go forward to the crawlspace L and
follow that to the blue cave, go R around the pillar to find Secret #1, Ammo and climb the low ledge next to it, go jump the corner pillar till
you can get onto the centre one, follow the cave to the Boulder-river
with some surprises both L and R. Just walk slowly onto the lower grey ledge
and watch the show, then proceed slowly and go to the opposite cave (In the
river is a tunnel, but all I could find there was a Labyrinth where Lara gets
trapped and drowns).
The Green Cave.
Slide down the next cave and land in a pit, shoot the 4 artifacts on the wall
of the pit and a trapdoor opens in the floor, drop to the block below and
go S, jump to the ledge in the poison a bit to the L and run jump into the
S passage, follow through the crawlspace to a room with Flares and
a Too sharp to handle Saw-blade and dont shoot the Crystal
ball in the opposite corner to get the Broken Handle from under it,
problem is that Strange Critters will appear from the crystal ball,
better crawl at the Ball to get the Handle so get back into the crawlspace
and run jump to the centre ledge only to grab in the last moment, get up and
use the green slime monkey swing R to go E and L to the ledge behind the L
hand pillar, combine the Handle and the Saw-blade to cut the green web and
run jump to the N pillar, grab the next monkey swing and go over to the crawlspace
in the N wall, drop/grab and go L, drop into the lower passage to land in
the Temple.
The Temple. (part one) The Spirits are Angry
Go forward and climb up the crawlspace in the R hand corner to get the Crowbar
from it. Jump up the pillars in next room to the highest in the corner, face
N and back flip onto the slope behind, jump/grab the next ledge and go on
like this till you reach the bluish ledge you can stand on (about halfway
up), go into the crawlspace and to a door of Spider web, pry it open with
the Crowbar and get Secret
#2, the Shotgun and a ½ Medi pack. Go back to
the jump shaft and resume jumping to the top and climb up to a passage with
a pit, jump over and sprint past the overhead Boulders, hit Alt just
before the slope and roll, run into one of the corners of the dead end and
you wont be harmed, climb the slime ladder L and go have a look in the next
nice passage, theres a spike-trap you have to jump and Boulders will
come down, what I did was run jump over the trap, go R or L a bit so you will
land in the pit behind it, facing into a corner, several Boulders will join
you, but you stay unharmed, turn a bit so you can side jump back where you
came from, now do a back flip over the pit and immediately jump back. Now
the way is clear to follow the path of the last Boulder. And Stop!!!
In the corner is one more surprise, stand facing back in the passage, against
R hand wall and step back in the lower passage, immediately jump forward and
let the Boulder lead you the way to a room with a pit, looking down
it looks dangerous, but you can just climb down the ladder a bit and drop
into the Spider cave. Heres the way Bojrkraider suggested to get past the
Boulders and Spikes: Jump across the spikes and immediately jump backwards. Jump again
across the spikes and roll just in front of the pit, then run back, the spikes
will be deactivated this time. Finally jump across the pit and next spike
trap, run, immediately turn left and run like mad. Just a few steps in front
of the next pit do a rolling jump to get Lara on the other side. Then safely
climb down into the spider cave.
The Spider cave.
Go run around and find out why they call it like that, shoot all the tiny
spiders and look for the 5 Spider remains that stay behind, pick them
up and spot the 5 receptacles on the walls where you can place them, one well
hidden behind one of those pointy push-blocks NE, then go to the NW block
and push it from the trapdoor it is on, careful, theres fire.
Fire Pit.
Stand on the NW corner of the hole and back to the trapdoor, hop in backwards
in, grabbing the edge and be sure to keep Lara hanging on hands only or she
will burn her butt. Go down 5 grabs, then go to the L side, go down 3 grabs
and when the lower fire is out, drop into the Forgotten Cave again (no need
for Medi packs so far).
The Forgotten Cave- (part two)
The Cocoon Cave.
Stand halfway down the sloped side of the Cocoon on the SW corner,
facing S and do a long run jump around the Stalactites to a break ledge in
front of a blue passage, to land on a break ledge, run to safety and go in,
L and past the broken gate to a push-block. Pull the block once and back flip
at once, thats why the Skeleton was there, he didnt do the back flip.
The 1st Axe.
Go around the pillar to where the passage is now open and follow it to the
Skeleton, grab the 1st Axe he doesnt need any more and the door will
open, bringing in Spiders, shoot them and this time you dont need to clean
up the corpses. Follow the underground tunnel to a cave with a Big gate,
go out the L opening to the Cocoon room turn R and see the crawlspace further
in the E wall, jump/grab the yellow wall and go all the way to the crawlspace,
go in to open the Big gate and return the way you came, this time you can
climb around the corner to the Gate.
The Big gate.
Go in and L, (to the R is a passage where we need the Ruby first) to a sloped
passage and a Boulder above, run into the passage to the Boulder pit
and jump onto the grey Tile between the 4 trapdoors, 4 Boulders come,
just wait in the centre of that grey Tile and watch the show. Follow the passage
straight from the entrance and up in a crawlspace on the R side, turn around
in the corner where you can stand again and jump/grab up to the next crawlspace.
In this room you will find 3 Torches, Lara suggest to let them be for
now till you know what to do with them.
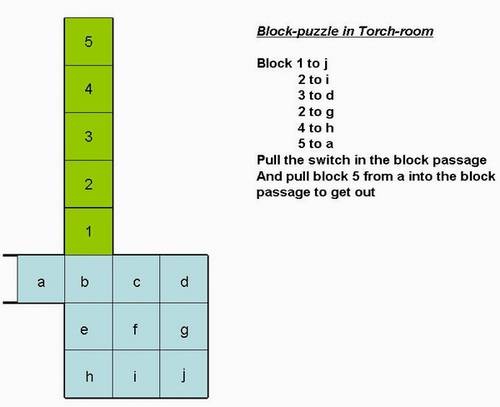
The Block puzzle.
You have to get the 5 blocks into the small room to get to a switch that will
open a door in another room, you can use the help of the picture I made and it is possible to cheat a bit here, if you pull out block
Key Broken path 2 and the 2nd Axe.
Go back to the Boulder pit below and go into the R hand (W) passage, theres
the open door. To the L are 2 Keyholes at the Cocoon room (for later), follow
the passage up to a room with a green pit in the centre, climb down in it
and shoot the Spider, grab the Key to Broken path 2 and get out again,
to the S is a passage out to the Cocoon room. (for later) Go into the W passage
and come to a room with huge pillars, drop backwards in onto the pillar below,
run off onto SW lower pillar below. Jump/grab to a yellow ladder-pillar in
the NW, you can climb this one to the top. Pick up the 2nd Axe and
look over to the SE corner of the room, where you can spot some Goodies in
an alcove. Run of the pillar of the Axe to the S to land on the lower pillar
and go on to the light colored pillars in the SW, run jump to the SE pillar
under the ladder to get the Goodies.
Key to Broken path 1 and the Ruby Gem.
Now find your way down to the ground floor of this room in the SE corner and
find the passage to the Cocoon room E and when you enter you can see the Ruby
in the green pool L, go R around the pool to the blue pool and go around the
break floor to the S wall, climb the pillars there to run jump to the ledge
on E wall, shimmy L to the white ledge and hop around the Gate to a pit with
burners in one corner. Drop into the pit, shoot the Spiders and find
the Jump switch on S side, it will kill the burners. Climb the green ladder
where the burners were and go down to the green pool to get the Ruby Gem.
Jump/grab straight up to the monkey swing over the ledge and go S, crawl onto
that pillar to get the Key to Broken path 1.
Chopping 1st Branch.
Drop from this ledge and go into the blue pool, a push block has to be pulled
in one ongoing movement into the opening in W wall, locking yourself in the
room and it will fill with water so you can swim up to the top of the Cocoon
room, climb out and jump to the L ledge (standing near the exit, jump up once
and then sideways to the ledge) At the N end of the ledge is a Branch, supporting
the Cocoon, chop it off with the one of the Axes.
Burn the 3 Web threads.
Go jump to the ledge in the SW and then to the blue passage you went in from
the Cocoon, follow all the way to the Big gate and then L to the Boulder pit,
pick up the torch and go back to the Big gate, go into the other passage behind
it and drop the torch, place the Ruby L and light the torch on the Oil lamp.
Go S out of the Big gate and R into the opening to the Cocoon room, on this
ledge to the L is a thick Web thread, burn it! Take the Torch and go
to the Boulder pit, L and up to the passage with the Key holes, L on the ledge
around the corner is another one of those Web threads, light it too.
Go into the passage where you found the Broken Path Key and out of the S opening
of the room with the pit, on the ledge outside is the 3rd Web thread
to burn.
Chopping 2nd Branch.
Go back to the ledge with the Keyholes and drop the torch, now its time for
the switch, it will raise the timed platform under the 2nd Keyhole. So better
save here and pull, turn L and jump to the keyhole, quickly use the Key and
hold side jump R while Lara uses the Key, this way you will make it back to
the ledge in time and land just in front of the other keyhole, place the 2nd
Key and the gate opens. Go up to the ledge where you can chop off the last
thing holding the Cocoon up and see it falling into the pool below, 2 ropes
appeared, grab the two ½ Medi packs on the ledge and you can
now get to the pillar the Cocoon was on, for the swing to the 2nd rope I didnt
get all the way down on the 1st rope, because I went too far when I did. From
the 2nd rope just go down and drop into the pillar.
Follow the passage to a golden ladder on R hand wall and go up to the Red
cave.
The Red cave.
Jump/grab the ladder on the red pillar in front and go R around the corner
and hang on the 2nd part, go down a bit, so you can back flip/roll/grab the
crawlspace behind, go in and follow to the L to a Blue cave, drop out
and hang on the edge, go L and drop into an alcove, throw the switch and get
back shimmying to where you came from and on to the far R side, get into the
crack, drop out on the R side and go to the trapdoor you opened. Drop down
to get to the opening to a pit, when you throw the switch here, a timed platform
comes out of the floor under the opening, dont look just pull, turn L and
run jump from that platform and grab the opposite opening to come to the Pink
cave.
Run jump/grab the crack in the opposite wall and go L, into a crawlspace first
to get Secret #3, Ammo[/b]. Drop out of the crawlspace and do
a back flip/roll/grab to a crack behind, pull up in there and follow to the
bottom of the Pink cave, drop from the entrance and go into the crawlspace
L in S wall, pull the switch and drop out, climb back up in the entrance and
run jump/grab the R hand opening in N wall, throw the switch and the door
L of you opens.
The Flippers.
Go into the crawlspace room, in some of the lower gaps are shoot able objects
(3?) and then use both Jump switches, blocks come out of the walls go to the
NE one and climb up the crawlspace, go to the R and go backwards into a cave
with Skeletons that wont need their Flippers anymore. Save and grab
them and while Lara picks them up hold back flip to get out of the way. Go
back up the crawlspace and to the R into the other passage, climb the golden
ladder and back flip/roll from the top, slide and jump/grab the opposite ladder,
go up to get back to the Red Cave.
The UW River.
Go up to the bank of the river and put on those Flippers (Great!). Run/dive
in a SE direction and swim between the Boulder and the pink rock into the
cave there, go R in the end and pick up Secret #4, a Medi pack. Over the Secret between
the light grey rocks is a shaft with some air, you have to break the surface
at an angle. Because you cant surface in the big pool where you jumped in,
you have to be sure to get a good lungful and save before the next challenge.
Swim back to the pool and straight into the opposite cave, R and up (the down
arm leads to a dead end), youll be pulled into another cave by the current,
swim into the NW corner there and come out in a cave with a Shark of
some sort (I heard of Hammerhead sharks, never of a Lamp head shark). Climb
onto the ledges over the entrance and shoot the shark, you may have to jump
around a bit to get it out of hiding. Look for the crawlspace in the wall
and get the Emerald Gem from inside, the UW gate will open.
The Switch Puzzle.
In this UW Labyrinth are 3 hidden rooms, where you have to pull one switch
each, swim in and L, go to the end where the yellow light is and see the signs
of the ones you have to pull in front of the closed gate (whenever another
Shark shows up, swim back to the pool to get rid of it). Swim back
a bit and look L for an opening to a room in the ceiling of the 2nd alcove,
here are 3 switches on one wall and there should be a clue here according
to the Hints, Ill be damned if I found it. The L one is obviously a trap,
so I started here with the centre switch, the Axe sign, swim out and
L into the passage, up in the room above the entrance at the pool and throw
the Wolf sign there, swim down and to the R hand side of the Labyrinth,
into an alcove to the R and up[ to the room where you can throw the Glove
sign. Swim to the gate with the yellow light followed by some Sharks
if you chose to ignore them and swim in, follow to a crossing, go L into the
tunnel with the dark grey floor and stay high in the tunnel, at some point
youll find and air hole in the corner where the tunnel goes R, climb up there
and place the Emerald Gem, a cut scene takes over and some freak Dwarf
steals Laras Flippers, Lara will put her Boots back on and were on our way
again...
The Forgotten Cave.
The Mushroom Cave.
Hop into the water and swim R, there are 3 tunnels, one sharp R at the white
rock is a No-no!, go straight into the R hand one of the 2 you can see in
front and walk up to the edge, overlooking the Big Mushroom Cave. Back up
over the edge and shimmy L till you can grab a crack below, go L and drop
one more time to get to the crawlspace. Drop on the other side and just see
the Dwarf walking away with your Flippers. Drop down and hop on the
Golden block to get Secret
#5, the 1st Golden Proteus from it. Follow the passage to where
you can drop into the pool below, swim down to get the Dwarfs Manual
from the bottom and get out on the W side, shoot some mushrooms and get the
Medi pack. Then go S into the Mushroom garden, study the Manual to
see you have to push brown and the grey Mushrooms and shoot the Red whenever
they block your path, stay clear of the green capped ones, they are deadly
and stay out of the Sparkling pool. Theres a nasty surprise in that pool.
Remember: When Lara has to get between a push able object (you cant pull
from the other side) and an obstacle, sidestep in as far as possible and hit
Ctrl she will squeeze in herself.
The Mushroom Puzzle.
Go E along the fence and brick walls to the Huge Mushroom and around
it to the R, here is a push block on a grated block, 2 Push rooms (push able
mushrooms) and you can spot the 1st of the small mushies you have to
collect here on top of the green pillar over the push block. First shoot the
near-by Red Mroom and pull/push the 1 grey and 1 brown push rooms to the
2 white flowerbeds SE of the pool and new Mrooms rise next to them, side
jump out or climb over, between the brick walls E is a new Mroom, climb it
and get on the wall to the Huge Mroom and jump to the green pillar, get the
1st small mush and drop to get rid of those Fairy Locust. Look
where the Huge Mroom disappeared for the 2nd small mush and climb
to the brick wall again, see the crack in the S wall next to the green pillar,
run jump/grab to the crack and go R, around the corner is a crawlspace, go
through and down into a room with a push block, carefully shoot the Red Mroom
and pull/push the block onto the marked Tile. (Screenshot of the S opening
in the Mushroom garden.)Go out and along the S wall to the W Red Mroom, shoot
it and turn S to shoot a small Mroom in the corner, blocking the path to
the SW flowerbed. Go to the push block N at the blue wall and pull it to that
flowerbed SW, go to the NW corner and first shoot a Red Mroom in the corner
there. Get the grey Mroom and push it to the flowerbed behind the 2 green
Mrooms at W wall, a huge Mroom appeared next to the push block, go climb
it and onto the R hand grey wall, get the 3rd small mush and shake
off the Fairies, stay on top of the rock, as the job isnt over. Go NW and
into the passage down to the push block in the wall, push it out to the Tile
where you shot the Red Mroom before (Screenshot of the S opening in the Mushroom
garden.) Turn around and light a flare, look in the opposite alcove for the
small crawlspace leading to the 4th small mush Go back to the Huge
Mroom below and see you can now move the push block to the Tile (Screenshot
of the S opening in the Mushroom garden.) Go E and move the last push block
onto the Tile between the brick walls, behind that green Mroom (Screenshot
of the S opening in the Mushroom garden, where a Huge Mroom has risen).
The Spider Fight.
Go there and climb onto that big one to look out into the Spiders Den.
A Huge, Huge Mroom in the middle and a grated block in the SW corner that
has to come down in order to proceed, get out the Shotgun and run jump to
the top of the Huge Mroom, be prepared to get into Battle as 2 Enormous
Spiders and one of their children drop from the ceiling. You will have
to avoid them the best you can, taking a Medi pack every now and then, the
blurred vision will bother you when you get bitten. Pick up the Spider
Guardian Key after the fight and the grated block goes down, jump to that
ledge and go down the steps, drop into the lower part and walk E, a big Red
mushroom will grow behind you, get on it and climb off S from the top, go
to the gate and get the Little Wheel from the pedestal. Through the gate and
into the Crystal Caverns.
The Crystal Caverns.
Maybe I forgot some Fire Flies, there are so many, Ive highlighted some names
in Red
to point them out so you can refer to the route to get to them when I tell
you to go there. Use the Key L to open the next Gate and walk over the bridge,
shoot some Fire Flies and go to a room with a Machine block, look for
the crawlspace in the R hand corner and go into turn a wheel, the bridge rolls
out in the Hut Cave, so go back, shoot some Fire Flies and
step on the bridge, turn around and see the opening in the wall in the NE
corner, run jump in with a grab and crawl to the Sacred room with the Blue Angel Statue (you cannot use weapons
here), so ignore the Firefly and go to the door in the end. Stand against
the door and turn L so your back will face the sloped block in the corner,
back flip on and run jump from the highest point with a R curve to the ledge
under the monkey swing, grab, pull up and go use the monkey swing to the end,
theres a nasty crack in it you will have to go around on L side and drop/grab
the crawlspace at the end of the monkey swing.
The Crystal Angels Head.
You will come to a lava room, jump/grab the pole and turn to back flip to
the ledge with the switch, run jump/grab to the opening in the wall next to
it and follow the passage to a water hole, swim in straight and go L to a
white cave, swim up into the hole in the ceiling and follow the path to the
next tunnel, get the Crystal Angels Head from the end and return to
the lava room. Run jump/grab the ledge under the switch and pull the switch
to raise a platform under the exit, roll and do a run jump with a little L
curve to the platform under the exit, grab up fast. Go through to the Sacred
room. Place the Head on the Statue and a door opens S. Behind it is a nasty
cave leading down to the Lower Hut in the Hut Cave, there is another route
down that will give you a Secret and a Rope, its up to you which route you
take
1: Route down (with Secret #8 -the easy way, my favorite of course).
Ignore it and go back through the N crawlspace to the top of the Hut Cave
and before you jump back to the bridge, shoot that nasty Fire Fly.Walk
up to the Top Hut and look W, down you can see the Centre Hut, do a stand
jump to land on the L side of the roof, so youll slide down to the S branch,
walk to the end and spot the white fungus on the wall of the cave, with a
crawlspace R of it. Run jump/grab the fungus and go into the crawlspace. To
the L after picking up the ½ Medi pack and Flares you
will find Secret #6, the 2nd Golden Proteus. (**Now you can
go down the hole behind the Secret, but then you will have to make a detour
later to get the Rope**) Turn around and go up the ladder at the crossing,
follow to a shaft, drop in and get the ½ Medi pack, crawl into
the next tunnel and at the crossing with the Hanging Bridge to the R, go straight and come to the Rope Cave. There are old broken
hooks on the ceiling and you can see a Rope on the floor below the
ledge. Drop down and go get it, shoot some Fire Flies and look for
the hole in the E wall, you can run jump to it with a L curve from the white
sand in the NE corner, climb through and come out in the monkey
swing Cave.
The Lower Hut.
Stand on the somewhat higher part of the floor, near the closed door in the
end of the passage and grab up, drop on the other side into the monkey
swing room. Go R from where you dropped and look for the switch in the
corner on the Green brick wall, use it to open that door in the front passage,
Worms crawl into the room, shoot them and follow the lead of the cut
scene, go up the sloped part of the floor and grab the monkey swing to get
back to the passage and enter the door, here you can turn the wheel to rotate
the Lower Hut. Go out and L at the crossing. (in the other hand of the passage
is the door you would have come through taking the other route, only without
Secret and Rope) Jump/grab the edge of the roof and drop/grab to pull up into
the hut, go R and enter the White Cave.
The White Cave.
In front of you is a closed door, go R and into the cave, Worms and
Fire Flies attack, try to get off the ground by hopping on the block
near the entrance and shoot the lot! Then follow the cave to the end and go
R into the corner, here is a higher ledge to climb. Pull the switch there
to raise a golden block, go down and up the block, follow the path N and L
onto a pillar, shoot some more Fire Flies and jump/grab to the grey
ledge S, turn l and spot the Blue Snake with the Ruby, return here
after the following part. Climb the S ledge and get into the R hand upper
Brown tunnel. The first hole in the floor leads back to the
Worm Cave, jump over and follow the tunnel to the next hole in the floor.
You can see a pipe sticking out of the wall, jump over and run into the hole
in the end of the tunnel, pull the switch and jump into the alcove at the
3 Golden Gates turn and see theres a cover on the pipe (which
is really a camera like those security devices that track your movements in
a department store), shoot it off and get a screenshot of a room with switches.
Those will open the Golden Gates later. Now jump back to the switch and climb
up to the upper tunnel, follow back to that ledge where you saw the Blue
Snake. Shoot the Ruby to open the closed door you saw before at the entrance
of this cave. Now jump over to where the Ruby was and hang from the edge,
shimmy R to the end and pull up into the alcove for Secret #7, the 3rd Golden Proteus. Drop out of
the alcove and return to the N side of the cave, go to the open door and enter
the Room with the 9 Switches.
The Room with the 9 Switches.
In the E is a mirror that reflects the beam coming from the Pipe "camera"
(remember shooting the cover off other end), now you can see the Golden Gates
from down here. There are 3 sets of switches, L= Red, R= Green and
in front= Blue. Starting with the red set on your left, throw only
the left switch. Turn to your right and throw only the right switch in the
blue set. Then continue to your right and throw the middle and right switches
in the green set. The Golden Gates should now be raised, giving you access
to a new area. For some reason the right combination to open the gates
can vary, depending on where you've been walking around in previous parts
of the level. But if you've followed this walkthrough up to this point, the
order given above should work.)Note from Bojrkraider: (The combination can't
be predicted, there are about two possible combinations for every set of 3
switches. Anyway, a high % of players will probably have the same combination
if they'll follow the obvious route. Some who want to look at every corner
will end up with different combinations. So the combination depends on the
path the player choose. It may even happen that after all doors are opened
a door closes because a player guide Lara to a tile where she wasn't before.
But that possibility would be extremely rare.) Dont jump into the wall, remember its only a projection, go back
and up in the White cave, follow the brown tunnel to the Pipe shaft, jump
over to the new entrance at the Golden Gates and end up in the Rope Cave. Lara looks up to the old hooks in the ceiling, stand on the R hand
triangular ledge, under the hook there and use the Rope, Lara will make a
lasso and throw it to a far hook (Neat trick!!), now you will be able to swing
to the ledge in the NW corner of the cave, follow the tunnel to a crossing
and go L to the Hanging Bridge and come to the Lava-pole room.
From here on the 2 Routes come together, see below after route 2
2: Alternate route down (with Secret #8 - in a detour).
Open the door by placing the head on the Statue, go in and the door will close
behind you.
The Worm Cave.
Run into the cave and pull out a weapon as Worms will attack from both
front and rear, make your way to the last cave with the hole in the floor,
but dont drop in there, its a trap, same as the Spike-trap behind it. Go
crawl along the R side and quickly stand to shoot the Worm. Drop from
the edge of the floor and look for the small crawlspace on L side, just under
where you crawled. Could be a little hard to grab the edge, but it is possible,
follow the path to the hole in the corner, drop and find a closed door, a
crawlspace and a Boulder in an alcove, step backwards onto the dark
Tile to trigger the Boulder and jump out to the R side. In the alcove is a
Jump switch that will open the door behind the Boulder, open the door, go
through the crawlspace and come out in a passage to the Lower Hut.
The Lower Hut.
To the L is a crawlspace up in the wall that leads to the monkey swing Cave. Stand on the somewhat higher part of the floor, near the closed
door in the end of the passage and grab up, drop on the other side into the
monkey swing room. Go R from where you dropped and look for the switch
in the corner on the Green brick wall, use it to open that door in the front
passage, Worms crawl into the room, shoot them and follow the lead
of the cut scene, go up the sloped part of the floor and grab the monkey swing
to get back to the passage and enter the door, here you can turn the wheel
to rotate the Lower Hut. Go out and L at the crossing, jump/grab the edge
of the roof and drop/grab to pull up into the hut, go R and enter the White
Cave.
The White Cave.
In front of you is a closed door, go R and into the cave, Worms and
Fire Flies attack, try to get off the ground by hopping on the block
near the entrance and shoot the lot! Then follow the cave to the end and go
R into the corner, here is a higher ledge to climb. Pull the switch there
to raise a golden block, go down and up the block, follow the path N and L
onto a pillar, shoot some more Fire Flies and jump/grab to the grey
ledge S, turn l and spot the Blue Snake with the Ruby, return here
after the following part. Climb the S ledge and get into the R hand upper
Brown tunnel. The first hole in the floor leads back to the
Worm Cave, jump over and follow the tunnel to the next hole in the floor.
You can see a pipe sticking out of the wall, jump over and run into the hole
in the end of the tunnel, pull the switch and jump into the alcove at the
3 Golden Gates turn and see theres a cover on the pipe, shoot
it off and get a screenshot of a room with switches. Those will open the Golden
Gates later. Now jump back to the switch and climb up to the upper tunnel,
follow back to that ledge where you saw the Blue Snake. Shoot the Ruby
to open the closed door you saw before at the entrance of this cave. Now jump
over to where the Ruby was and hang from the edge, shimmy R to the end and
pull up into the alcove for Secret #7, the 3rd Golden Proteus. Drop out of
the alcove and return to the N side of the cave, go to the open door and enter
the Room with the 9 Switches.
The Room with the 9 Switches.
In the E is a mirror that reflects the beam coming from the Pipe, remember
shooting the cover off other end, now you can see the Golden Gates from down
here. 3 sets of switches, L= Red, R= Green and in front= Blue.
The solution is below if you want, just highlight the text and dont panic
if the solution doesnt work, just pull those switches till the doors are
open (I noticed that even if I played the level in the same order as before,
the code could vary.) Spoiler:Red,=only
the L switch, Blue,= the L hand 2 switches, Green, the R hand
2 switches= if you follow this order it works, if you start on the other side
the combination may be different. But if this order doesn't work, try the
combination provided earlier in this walkthrough for this same 9-switch room,
accessed by an alternate route. Dont jump into the wall, remember its only
a projection, go back and up in the White cave, follow the brown tunnel to
the Pipe shaft, jump over to the new entrance at the Golden Gates and end
up in the Rope Cave. Lara looks up to the old hooks in the ceiling and theres a rope
down in the cave, you can see it from up here. Drop down and go get it, shoot
some Fire Flies and look for the hole in the E wall, you can run jump
to it with a L curve from the white sand in the NE corner, climb through and
use the monkey swing in the monkey swing cave to get back to the Lower Hut,
follow the White Cave to the brown tunnel and back to the top of the Rope
Cave through the Golden gates. Stand on the R hand triangular ledge, under
the hook there and use the Rope, Lara will make a lasso and throw it to a
far hook, now you will be able to swing to the ledge in the NW corner of the
cave, follow the tunnel to a crossing and go L to the Hanging Bridge and come to the Lava-pole room. (Now if you still want that last Secret: Go
to where the cable ride starts. On the right you can see the Centre hut. Jump
to the nearest hand branch of the hut, than run through the hut to reach the
second hand breach (the S branch). From there run jump/grab the fungus on
S wall, shimmy to the crawlspace R and go get the Secret (the 3rd Golden
Proteus) after picking up the Goodies, turn around and go up the
ladder to end up at the crossing to the Hang Bridge, now go proceed as below
and turn the Centre Hut.)
From here on the 2 Routes come together.
See the opening R? Jump to the pole and go down a bit, turn to back flip into
that opening and use the Cable ride to land on a ledge in the Hut cave.
Use the wheel to turn the Centre Hut around and roll out a bridge behind you. Stand jump/grab up to that
Bridge and go to the end, run jump to the R hand branch and walk up to the
end of it, run jump/grab to the far ledge in the Cave, go R and find a small
Blue statue, a golden block lowered there (when you placed the Head on the
big Angel Statue), so you can use the switch to open a trapdoor in the top
of the Hut Cave, giving access to the Top Hut. Go back to the Cave and run jump/grab back
to the branch of the Centre Hut then to the bridge E and now do a run jump
onto the roof of the Lower (SE) Hut so you will slide off to the branch L
of it, heres the route back up:
To The Top.
Up in White Cave, Golden gates, Rope Cave, Hanging Bridge, Lava-pole room
and from the pole go back flip over to the N ledge. Run jump onto the 1st
block and run jump to the next, stand on the N side of it facing the end of
the room, take one sidestep to the L and side jump onto the sloped ledge R,
slide and jump R to the closest ledge. Run onto the next and run jump/grab
the ledge under the hole in the ceiling, shoot the Fire Fly that only
sometimes appears here, roll and jump/grab up to the hole. Run up the slope
to turn sharp R just before the narrow passage and run into the R hand corner,
let the Boulders pass and shoot some Fire Flies. Continue up
the cave to a hole in the floor L, (which leads you back to the Machine room,
just before the Hut cave) go around it carefully and pass by the Dart traps,
youll come to a crossing, the trapdoor in a R hand passage and a hole in
the end of the L hand passage, drop from the hole, hang and get into the crawlspace
L for some Goodies and a Fire Fly. Go back to the crossing and
climb down into the Top Hut. Turn the wheel to roll out another bridge in
the W side of the Hut Cave. Climb back up and go past the Dart traps to the
hole in the floor in the Boulder cave. Drop down into the Machine room and
go out to the Hut Cave. Stand jump to the Centre Hut to land on the r side
of the roof, slide onto the branch and go through the hut to the W branch,
run jump to the Bridge to the Dwarf Village.
The Dwarf Village.
There are 2 Parts, the lower village and the upper one (S), Worms attack,
so better run around to get rid of all of them first. There are several huts
which need Keys to open them, a pool in the S, a Pyramid where you have to
place 4 Crystals later and behind the Pyramid, next to the W hut there, you
can hop over a sloped block to land in a passage back to the Temple.
(later)
The Anataz Crystal.
Jump into the tunnel in the S pool and swim to the other end, to come out
to an UW waterfall and jump onto the pillar in the NE of the cave, crawl into
the crevice there and find the hole up in the corner, heres the UW lake and
just below the high ledge is a rock, drop to it and dive under the rock to
find a shaft down to the Anataz Crystal, swim back and climb back
up to the Waterfall cave, from a small sloped ledge R of the waterfall, you
can climb back up, swim quickly past the Worm and dispose of it when you reach
the pool in the Dwarf Village. Look for a passage in the SW corner, L of the
W hut and follow this passage to a Stalactite Cave. Stalactites falling
everywhere, so be careful.
The 2nd Cogwheel.
Go straight up the slope, jump over the pit and follow to where you can go
L around the corner at the brown rocks, at the stalactite there, jump to the
higher part of the cave. Go up to a pit where you can see an opening in the
wall below, well be back here later. Go NW first and jump to the ledge in
the NW corner of the pit there. Get into the crawlspace and follow to a higher
cave, go to the first mount on the floor L and stand on the top of it, look
E and a bit L, you have to stand jump/grab the lowest L corner of the rock
there. Get into the new crawlspace and follow all the way to a pit, jump over
to the other side and go to the crossing, straight is where you go later,
first go R and run jump/grab over the pit to get to the room where the 2nd
cogwheel is.
The Piromforfit Crystal.
Go back to the crossing and R, drop into a lower cave and crawl out, youre
back at the pit. Go to the NE side and carefully go around that small pit
with the opening in the wall, run in opposite the opening and jump/grab in,
be careful, deep pits here. Go to where you can see a green light shining
in a lower cave to the R and shoot the Worm. Pry the Piromforfit
Crystal from the wall and see one piece break off and fall through the
grating below.
Dwarfs Hut Key and Dworfinas Secret Recipe.
Turn and find that you are now on the roofs of the huts, jump to the one L
and go around the chimney to pull the switch that will open the door of the
hut below. Run jump to the centre hut and then to a ledge in the SE, go into
the hut there and pull the shelf out of the wall, push it aside and throw
the switch to raise a platform that will make the route up here much shorter,
its just outside at the pool. Go out and L around the corner to the upper
village, into the first R hand hut and get a Medi pack from the bed,
climb to the top bed and get the Dwarfs Hut Key from under the yellow
pillow, now open the drawer of the small cabinet and get Dworfinas Secret
Recipe.
The Honey and the Torch.
Go back to the lower village and to the Dwarfs Hut W of the pool,
open the door and get the Honey from the cabinet in the back and a
Metal Rod and Crowbar (we had that already) from the drawer
L of the entrance. Then look for the Torch on the block near the entrance
and get it, Lara will state you will leave it there till you know what to
do with it, but just take it to the Kitchen Hut (N) you opened before and
light it on the Burner in the back, go to the front and look at the machine
there, drop the torch for now.
The Dwarfs Meal.
The machine will grind the Mushrooms you have in your possession and spit
them out into the Golden Bowl go to the bowl and put the Honey in, then light
the lot with the torch and go to the door, you will see the Dwarf coming out
of the hut in the upper village, so go there and enter that hut. In the cabinet
you will find the Laser sight. On the bed is another ½ Medi
pack.
The Conversation with the Dwarf.
Return to the Kitchen hut where the Meal is cooking and meet the Dwarf a cut
scene takes over:
L: So, that meal really does attract dwarves.
D1: Mmm, I haven't eaten this in ages. It's quite good, but the way Dworfina
made it.... mmmm....
You can't beat her.
L: Enough. Why did you push me and steal my flippers?
D1: I couldn't let you to go through the water currents anymore. Someone had
to beat the spider guardian, and get the cog wheel from the other side of
the mushroom field, and I got the meal.
L: Hey, just a minute. Someone had to get the wheel. That was a suicide action.
D1: You're quite a skilled woman, and you had a good chance of beating the
monsters. It's been a long time since us dwarves left the underground because
of the monsters, and there's very few of us who still remember our true origin.
A lot of our race was lost among the human population so if you'd lose: what's
one human compared to the whole dwarf population?
L: Huh?! What do I have to do with this, and I don't remember having anything
to do with you. And I don't care about this quest anymore. It has taken me
enough time and nerves already. And it seems you know an easy way out.
D1: Listen, that archaeologist, is my cousin and I found out what he's trying
to do. Stealing our races' treasure to use its powers. I won't let him do
this and I won't show you the exit until you get the dwarfian heritage for
me!
L: Hey, what's that cousin thing?
(Dwarf runs and hit Lara, so she falls)
L: This is the last time you push me!
The Realgor Crystal.
Turn around and follow the dwarf into the Centre hut. Crawl in front of the
basket and get the Broken Key from it, the boxes are empty, look for the hidden
Crowbar door in the SW and open it, go down the ladder and follow the tunnel
over a Spike pit to a second pit. A Boulder trap, stand on one side of the
tunnel and jump over to the white Tile and the Boulder comes, hop back and
hang in the pit while it passes, then go look in the end of the tunnel where
the Boulder came from to find the Jump switch. Drop down into the lower tunnel
L of you and go over the lowered golden block to a Cave. Go L and in the corner
you can climb your first pillar run jump to the and quickly run around the
corner, then run jump to a next pillar and land on the far side of it, so
the rocks will drop behind you. Stand jump/grab the crawlspace in the wall
in front and follow through, run jump to a pillar L of the Moira gate and
then over to one dark ledge in the far corner, climb up L and shimmy L, then
you can see the Crystal, the rest of the route is clear so go get the Realgor
Crystal and make your way back to the ground floor, by dropping onto the
pillar under the ledge. Go back through the passage with the boulder and climb
up to the Dwarf village and to the NW Hut, combine the broken Key and the
metal rod to open the door, inside is the missing piece of the Piromforfit
Crystal. Now theres only one Crystal missing and we have to make a little
detour for it to the Temple.
The Temple, to get the Kalcit Crystal.
Go into the passage to the Temple. Its just R of the W hut, follow to a big
gate and 2 Statues, go L around the yellow rock and find the crawlspace in
the N wall, follow to a Lava River. Jump the blocks, be careful, some are
sloped. A run jump will get you to the last one and from there you can grab
up to the pillar above, climb to the top and follow the path to a green tunnel,
where youll drop in a lower tunnel, L is back to the Lava river, straight
in front is a crawlspace up in the wall (If you go there youll get a hint
for the right switch combination to the Secret door in the 10 Jump switch
room.) and R is to the room with the big Stalactite. Go climb up to the top
on the NW corner of the Stalactite, stand jumps to the right spots will do
the job. On the top of the thing, go do a long run jump without grab to the
R side of the yellow rock in the W, go jump/grab over the pit (Great Lava
flow R side) and get the Kalcit Crystal. Well, the way back is about
the same, go straight at the crawlspace I pointed out before and be careful
on those down-sloped blocks in the Lava river and when you get back in the
Dwarf village all 4 crystals have to be placed in the Pyramid, glue the broken
one together first. The Pyramid opens up and reveals the Temple Key.
Grab the Key and go back to the Temple.
The Temple. (part two)
When you get to the Temple square theres a Keyhole at the R hand statue.
The big gates open, go into the Angel Hall, push the Symbol-buttons
on the Base of the Statue (push the Wind-Water-Fire symbols, in this order)
and a gate opens E, crawl to the 10 Jump switch room.
The 10 Jump switch room.
In case you didnt pay attention before, the solution is here: Spoiler:(
from L to R on the L hand side=down-down-up-down-up / / from L to R on the
R hand side= down-up-up-down-down) When you look around in this room youll
notice more Symbols on the walls. (better take note of them, the ones on the
N wall give the solution for the buttons on the Angel Statue.) Upon leaving
the room through the crawlspace, youll see a screenshot of the secret door
opening up. Return to the Jump switch room and enter the Treasury to get Secret #8, the 4th Golden Proteus. This time there are some nice Goodies
in the boxes, 2 Medi packs a Crossbow and some Ammo.
Go out to the Angel Hall, to the buttons on the Angel. Notice they have Symbols
on them, which look like the combination you saw over the crawlspace in the
Jump switch room.
The Wind room. (E)
Spoiler:(Button
order: Fire Water Wind, the E gate to the Electric room opens.)
The trick here is to do short jumps every time you reach the end of one of
the conveyor belts, so youll land in the centre of the next, cause when you
get too close to the side, youll be toasted. At some points you have to jump
over crossing belts or turn sharp R or L, while in the air to get onto a belt
next to the one youre on. Youll get the hang of it after a few tries. You
have to end up on the last belt that is heading for the pit, here you have
to jump sharp L to land on the short belt headed for the centre of the pit,
jump/grab the pillar in the pit, go L around the corner and pull up, slide
jump/grab and slide into the alcove with a Gem on a pedestal with Knifes
both front/back and sides, so better take the Wind Gem from one of
the corners and carefully step aside to the wall, go up to the Doors slamming
away, but dont get too close, stand jump/grab the dark green ladder over
the belt outside and go up, run over the top, the Wraith chasing you
and slide from the other side, jump/grab into the open gate over the entrance
to the room and quickly drop from the other side of the crawlspace, run to
the Angel Statue and she will take care of the Wraith (which looks great by
the way.
The Fire room. (W)
Spoiler:(Button
order: Wind Water Fire, the E gate to the Fire room opens).)
Stand jump/grab to the break tile straight in front of the entrance ledge,
pull up and run jump through to the one a bit R and down, stand jump/grab
the next immediately and go around the r corner to where you can see a set
of 3 Tile on the R side, pull up, run jump to the lowest and jump/grab the
next fast, go L around 2 corners and pull up, stand jump/grab the last Tile,
go around the R and to the next corner, and hang facing the alcove on the
corner of the Tile, so you can pull up, turn R a bit and stand jump in. Grab
the Fire Gem from one of the corners (or you will be cut in half) of
the pedestal closest to the room and turn to face the room as soon as youve
got it, the doors start slamming and you can see a platform raise from the
Lava below. A Fire Wraith is making things look even better, run jump
out to the platform as soon as you got a chance and run jump to the Tile hanging
R and in front, from there you can follow the Tiles to the exit of the room
and sprint past the Angel to those water pits in the E passage, better go
around the corner to the deeper one. Stay low till the Wraith is gone and
return to the Angel for the next gate.
The Water room. (E in the R side passage)
Spoiler:(Button order: Wind Fire Water.) Go to
the pool where you got rid of the fire Wraith and into the open gate there,
pull the Jump switch and return to the Angel, the trapdoor behind it opened
Save and go in, theres a Lamphead Shark, but to me he was quite friendly,
the only reason hes here is that every time he swims over that Yellow marked
Tile, the Spikes at the 4 levers on E and W wall will pop up and you
will have to get them down again with the lever in the S. Keep track on which
ones you did already. After youve pulled them all, a floor-grating opens
up near the back lever, the Water Gem is in there, when you try to
swim back a strong current will try to pull you into the Spikes, so make your
way back carefully. Go up and to the E passage where you used the Jump switch
to open the Water room and find the 2nd gate open the jump switch inside will
obviously close the trapdoor so you can place the water Gem in the Angel Statue.
Go through the open gate and place the other 2 Gems to get through the next
gate.
Premonition.
The Giant Guardian Worm.
Go L as theres a writing on the wall that says so and the level will change. Expert's challenge: The writing on the wall advises you to not pull
the jump switch. Ignore that and pull it for a harder last battle. Youll be standing on a break tile floor, hop back once and wait,
slide and jump the pits youll encounter. You will land into a Big Cave with
a Giant Worm, go R and behind those huge pillars to find a Revolver
and some Ammo next to the S pillar, near one that didnt quite make
it. You will have to climb up to the very top of the N pillar and at some
point Lara will look over to the L, a big rock is hanging on a single thread,
shoot that and the rock will squash that Worm! Now from the very to
of this pillar you can run jump with a L curve to the ledge sticking out of
the S side of S pillar. Once there you can pick up the 3rd Cog wheel, you
saw in a cut scene. Jump back and go to the bottom of the cave, look over
where the Worm was and find the Worm Guardian Key it dropped. Go climb
the N pillar again on the NE corner and from the 2nd ledge, jump over to the
ledge along the wall of the cave, find a spot to climb up one more ledge and
follow the path, jump/grabbing the N ledge at the corner and with a shimmy
in the end to the opening in the N wall behind where the worm was, go in to
find a Key hole. Just behind the door is a crawlspace in the R hand wall.
The Bridge Cave.
Go in to come out in the Bridge Cave with a Key in a cage. 2 Rooms, L and
R of the cage. One is a room with Swinging Blades, its more luck than
wisdom to get through here, jump over the ledge to the timed switch in the
L hand corner, when you pull it a burner, on one of the ledges to the button
on the other side, will go out. So pull, roll and run with a slight R turn
and jump to the blade ledge, heres where the luck comes in, the Blade could
be right in front of you and you die or you will get past it and with a running
jump to the burner ledge, then a running jump to the next and a curved one
to the Button (the 1st Button for the Cage) Dive in and notice the
tunnel there with the strong current, swim back to the entrance of the room
and get out on the 1st Blade ledge. Jump over to the Bridge Cave and go over
to the other side to the Spike-Break floor room. Run jump from the
entrance to the passage a bit R opposite the entrance the rest of the floor
are all break tiles and you need them later to get out, roll and run jump/grab
the gratings on the wall, go L and back flip/roll onto a break floor, run
to the end and jump to the Tile in the corner, try to land on the R hand side
and run with a L curve to jump/grab the far Tiles, Pull up and run jump into
the passage in front, go up carefully as there are burners on the walls and
also in the floor. From the start, run past the 2 wall burners and the floor
on and end up in the R hand corner in the corner of the 2 walls, here you
are safe and you can spot the next burners. Run past them and duck as a Blade
comes towards you, then go past those wall burners and around the corner is
a yellow Crowbar door to the R, open that one and pull the switch to open
the exit gate of the Secret room (later). Now run past the last burner into
the lower cage and push the 2nd Button for the Cage. Carefully make
your way back to the beginning of the burner trap and get into the R hand
alcove at the Spike floors. Get a bearing of the exit of the room and drop,
roll and run like crazy. Outside, run off the bridge to land in the pool below
and swim into the small tunnel under the room you just left. Go up and place
the 4 Golden Proteus Artifacts and the door to the Secret#9 room opens in the water below, dive in and swim into the cave, go
look around for lots of Ammo, a couple of Medi packs and in
the 2nd cave of which you opened the gate before are the Uzis and some
more [b] Goodies. Go find the small tunnel in the corner opposite the
Arrows and swim to a garden.
The Garden.
The red floor parts are mushrooms waiting to grow, go up the slope NE and
up to the drop off, shoot the Mush on the opposite ledge and watch the 1st
Mush grow, jump on and throw the switch on a ledge you can now reach and the
gate opens to another garden go there and shoot the Mush to let the 2nd Mush
grow, get back to the other garden fast so you can still jump up, go shoot
the one Mush in the back (of course) of the upper garden there and return,
no hurry this time, just go back up to that switch again and jump up the 3rd
Mush, climb up to a very, very Secret area where you will find Secret
#10 a Rose for Dworfina on Dworfinas grave. Go back down, swim
through the small tunnel back to the Proteus room and to the pool, go L and
climb the SE ledge, up the next and L to the highest one do a run jump to
the opposite corner, follow to where you have to run jump/grab the crack in
the wall in front of you and go L to where you can pull up, use the ledges
to get to the top one and run jump back to the bridge. Well, nothing left
to do than going to the last passage in this room, up the sloped passage,
through a somewhat wider cave and up the next white passage, after 2 jumps
up sloped parts, and just around the white corner, look up R for a well hidden
triangular crawlspace. Throw the switch inside, climb out and follow the passage
up to an open gate.
The Garden Labyrinth and Switch Puzzle.
Its a big outside Garden Labyrinth, go up the sloped garden and straight
at a crossing in the narrow path (the R hand path is for later, remember!)
go on and L and find the crack in the wall L, look to find the Cog wheels
and shoot a small root of a tree to get them working again, then follow this
path the a switch and a trapdoor, throw the switch and see a Tomb slide from
its place, you can open the trapdoor too, its for later though. Go back
to the crossing (past the crack and go L, to the Tomb, drop in and
shoot the Worm, then pull the switch there to open a gate behind the
other one. Return to the trapdoor and go in, shoot 2 Worms and go L
to the end to pull a block there out once. Follow the other passage and see
another block, pull that one once too. Then go on to where youll find the
switch that can now be reached because you opened the gate from the other
side. Again go to the Tomb (shooting a Worm on the way over) and into that
passage, because now you can make some progress there.
Timed run for the M? Garden Key.
Theres a room open with a Chain, that chain will open the door behind the
fence (timed of course) and you have to go through the passage opened by pulling
the blocks to go in. Nice thing is though, the timer will be activated near
the 1st push block, so test where that spot is, line up for a run around the
corners and sprint hitting Alt in the last moment to roll through the door.
An
alternate solution for the timed run, found by Vic: To gain more time for
the timed run pull the chain 3 times and run towards the door with combination
of run/sprint and rolling jump under the door. On the first pull the door
will open, for the second it will close (this door is closing very slowly
and that gives a little more time), for the third will reopen again, while
youll be already running. Inside is the M? Garden Key on a block and a chain to reopen
the door. Go to the 2nd push block on your R and push it all the way in, go
L every turn and come to the passage with a switch and a gate, look in the
floor for the break tile and fall in, there is a deactivated Spike trap (by
activating the Cogwheels before), follow the tunnel to Secret #11, Ammo and Medi pack. Go back and
up into the passage, go to the push block and straight past it, L to get back
to the trapdoor and climb up. Go to the Tomb and look in the SE corner for
another path to the M? Gate. Go past the Gate first and around the R hand
corner are 2 bushes sticking out of the wall, go in the crawlspace, shoot
a Worm and push the 3rd Button for the Cage. Go out, shoot another
Worm and go open the M? Gate. But before you go in, return all the
way to the Cage to pick up the Silver Mechanism Key there and return
here.
The M? Gate.
Go run around till you find the Golden Neptune Statue, shoot the Worms
and push the Statue to a brick Tile just outside this little yard and a gate
opens in the E, go there and enter the Wishing Well Yard, shoot the
2 small Mermaid statues and Blue Rays activate, now you have to find
a 3rd Statue, dive in the Well and swim into the tunnel (the other gate will
be closed forever) and climb out in a small garden, follow the path to the
next garden, shooting the Fairy Wasps and look for the crawlspace up
in R hand wall. Go to a bridge and enjoy the View for a moment. In the end
of the path youll find another Mermaid Statue, shoot that and the
Wasp and go back to the Wishing Well, shoot the worm first before jumping
into the water. At the Well a passage opened up in the back under the arches,
go in and look for the break tile floor around the 2nd corner, stand on the
centre one of 3 and let yourself drop between the Spikes. Use the switch in
the alcove to open a gate along the upper passage, go stand jump/grab up to
the last break tile and go into that gate to come to a great room
The L gate
will stay closed, the one in front of you can be opened with a switch, located
behind the ??? tree. Watch the slamming doors there and jump across the pit.
Pick up a Medi pack and Flares. Go back to the main room.
The Midas Statue.
Climb the block R of the entrance and jump up to the upper floor, follow the
passage to whats left of a once enormous Midas Statue. Put the Silver
Mechanism Key in the big hand on the floor and it will turn into Gold and
thats exactly what we needed. Now you have to return all the way to the Bridge
cave, run jump/grab over the Spike-pit and take some damage, get healed and
go on shooting everything thats trying to stop you and straight into the
S crawlspace, to the Worm Guardian door and into the S passage, down to a
deeper cave, drop into the SW hole and land in front of the Mechanism.
The Mechanism.
Place the 3 Little Cogwheels on their axes in the Mechanism and put the Key
in the lock to lower the Golden Block, pull the switch to open that suspicious
door. Go in and to the last room to get the 3 Golden Tablets from the
sarcophagus.
The Spirits are Angry
A cut scene takes over and youll be taken to a strange room in the Temple.
4 Angry Angels will start shooting at you, try to dodge their bolts
by hiding behind the hardly visible green spotted blocks, one on every side
of the room. Its hard I know, but keep trying with the heaviest weapon you
have. After youve got them all, collect the 4 Rainbow Crystals, go
to the low blue block in the centre of the room and it opens, drop down and
open the doors with the Crystals. When you get to the last door, Troops
storm in and also the Dwarf, which was playing a double role
Note from Bojrkraider: This battle will be much
harder for those who pulled the jump switch at the warning sign in the temple.
There will be only one block where theyll be able to hide.
The Final Conversation:
D2:
Congratulations Miss Croft, you did it.
L: And for the price of what? I've almost been killed by all those monsters.
D2: your reputation convinced me that you'd be able to do it. Especially,
if you are searching for some mystery.
L: Well, mister archaeologist or should I say dwarf?
D2: Huh?
L: I know it all. I've met your cousin. But I don't know why it was necessary
for me to go through the whole freaking cave, if it is obvious that you all
know of a better entrance.
D2: Yes, that's true. It's not far from here. The river leads to the waterfall
that finishes in the open lake. We just needed someone to collect the wheels,
so we're able to open the doors to the dwarfian treasure.
L: Those tablets?
D2: Yes, now you better slowly pass them to me. And no playing around.
L: I thought dwarves were braver, but I guess I was wrong.
D2: Enough! Give me those tablets! Now!
L: Here they are mister scary dwarf.
D2: Hey, get her!
Make
your escape by swimming up in the lake and the levels end
Great set of levels
End of the level.
Pickups: not counted
kills: not counted
secrets: 11
Az oldalon közölt képek, a szöveges tartalom, illetve minden sajátkészítésû anyag, a © TR Editor.hu tulajdonát képezi. Azokat semmilyen formában nem lehet reprodukálni, másolni, terjeszteni, csak a szerkesztõség engedélyével.