TR3 - Vision of Future v1.0
Author: LaraHCroft91......... Homepage
Download:Here(FullGame)
Walk by D&G Productions.
The Mansion. No secrets.
You cannot save here, I give the route through the level with all pickups, but there are more areas that can be explored.
The Labyrinth key.
The door straight leads to the landing and the bathroom, nothing there. So go left and go through to the room with the piano, behind the piano on the bookcase is a book switch, use it and turn around to see a door opened in the right hand opposite corner. Go get the Labyrinth key there. Go out and open the door to the landing, make it down to the ground floor hall. Coming down into the hall go right to the room with the big aquarium. Go right through to the swimming pool and take a left along the walls, on the last pillar on the far corner of the pool is a lever. Throw it and see a trapdoor open up in the Labyrinth. On the bottom of the pool are Flares, then swim to the end and climb out left or right of the dive board.. (Shortcut: If you go back to the Gym now and open the door to the left, you will come to the small garden and miss the Labyrinth).
To use the Key, go back to the room with the big aquarium and right around the corner is a button to open the door to the training course.. Go straight passing a pit into an alley.
Labyrinth.
There is the lock for the Labyrinth key, enter and go follow left everywhere you can, youll reach a small garden (see shortcut above). Turn around and go back into the Labyrinth, keeping left where you can till you reach the open trapdoor. Climb down and go into a cellar, to the left are more Flares and on the back of the central pillar is a lever opening up a door in the small garden. Go back and up the ladder, follow through the Labyrinth going right where you can. Go to the other side of the garden, near the house and left is the open door to the shed. Get the Pistols there. Go to the door in the house and open it, go into the Gym and head left, right to the big window in the opposite wall, open the door to the front yard and go open the entrance gates.
Level 1 - Roofs of Glasgow. 6 secrets.
Only enemies of importance (leaving behind pickups) are mentioned. Theres no compass, so giving directions will be tough, Ill do my best.
Just let Lara slide down into the alley, go left and shoot the Guard, pick up the small medipack he will leave behind and move that grated block away from the MP5 Clips and Medipack underneath. Get on the wooden crate and climb up the grate on the wall and climb to the top of the ledges, drop into the lower passage and use a button to raise a platform. Climb back up, go down to the lower ledge and jump to the grated walkway left in front. Hop over to the next one and at the corner, look up to the right, next to that chimney is a hole in the roof, jump in there to get Secret #1, a small medipack and MP5 Clips. Jump back to the walkway and jump over to the green platform, quickly run onto the grated platform. Hop up into the opening in the roof straight ahead and youll break through the bottom. Follow the underwater tunnel and pick up the Reserve Key. Then look on the side of the pillar for the underwater lever and use it to open a hatch. Swim to the other side and climb out of the water, grab a small medipack and climb back up to the alley at the start.
Follow the same route back up to the green platform, this time you dont have to use the button to raise it. From the grated platform turn left and jump to the next walkway. Go around the corners to find the key hole. Open the door and go in, up the steps and use the switch there. A platform raises outside, go out, jump left and then across to the platform. Pick up Secret #2, the MP5 gun, MP5 Clips and a Medipack. Go back to the room with the switch and pull out the grated block on the left of the entrance; you get Secret # 3, MP5 Clips and Flares. Now go to other side, opposite the entrance is another pushable block. Pull it out twice, go in behind it and use the switch to open the door in the corner. Go through the passage with the keyhole to where you get a screen of the key.
You are standing under a Zip line, use it to get across to that walkway below and turn right to jump over to the walkway at the grey roof.. Walk up to the roof and jump a bit to the right over the top. Go right and climb over the chimney to get the MP5 Clips, climb back up and jump to the wooden crates in front right. Jump forward from the crates over the barbed wire below and run over the first break tile. Turn around, go down the ladder and hop into the niche to get Secret #4, MP5 Clips, Flares and a Medipack. Go back up and backflip from the ladder, follow the ledge and run a bit left over the break tiles to jump and grab the flatter part of the roof. Hop over to the lower part at the chimney and climb up, then jump to the chimney where the Zip line is attached and pick up another Reserve Key.
The Unnamed Key.
Now jump over to a grey chimney next to the walkway at the grey roof (possible with a straight jump). Or jump down onto the grated block on the walkway below,
Move the block over to the grey chimney on the other side and climb up there, drop down on the other side to find the crawlspace. Follow through to another area of Glasgow. Platforms drop down as you step to the lower ledge, jump and grab up to the roof on the right, jump down to the grey ledge between the houses and then to the next, turn right and jump over to where the grated wall is, climb it and climb left onto the roof. Turn right and backflip over the top of the roof, grab the edge and shimmy right.
Timed platforms (or not).
Without the timed run: You can bypass the Timed run; follow the next paragraph of the walk.
Shimmy passing that flat part in the roof, do not pull up there and the platforms will stay up. Just past that, pull up and backflip roll to land with a grab on a ledge under a wooden crate. Do NOT throw the switch and turn left, jump over the platforms to the ledge.
With the timed run: After you back flipped over the top of the roof, shimmy to the flat part and pull up, jump over to the wooden crates and throw the switch there, turn right, jump to the crate there and back on the wooden crate over the switch. Run and jump onwards and down to the green platform, turn left and jump to the other side, turn right and jump to the next. Then hop up to the ledge. Turn right and grab up to the edge of the high roof (with the baddy on top), shimmy left to the second window and pull up. Backflip onto a balcony, drawing guns to shoot the baddy. Climb up to the top of this roof and get the Unnamed Key.
Go around this roof and collect a Medipack on one of the small balconies, on another is Secret #5, MP5 Clips, Uzi ammo and a Medipack. Now on the last balcony, near the corner where the Timed run was, is a button that will raise the platforms back up on the side where you have to get back to the previous area. Go over there, slide down and jump over to the exit (the crawlspace).
Crawl out, climb the grey wall, jump straight to the brick ledge and jump further to the small medipack on the chimney. Take a running jump in the same direction to a flatter ledge behind the roof and hop to the chimney to the right, turn left and jump back to the passage where the Zip line started. Get in and open the door there with the key you have and go down the stairs. Climb down left of the stairs to get Secret #6, MP5 Clips, Flares and a small medipack. Climb back up to the stairs, go further down and open the door with the Unnamed Key.
Go in and youll drop through the trapdoor.
Level 2 - Glasgow Subway. 4 secrets.
Turn right, walk up to the tracks, but dont get on them yet, look around the right hand corner and spot an opening with red light, climb down, run quickly into the opening before the train hits you. Get Secret #1, a small medipack and MP5 Clips. You can use those green Crystals to boot your health back up.
Abandoned Platform, the Star Symbol.
Go out, go left and run along the track to the second platform, climb up there, grab the Uzi ammo from the machine in the corner. Go up the escalators and in the upper hall go left and shoot the left hand grate out of the wall. Go in and in that dark place are two breakable tiles in the floor, the first is a spike trap the other has Secret #2, MP5 Clips, Flares and a Medipack. Go back out and down the left hand escalator, turn left and find the button in the corner on the machine there. A train comes through the tunnel; this means you can now go further left along the tracks to an opening on the left. Go in and turn right and jump, there is a spike pit to the right. Turn around and backflip onto the slanted block next to the pit, jump again and grab the high opposite block. Get the Star Symbol and climb down from the safe side of the block, turn left and get the MP5 Clips from the corner of the room. Go back out and run back along the track to the second platform where the level started.
The Hammer.
Climb back on the platform, run straight in de direction of the door that needs a key and shoot the Thug that will show up, get the small medipack. Now go up the right hand escalator and halfway up turn around to spot a ladder in the ceiling. Jump up and grab it to climb left to the upper passage, jump and grab over the spikes and climb in. Shoot the rats and go around the room to collect a small medipack, Desert Eagle Clips. Go to a push block near the crate and push it all the way in, climb up to the right and crawl left to get the Hammer, dont turn around but just crawl backwards till you drop back down onto the platform below.
Now go up the escalators to the upper level, go left and doors open up, go left and get the Key to the Ticket room next to the opened safe. Go back and straight into the dark passage ahead, climb up and get Secret #3, a Medipack and Flares.
Climb down, go out and right into the dark passage not yet explored, light a flare to spot the pit and jump to the ledge left, climb down at the back of it and climb down once more to get to Secret #4, Flares, a small medipack and MP5 Clips. Climb back up and turn around after climbing the second ladder and hop onto the ledge to the right, go around this passage and come to a slide, slide and jump to grab the opposite crawlspace. Go in and push the block twice so you can use the button (door opens at the spike pit). Then pull the block back once and go into the crawlspace to the right, follow through to where a door opens and you are back in the upper hall. Go right, again into the dark passages and left on the ledge, up right to the higher ledge and around the corner. This time grab the grate on the ceiling and monkey climb to the left around the corner to where a door opened up. Follow the passage and come to a closed door, here we need the Hammer to break the lock. (Hit esc, arrow up to get to the inventory and choose the Hammer, then hit enter)
A Penny for a Ticket..
Go in and get the Penny from the machine in the corner, carefully go to the other corner and pick up the Uzi ammo. Go back and over the monkeyclimb to the escalators, down to the platform and to that door left, open it with the key and go get a ticket from the right hand counter, stand in front and use the penny, the Ticket will drop on the floor. Go down to the tracks and left to the abandoned platform, up the escalators and use the Ticket at the small gates there (Hit esc, arrow up to get to the inventory and choose the Ticket, then hit enter)
The gates open up, go down and right around the corner, shoot that grating out of the wall there and climb up in, up the ladder and straight into the crawlspace, get the small medipack there and return to the crossing, take a right and use the button in the end. Go back to the ladder and down to the hall where the door opened.
First go to the platform and left to get the Flares, turn around and go to the other side, down on the tracks walk through the tunnel to an opening to the right, A safe haven Turn around to face the direction you came from, hop back once and music starts. Quickly get into the hideout and let the train pass. Follow the train to where you find a hole in the ground, go in and use the button there to open a door. Return to the platform; go left into the hall and through the open door. In the next corridor is the last door that opened, to the right. Go in and follow to a waiting room. Climb into the crawlspace up in the left wall and follow through to a slide, run with a U turn over the break tiles and look for a crawlspace below the entrance ledge. Drop and grab in there, coming into another hall, go right and around the corner is another crawlspace, get in, follow through to find a button down there to open the hatch above, climb back up and go up in the hatch. Up the ladder, turn around and jump across the shaft, go to the door and stand in the middle of the door. Use the Star Symbol to open the door (Hit esc, arrow up to get to the inventory and choose the Star, then hit enter)
Step out
Level 3 - Glasgow Church Tower. 5 secrets.
Go straight to the edge of the roof and drop from the edge to grab into the opening below. Two ways to go inside, go left and grab up to the grated monkey climb, follow around to the end, drop and turn left to climb off the side of the ledge, follow through, up and down ladders to a switch. A platform will raise for later. Go back and at the crossing after the monkey climb, go left into the second opening. Drop down into the pit, run into the lower part when the flame is down and stand under the second burner. Hang and pull up when the flame goes down. To the right is a crawlspace with Secret #1, Flares, a small medipack and MP5 Clips. Climb back out and go straight, walk slowly onto the breakable floor and hop back, stand back against the crawlspace and run to jump and grab over the spike pit under the collapsed floor.. Climb down the other end, go up a ladder and drop down again. Youre back in the passage to the switch, turn right and grab the ladder there to follow back to the monkey climb and to the right is the exit to the Zip line.
Use the Zip line to get to that green platform. (In case you didnt raise it, you can go back using the ledges to the left).
Enter and get into the crawlspace, go straight into the Hall. Go left around that central pillar to the far left corner and face left; the block with the lamp on it, is a push block. Pull it out and put it under an opening in the ceiling nearby, climb up (facing the wall) and get Secret #2, Flares, a Medipack and MP5 Clips at the Health Crystal (You could save this health Crystal for later if you want to spare medipacks). Drop back onto the block and look for the opening in the wall in front of you and a bit to the left, remember it for later.
Killing the Lasers.
Go into the corridor leading from this Hall and look up left for a crawlspace. Climb a long ladder, crawl through and drop out to a roof. Drop from the end onto a lower walkway and push the button there to open a door in the Hall. Go back the way you came and shoot that Guard in the Hall. He will drop a Gold Key (in my case it was under a flower pot and I couldnt find it at first). Go back into the corridor and open the door there, enter and run through to shoot all the guards, then pick up a Medipack and go into all niches to push 4 buttons in all.. A door opens at the end of the passage; walk up onto the walkway and straight against the wall ahead, look up to the right and climb up there to get Secret #3, a small medipack and MP5 Clips. Drop down, turn around and go to a button on the wall, push that to open a door for later.
Now go swim to the opposite corner from the secret corner and find a small room you can climb up in.
Throw the switches and the room will be drained. Face out into the room, jump forward and grab the monkey climb. Go over to the entrance and drop down on the walkway, near where the button is you can drop down onto a pillar, jump to lower ones till it is safe to drop to the floor. Behind that tall pillar is a push block, move it aside and use the switch to open another door in that corridor with the 3 dead Guards. Pick up a Medipack in the corner.
In the other side of this empty water room is a switch opening up the door left of it. (Looked like timed, but when I used it a few times the door stayed open.) Follow the passage straight into the crawlspace first, all the way to the end, turn around and use the button to open a trapdoor. Return and now go left as you come out of the crawlspace. Walk slowly through the barbed wire and crawl under the laser, side flip over the last one and walk slowly again to climb up on the ledge with the switch. Now the Lasers in the room near the Hall are down.
The Key.
Grab the monkeyclimb and get back over the barbed wire, hop the lasers and walk through the next barbed wires and return to the big pit, hop over the pillars to the higher one and climb up to the walkway. Go back to the corridor where you shot the Guards, follow through back to the Hall and go right into that crawlspace you came from before (after the zip line) to the end and climb out, step left a bit and climb the ladder there, backflip to a ledge behind and climb up to the roof. On the wall behind the ladder and is a switch, use it and go back down, back into the crawlspace to the Hall, but take the first right now, crawl through to get Secret #4, a Medipack, Flares and MP5 Clips. Now you can return to the Hall, hop onto that push block and jump into the opening in the wall (remember) climb up to a ventilation room and up to the right of the fans is a crawlspace, get Secret #5, climb up left for the reward, Uzi ammo, a small medipack and Flares. Get back to the Hall and enter the office in the corner, shoot the Guard and get the Key. Go back into the corridor with the dead Guards and into the open door left in the end. Use the Key in the lock.
The Thunder of Vision.
Go in and straight to the opposite wall, to the left is a small medipack, then get into the crawlspace and follow through to the Tower where you can pick up the Thunder of Vision and the level ends.
Level 4 - Streets of Venice. No secrets? (Something seems wrong with the stats, as all secrets counted as none).
Grab the Medipack and walk the street, a bunch of Thugs will come out of the alley to the right, wait for them and take them out one by one. One seems to drop MP5 Clips, another a small medipack although I didnt see it under that pile of dead Thugs. Go into that alley and to the right is a ladder, go up to get Secret #0, a Medipack, Uzi ammo and Flares. Go back down, go left and then right to the end of the alley and pull that crate out of the niche to get a small medipack from underneath. Then move the crate into the right hand corner of the square, next to that small tree and climb on top to use the lever on the wall, a gate opens. Notice the keyhole in the opposite alley but for now go out of this alley to the first street, go left and then right to where the gate opened. Shoot the Thugs and get some Desert Eagle Clips. Dive into the pool to get the Golden Key. Climb out and go to a crate standing in the alley in the far right hand corner of the square, push it once and climb on top to climb up to the right. Get Secret #0, Flares, 2x Uzi ammo and the Uzis.
Go back to that first alley and left to open the house, go in and use the button to open a gate on the square with the pool. Head back again to the pool area into the newly opened gate, follow in, go straight to that crate and pull it once under the keyhole. Hop over the crate to get a small medipack, hop back and go to the right to find a button next to a door. Go in and shoot a Thug on the opposite balcony, then jump over and climb left to pull up and get a Golden Key. Drop down, go to that crate you pulled out and hop on to open the gate next to you.
Go in and jump over the canal to go to a small square where Thugs attack, leaving behind a small medipack. Get another Key (called Ef) from inside the gazebo and return over the canal. Go left through the street, back to the square with the pool and straight to the first street, take a left to another gate and open it with the key. Go onto the bridge, dive off to the right into the canal and swim till you can go into a tunnel to the left, throw the underwater lever and return to the bridge, the gate has opened, go through and the level ends.
Level 5 - Via Carminati. 3 secrets
Go to the canal and dive under the jetty, throw the underwater lever to open a gate further on. Swim to the boat and press Ctrl to get in.
Boat controls:
Forward- Ctrl
Backward- Alt
Left/right- Arrow keys
Get out- End + Arrow keys
Take the boat through the opened gate, through a narrow canal and make a right, you can get out of the boat on the small jetty to the right and swim to the next part or take the boat there now, theres a Guard around the corner near a closed door, shoot him and take the boat further through the canals, going right theres a small street to the left leading to Via Carminati (closed). So proceed and shoot the next Guard around the corner, look for a ladder on a wall in the direction you came from and go up the ladder to backflip to an awning. Jump to the next one and throw the lever on the wooden platform to open the door below. Go into the house, shoot the 2 Thugs and get the Key to Markuss Mansion and a small medipack..
Go back to the boat and turn the first corner, go straight to the end where youll find a button on the jetty, push it to open a gate. Go back and take the first right, go passing the first Guard you shot and straight through the opened gate. Hop onto the jetty and go inside, shoot the Thug for MP5 Clips and go right for the Flares. Continue your exploration upstairs and find a hole in the floor to the right, climb down for Secret #1, a Medipack, Uzi ammo and MP5 Clips. Climb out and on top of the wooden crates are a Key and a small medipack. Use the key at the door and climb down the ladder, dive in and swim around the corner, use the underwater lever under the jetty and climb out to shoot the Guard, get the Medipack and throw the switch inside the opened door.
Dive into the canal and go into the opened gate, get a small medipack under the new boat and take the boat out. Go right to the high jetty and jump out of the boat to use the button. Go through the opened opposite gate and when you are in the wider canal with the clothes line, jump out of the boat and look for a small opening in the right hand wall (seen from where you came). Swim in and keep going left where possible to come to Secret #2, a Medipack, Flares and Uzi ammo (Save before you take it as Lara went into the wall in my game). Get back into the boat and go on around the next corner, jump out on the next jetty, shoot the Thug to get the MP5 Clips and use the button. Swim under the jetty with the Thug and climb out into a room where youll find a Thug, shoot him and get the Golden Key.
(In my case the Thug disappeared and I didnt find the Key, at the second go I never shot him and he ended up dead in the water, so that is how I found the Key )
Go up the steps in this small room to get Secret #3, a small medipack, Uzi ammo and MP5 Clips. Get out to the boat.
Take the boat through the canals, around a corner where a Guard opens fire (shoot him or not) and come to some crates to the left, jump out and throw the lever there. Now you can proceed with the boat, take a left through the little gate and come back to the canal where you shot the first Guard. Now you can open the door there and throw the lever inside to open the gate to Via Carminati. Go out and to the right, and get out onto the small jetty in the alley to the left.
Via Carminati; Markuss Mansion.
Follow through, shoot a Guard on the square for a small medipack and open the door to Markuss Mansion.
Level 6 - Markuss Mansion. 3 secrets
Go to the front door and open it, go straight and take the next left into the kitchen. In the far left corner is a switch, use it and return to the front garden. In the far right hand corner is a hole in the ground, get the Key to the wicket. Climb out, face the house and go left to the wicket (gate), open it with the key. Go in and right around the corner of the house is a button, opening up a ceiling hatch. Go back and into the house, go into the first left and get the Flares in the windowsill. Proceed through this passage, up the stairs and the left/right to the open hatch, climb up to the attic and use the lever there to open a door. Turn around and push that crate as far as it goes, revealing a switch and a button, use both to open more doors (for Secrets).
Drop down from the attic and go right to the bedroom, in the right hand corner a door to the bathroom opened, inside in the shower is Secret #1, MP5 Clips and a button in the other corner (opens a door). Go back downstairs (keep to the right) and from the front door into the main corridor, take the first right and right again to get Secret #2, Uzi ammo and MP5 Clips. Turn around and go left, all the way on the other side is another opened door, inside is Secret #3, a Medipack, Uzi ammo and Flares. When you go out of this passage, go left and find another Medipack on the floor. Go left around the corners into a small tiled room.
Markus and the Infada Stone.
Save there and slide down to the pool room, shoot Markus while jumping from side to side and after the dropped you can go collect the Infada Stone..
Level 7 - Elbrus Valley. 3 secrets.
The 2 Stones are gone from the inventory, you only have pistols left.
But that is easily fixed, turn around and shoot the blue window, go in and get a Medipack, the MP5 Gun and MP5 Clips. In the entrance to this short passage you will also find a lever on the wall, it will open up a hatch in the ceiling of the room. Pull two crates from their places to get 2 small medipacks, 2x Uzi ammo, Flares and MP5 Clips. Move one of the crates under the hatch, climb up into the place above and move the crate to get the MP5 Clips, in the next compartment youll find a small medipack to the left and a button to the right. The door below opens up; go down and out of the wrecked plane.
The Crowbar.
To the right is a small ice covered opening, shoot the ice and go in to get the Key of area 1. Go out and to the opposite side, just in front of the open cave is some debris to the left, under the debris is the all important Crowbar. Go to the cave and in the water are MP5 Clips, but the cold water will quickly drain your health, so watch out but dont take a medipack yet. Jump from ice ledge to ice ledge and look around the corner, there is a small medipack on the bottom, run and dive in, quickly get it and climb out on the nearby low ledge. Go inside the ice tunnel and boost up your health at Secret #1, a Medipack, MP5 Clips and Flares. Crawl back out and stand on the left corner of the ledge, look left and spot the crawlspace in the wall next to you. Now jump onto that opposite slanted ice block so you can slide and jump to grab to that crawlspace. Follow through to a monkey climb over the icy water, grab it and get down on the ground at the end.
In the next tunnel keep right and watch out for the icicles. In the end, when you come to an ice wall with 2 Tech guys behind it, youll find a tunnel to the right of that wall, go in and climb up into a crawlspace in the end. Get Secret #2, a Medipack, Desert Eagle ammo and Flares, get back out and go to the cave with the ice wall.
Left of the ice wall is a ladder in the hole in the ceiling. Climb up, back flip and follow through a climb down. Shoot the Tech guys and throw the lever to get doors to open and close in the area to the left. Go back to the ladder here, through the crawlspace, down the ladder, back to the monkey climb the way you came (dont use it) but go to the left where that pointy ice block stands in the way, there is a push block in the corner. Pull it out twice and climb over the push block to get into the new tunnel, over an ice bridge to come to an enclosure. Shoot the doggy and open the gate with the Key to Area 1.
Area 1.
Go to the dog pen and open it, shoot the dogs and two Tech guys that shows up, get their Desert Eagle and Desert Eagle ammo and go into the dog pen to push a button (it is behind the button you pushed to open the pen) that will open up a door.
Now go to those clanking doors youve started before and save, go in one by one to open the valves inside, the doors are quite deadly so watch out, after the third the gate to Area 2 will open up.
Area 2.
Go in and shoot 2 Tech guys, leaving behind a small and a large Medipack.
Seen from where you entered, go left into the far corner and turn left to climb the dark pillar, turn left and jump to the ledge with the small medipack, then grab the monkey climb and go straight over to the opening in the wall.
In this room is a lever up on the central wall, around the corner a push block. First move the block under the lever, use it to open the hatch behind you and then move the block under the hatch to get Secret #3, Uzi ammo, MP5 Clips and Flares in a crawlspace. Climb down and grab up the other side of the opening to get the Key to Contrivance.
Go out of the room, drop back to the ground floor of the area and go left, left into a door you opened earlier. Up the steps and use the key there, the cover lifts from the button to the left, so use it to lift the cover from a button upstairs. Go back out of the room, up the ladder to the room, via the monkey climb to the room with the push block and left in the corner is the button. The gate to Area 3 opens up. Make your way back down again and go back to Area 1, it started to snow Go out of the gate at the dog pen and keep the ice wall on your left. Go through the valley to where the gate opened.
Area 3.
Shoot the doggy and the Tech guy, pick up the Uzi ammo. Go to the door of the house, stand in the middle of the door and go to your inventory, select the Crowbar and then hit enter (If you got here without a Crowbar which is easily missed, you have to return to the start of the level, see the second paragraph)
Go into the house.
Level 8 - Tomb of Mysteries. 3 secrets.
Push the button next to the front door and enter the opened door. Go up some steps and at the crossing go left and pull the block out three times. Climb up and turn left, jump up and hoist up into a crawlspace. Use the button at the end. Get down on the block, roll jump off and use the button around the corner. Back on the block now turn left and enter the new open door.
The Crowbar.
Jump from the walkway to the one left in front and go left over the main track and then look down in the pit below. Look for a Tech guy below and shoot him, he has a nasty flame thrower. Jump to the walkway next to the shack and go inside, the opposite wall has a window opening, hop onto the windowsill and pull the block to your right once.
Climb up behind the block to get the Crowbar. Now to the hole in the floor, go down the ladder to the pit below and look for Secret #1, the Uzis and Uzi ammo near a pillar close to the ladder. From facing away from the ladder, go to the far right hand corner pillar and around the back is Desert Eagle ammo.
Go back up the ladder into the shack and into the opening in the wall next to the ladder, follow all the way down to a room with some buttons covered by glass, use the one in the far right hand corner to open a door on a track somewhere. Return to the shack, go back out to the walkway, jump back to the main track and go right to that barred door, use the Crowbar on it and turn around and go to the mine cart standing on the track just past the shack. Stand next to it and hit Ctrl to get in.
Cart Controls: forward is automatic
Brake: Alt
Hit the Rail switch: Ctrl
Duck: crouch key
Climb out: End + arrow key
Just enjoy the ride and after that fence with the Tech guys, be ready to hit the Rail switch so you will turn right, if you miss youll end up flat against a gate. Dont use the brake again and Lara will jump some gaps. Then brake and the cart will stop at the end, get out and walk back along the track to the centre of the last room, look up left and jump into that opening, go left and get the Uzi ammo, go all the way to the other end, crawling underneath the drills to get the MP5 Clips and then go back to enter the last passage opposite the entrance. At the icy cave a jump to the flat ledge far left and then diagonally across to another flat ledge, drop and grab the crack below and shimmy left to drop at the opening to another tunnel with a track. First go left to the crossing and immediately left around the corner you can grab up into an opening, get Secret #2, a Medipack and MP5 Clips.
The Silver Key.
Go back to the cart and climb in, just go straight at the crossing and youll go through the door youve opened when you were in the shack. The cart will stop in a large cave. Climb out and look down to shoot the Tech guys below. Then climb down next to the track (right hand side as you came in) and look for the button on the track support pillar, a door will open up above. Climb back up and jump over to the ledge with the open door, get the Silver Key inside.
Lift the Cover.
Jump back to the track and run right to the end, passing the cart, jump over the gap to the small part and grab up to the monkey climb, follow straight to the end (theres a crawlspace to the right), drop and grab the crack and follow that to the end, go left over the walkway and on the pillar to the left is a lever, using it will lift the cover from a button.
Lift the second Cover.
Drop down into the pit and now go to the crane, face away from the crane and climb backwards into the hole. Drop grabbing the crawlspace below and follow through, a bunch of doors open up for you; the last one can be opened with the Silver Key. Drop down into the opening and use the button to open the door to a corridor. Inside and on the slanted block is a lever, throw it to open a door back in the passage with the many doors. Return the way you came and in the passage with the many doors is an icy crawlspace to the right, remember, but first follow through and around the corner straight ahead is the door you opened. Follow through and it doesnt matter which side you take, as long as you reach a wide cave with a hill and pulsing light. Jump up the hill and first left a bit to get a small medipack there, then jump along the top of the hill to the lever and throw it to lift another cover. Go down the hill and into the lower end next to where you got the medipack, a crawlspace, climb a ladder, get off on the left and follow through all the way through and you are back at the crane pit. Pick up some Flares near the lever you used before.
To the shortcut.
Make your way back up to that monkey climb you used before, you cant get there from here so drop into the pit and go back over the track. This time turn right in the end of the monkey climb, drop and grab into the crawlspace. First go straight and get the Uzi ammo in the end, then go back and left into the cave, shoot the doggies and look for an opening in the ceiling over a block of ice. Climb up and a trapdoor will open up for you.
The Battery and the Jack.
Turn around, climb down and turn around again to go straight into the room with the buttons, straight to the opposite door and open it. Go in and the alarm goes off, doors open and Tech guys open fire, shoot them and the second one will drop the Battery. Go back out and to the other door across the room, open it and go into a small storeroom, pull the large crate back once and climb over the lower crate to get a small medipack and the Jack where the large crate used to stand.
To the Crane.
Go back out to the shortcut ladder at the trapdoor and up, follow back to drop into the crane pit, go to the crane and use the Jack on the back of the crane, now climb down as you did before, drop and grab the crawlspace and safety drop down to the now safe bottom. Follow the passage to another track tunnel, ignore the cart for now and follow the track through that dark support beam, just left around the corner of it you can climb up for Secret #3, Desert Eagle ammo, Flares and a Medipack. Get out of there and proceed along the track, place the Battery at the door to open it up. Go further up the track and climb the ladders to get to an area where 2 Tech guys are on patrol. Shoot them and go up to the Tomb entrance.
Level 9 - Trons Temple. 3 secrets.
Main Room.
Follow the tunnel to the Main Temple room. Go left around this ledge, hop onto the higher ledge in the back and youll you bump into a pillar on the right hand side. Use the lever on that pillar to drop a block into the room below. Make your way down and get on the block to use the lever on the pillar. A door opens up on the upper level, turn right and you can see it. Use the ladder on the pillar close to that door to climb back up and enter. Hop over to the ledge ahead and use the lever to open a gate in the Main Room. Turn a bit and drop down from the ledge, the block under the lever is pushable, push it and get Secret #1, Desert Eagle ammo and Flares. Go around, climb the block and then the ledge to return to the Main Room.
The opened gate is on the bottom floor opposite side, go in and follow to a spike pit, turn around and climb down. Walk slowly through the spikes to use the lever and climb back up the ladder, in the Main Room turn right and right again to get into open door and follow through. There is a pushblock in front of you, move it under a button on the wall left from where you came in and use the button to open a gate. Turn around and follow the passage to a Hall (theres a closed gate in the back and left). Turn left and go up the ladder, climb off to the right, roll and follow this ledge to jump into the opening to the left. Crawl in and first go right and in the end is a lever to open a door, go back and keep right, drop down in the end of that passage and shoot that Tinnos Monster. Look for a pushblock in the right hand wall and pull it out, then move it all the way to the nearest corner (Ill explain why later). Go in and push another block all the way in. Climb over the block to get Secret #2, Desert Eagle ammo, a small medipack and Flares.. Go back and climb the block you moved into the corner, pull up into the passage and save
Run with a right curve onto the trapdoor and slide, than jump forward to the ledge ahead. Walk to the other end and hop left onto the wider ledge, wait for the Tinnos wasps and shoot them from here. Face the entrance of the cave and climb backwards of this wide ledge, drop and grab the crack so you can climb down the wall and to the right into an opening. Go down into the water and use the underwater lever to open a gate. Climb out and turn right, jump and grab the crawlspace over the water and follow through to slide back into the cave. Now grab the ladder there to get into the crawlspace, follow and drop into a room where another Tinnos Monster attacks. Go into the opening to the left and on the ledge is a lever, another lever will appear in the other end of the room, so jump over there and use it to get another lever out. Use this one too and the big door downstairs opens up.
Go through and into the water; swim through and up another looong ladder. Youll get back to the room where the first secret was, go back to the Main Room and to the lower part, into the left hand door on the opposite side and follow to the right to the hall. In the back and left the gate has opened, go in and push the button to open a trapdoor. Run out and right to the corridor with the columns and turn right into the passage, the trapdoor will open up and down there is the trapdoor you opened with the button. Drop down, go to the opposite corner next to the statue and get the small medipack. Go back to the side with the trapdoor and spot the pushblock in that wall, get it out and move it to the right once, climb on and grab the ledge on top of the statues. Jump all the way to the other end and find a well hidden level on the left wall. Drop down and save in front of the opened door in the room below. Run and jump in to get out of the way of the Spike Roller. Shoot the Tinnos Monster and the gate opens on to of the steps. To the right of the steps, behind the totem is a crawlspace with Desert Eagle ammo.
Fire Dragons, opening the Three Gates.
Go up the steps and turn sharp right around the corner to find the lever. The gate will open up (the other gate is to a Secret). Go into the room and immediately to the right is a pushblock, push it as far as it goes, turn left and push the block there too. Throw the lever on the right hand wall and turn right, go into the passage and into the first left. Save and push the button there, immediately backflip or you fall through a trapdoor and have to go back here again. Now jump past the Fire dragon to the button between the 2 dragons and push that too, immediately duck. Go to the last button and push it, just stay put and see the last of the three gates open up. Turn around and go out, follow the passage back to the small gate and go right around the corner to the opened Secret gate.
Enter the opened gate to get Secret #3, MP5 Clips and Desert Eagle ammo.
Go follow the rooms back to the one with the statues and the pushblock, move the block under the trapdoor and climb up, turn around and backflip onto the slope, jump again to grab a short ladder, go up a bit and backflip to the upper passage, turn around and turn right into the corridor with the columns. Get back to the Main room and go over to the opposite side, left hand open passage.
Room with the Swinging Bowls, Trons Mask.
Stand on the right hand side and hop over the first pit with a grab, walk over to the next pit and sidestep left to the wall, now do stand jumps with grabs to get over to the passage in the end and slide down to get Trons Mask there. Turn left and go into the corner, up the ladder and follow through to the Main Room, go to the right hand side, left hand passage and follow through to the Hall.
Gate Labyrinth, placing the Mask.
Back
in the hall, climb the ladder again. From where you come up, look diagonally
to the opposite corner and spot some greenish transparent ledges through the
room to the ledge at the opening in that corner. Jump the ledges and go inside,
the gate closes behind you. Hard to explain directions here, so better look
at the layout 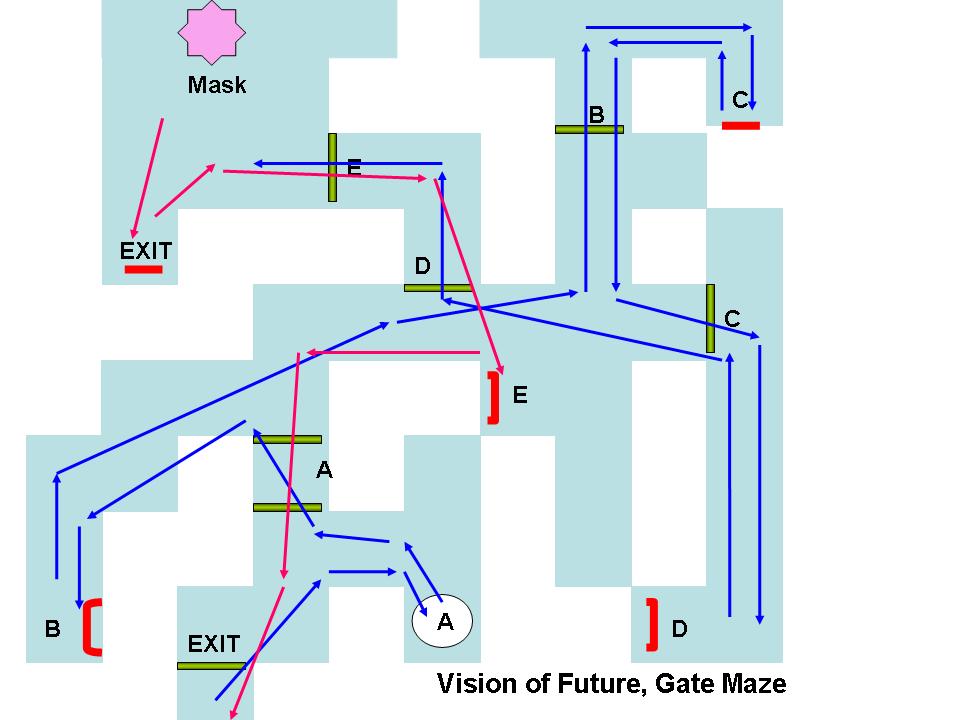 and follow the route, triggering gates to open till you finally come to the
room where you can place the Mask. In the corner is a Medipack and
in the opposite corner a lever to open the exit back up. Go back to lever
E and throw it again to open the double gates again. Now line up diagonally,
aiming for the left corner of the exit and save. Run/sprint through the left
corner of the exit and you should be out before the gate drops shut.
and follow the route, triggering gates to open till you finally come to the
room where you can place the Mask. In the corner is a Medipack and
in the opposite corner a lever to open the exit back up. Go back to lever
E and throw it again to open the double gates again. Now line up diagonally,
aiming for the left corner of the exit and save. Run/sprint through the left
corner of the exit and you should be out before the gate drops shut.
The Key of Vision.
Make your way back to the Main Room and climb up a pillar to get to the big doors and from there jump to the central platform on the column to get the Key of Vision. Open the big door, follow through a dive into the water; swim through the tunnel.
Level 10 - Vision of Future. No secrets.
Go to the gates and they open up, swim up in the next room and climb out, go around the room to collect a Medipack, MP5 Clips and Desert Eagle ammo. Go into the passage near the Eagle ammo and go left. To the right is a closed gate we have to open, there are two passages leading from here. Facing the gate go left and then right. Go to the blades and jump over them, around the corner is a small medipack to compensate for the loss. Follow to the end where you can use a lever to the right of the crawlspace. Go through the crawlspace and use a lever left of the next double gates. Go through the open gates, go left, then straight, left again (on your right is the pool you came out), left again and straight and at the end to the right and follow through.
Screwed Up Ceiling.
At the next gate use both levers left and right. Then save first in front of the open gate. Inside that room you have to find and use two levers. I went in sprinting and a bit to the right as the first one is on the wall you will then bump in to, turn left and run to the back, left as the second one is on the left wall in the back, roll again and sprint out of the room.
In the end of this corridor around the corner, go right and right, the gate is now open.
Step out into the snow and go follow the passage to where you step down into an opening. Save there
Conquer Sophia Lee.
When you slide into the room Sophia opens fire, nothing can be done about that, there are two pillars with each a fuse box. The fuses are up in the room and you have to collect them while under fire, so watch the health at all times and take shelter behind pillars every now and then when you have to shoot a Wasp. Trick is to keep moving as much as possible.
I went to the right over the ledge, turn around in the end and jump to grab the ladder on the side of the pillar, go up and jump straight over to the next pillar, then to the ledge on the wall and get the first Yellow Key, hop back to the pillar and drop down to the ledge on the back. Place the Fuse and go back up the same ladder, turn around and jump to the steps in the corner and then jump up to the ledge over the rooms entrance, run to the end, throw the switch there and get back to the other side of this ledge to throw a second switch, now a door opened to the left in the wall. So turn left and jump over to the next ledge and turn right to jump into the opening with a grab. Get the second Yellow Key and safety drop down, go to the receptacle and place the Key. Now climb this pillar again, turn around left and jump to the steps, up to the ledges and go over to the other side of the room. Jump onto the dark ledge over where you got that first Key, a cover lifted from a switch. Use that and Sophia will be blown to pieces.
Thunder of Vision, Spike of Future, Figure of Yore - Vision of Future.
Jump over to the ledge she was on and get your Precious Gems back, all three of them. Get back to the ledges below and place the three Gems in the receptacles at the end of each ledge and the Vision of Future will appear in the middle of the room, get that and see a trapdoor open up. For the last time climb up to the ledge over the rooms entrance and from standing at the switch there you can grab a ladder, go up through the open trapdoor which starts slamming away. Go up the ladder and off to the right, get the small medipack and follow through.
Alley of Traps.
Youll come to a slide, save here and go down, no need to hurry as the Spiked walls will stop wide open. Couldnt get the Medipack so I just moved on, hop over the Blade and run to jump over the pit in front, keep running and jump between the next set of Blades (will take a few tries). Crawl underneath the second Blade and slide, immediately jump with a sharp right curve as you have to slide backwards down the next part, grab the edge of the slide and hang there till the Spike wheels have passed. Drop and go underneath the Darts to the other end of the passage, jump to that ladder and go up. Shoot the 2 Tech guys and see the helicopter landing on the pad. Open the gate with the button next to it and go home.
24-01-2009
Az oldalon közölt képek, a szöveges tartalom, illetve minden sajátkészítésû anyag, a © TR Editor.hu tulajdonát képezi. Azokat semmilyen formában nem lehet reprodukálni, másolni, terjeszteni, csak a szerkesztõség engedélyével.