
Return to the Imprisoned Spirits
Author: George Maciver (George M)
Download: Here
Walkthrough:
We wont mention all the Enemies, only relevant ones.
Story:
Lara has not been sleeping very well. One evening, while she was curled up reading a book by an open log fire, she felt a half unconscious rumble deep within the earth. Since then she has been lying awake listening to the night, or prowling through her mansion until the early hours of the morning. Her thoughts constantly return to the Tombs of the Imprisoned Spirits. She knows they are awake again. She knows they are stirring, looking for their stolen artefacts, looking for her. But she's not afraid. She will never be afraid.
Level 1 - Return to the Imprisoned Spirits.
The Big Tar Pit. (like in the Imprisoned Spirits level, same environment)
After some slides, Lara will drop into a pool Climb out and take care of the Ahmet as theres a Timed run coming up, you are at a Big Tar Pit with bridges going in 3 directions (later)
Timed run for the entrance.
In the NE is a gate that has to be opened and the switch is near the pool on the E wall, pull/roll and turning R, start to run around the green hill then sprint the last part to get in the gate in time.
For the Silver Key.
Go up a ramp and up the ledge in the end, theres an opening up R, follow the passage to a drop into a room with lava and go on to the next caves W, then turn L (W goes back to the Tar Pit.) and follow the cave up to an alcove with Flares (just passed that gate up R) and continue up the cave to the place where you placed the Masks in the previous level (Imprisoned Spirits). To the L of the masks on E wall is a switch that will open that gate back in the lower cave, so return and climb the lower block N, opposite the gate and stand in the NW corner of it, turn SE and standjump with a L curve onto the higher block, stand SE and do a long runjump with a last moments grab to the edge of the opening, go into the room with the Snake Stone receptacles.
The Snake Stone room.
Go over the hanging bridge and L to the pole on the corner, spot the Key on the ledge E. You have to do a long runjump/grab around the outside (worked best for me) of the pole and grab the R hand corner of the ledge with the Silver Key, get the Key (screenshot of a door) and stand behind the pedestal to do a runjump with a L curve and land back on the ledge. Go back over the bridge and down the caves to that crossing W, go W and up the hill to go over the top and to the Tar Pit.
The Big Tar Pit.
Go over the bridges to the crossing and go W a bit more, to the L are blocks in the pit. Do a runjump to the first and then to the one SW, one more runjump to the ledge at the opening in the wall and follow the passage to a key hole to the L in the room with the door you saw earlier. Open the door and follow through to a grim room where mysterious music starts. Runjump/grab over to the other side and go to a room with a basin.
The Spirit Key, Gold Key
Dive in and swim to the E, follow past the first opening up and climb out at the second. Get the Spirit Key (Guardian Key) and go on swimming E, through the small tunnel and up in the next room, climb out on the small S ledge with the plant and climb up S once more to get the Gold Key in the gap between the rocks. Hop back in the water and swim back W a bit, again climb out to the S and go up the steps to a square, go to the SE and then E to go up the E side rocks there, jump the ledges to the opening in the E wall, follow down to the keyhole for the Gold Key, the door opens.
Next Silver Key.
Go into a small lava room and hop to the L ledge, grab up to the block and shimmy to the R, drop onto a ledge under a hatch and look out over the lava, up above is a MS, just standjump and grab it, if Lara wont move, turn R or L and use the shift key and one of the side arrows to swing sideways across, drop and go to the switch S. The switch will open the hatch at the MS, so head back and drop/grab the ledge at the hatch, pull up, turn around and jump/grab up. Go to the N side to get the Silver Key. Go back down and use the block to shimmy back L to the exit, jump out and go to that room with the rocks, straight across you can see that keyhole for the Silver Key on top of the black blocks.
Go up there and open the gate, inside an Ahmet will attack, try to take him out in the room and not in the S passage you have to go in, then follow the S passage to the balcony overlooking the room with the rocks. Use the Spirit Key to open some big gates and go back past the dead Ahmet to the water, from standing on those steps at the waters edge, look up the sloped ramp W, there are flatter ledges there. Runjump onto the first (holding the forward key) and then standjumps to the top, look L and forward a bit and theres a short passage W, walk to the block in the end and pull it out. Get behind it and go down the ramp. Drop into a room with Secret#1, Flares, Ammo and a MP, go to the other side of the room to get the 1st Golden Skull. Dive into the water and swim E to the last pool again and climb out SW. Jump up the W slopes again and now go(N) and to that gate you opened before. Go down a ramp and the gates close behind you, at one time I got a cutscene here of a Mutant going through a door, then the next time it wouldnt show. (But it has to show, otherwise the next door isnt open, so I closed TR and started it again and this time I got the screenshot, and the door was open).
Just go down the ramp and the gate opens, youre back at the Tar Pit, stay on the higher ledges and jump around the corner L, hop over the lower passage to the bridge and go on around the L to a ledge with a ½ MP (no secret?) But there is one somewhere else, go to the W side of the Tar Pit, using the bridge and walk into the blocked off entrance, from the somewhat higher floor you can pull up on the R hand side and when you do a runjump with a sharp L curve you will land on the top of the small mound and theres your Secret#2, Ammo. Slide down from the mound. Get back onto the bridge and head back to the S side of the Tar Pit, you came from before to the lower passage between the slanted beams and go S, into that door the Mutant went in. The next door will open for you and you can enter the Tomb of Despair.
Level 2 The Tomb of Despair.
Follow the path to where you get a flyby of the Mutant running through the dark rooms, then go up to that poor bloke on the jetty. Heart ripped out and left to burn
Nasty Spirits.
In the NW is the gate opened by the Mutant, straight to the N is a statue and that statue is to get rid of 6 White Spirits, they will be released whenever you get close to the W and E sandy areas, so maybe better if you run to the SE and onto the grey floor. Sprint along the sandy area to the N and then go L, past the statue and to the NW, go L on the grey floor and sprint S, then cross over to the statue again and let the Spirits kill themselves.
The Gold Key and the Crowbar.
Now go SE and jump onto the low wall next to the burning sand, runjump to the spot with the cobblestones in front of the opening S and go on to the E, finally jump to the E side grey ledge and go L (N) over a steeper part of the ledge and then a runjump (diagonally over the ledge) to the L and from that cobblestone area you can recover the Gold Key. Jump back and go S, jump back to that opening in s wall and go in, to the L is the lock for the Gold Key and it will open the door up R from the lock, jump in and go get the Crowbar. Go back out and from the cobblestones in the sand you can go to that E ledge again, follow all the way to the NE corner.
The Beauty and the Beast. (thrill of your life)
Get into the opening and the gates open up, sprint straight to the L side of the Crowbar-gate N (so Lara can open it right away) and open it fast, get in and get the Cog Wheel in front and Shotgun and Ammo to the R, on the opposite side is a MP for you. The Beast doesnt come in here (I never even took a shot at it) so prepare to sprint back out and go into the exit passage.
Jump around the R to the ledge there and head W, to runjump from the end to a closed gate, go L and then R to go through the shallow pool to the W side. Go to the R and in the corner is a statue push the statue onto the Tile and the gates open up (shortcut for later). From the statue, walk to the edge of the burning sand and do runjumps over the cobblestones to the other side. Go L and to the far SW corner, up into the opening there and follow to a room where 2 more Beasts will appear, just sprint over to the passage S. avoiding contact with the Beasts. Runjump/grab the rope over the pit and swing across to the switch, throw the switch to open the gate N in the room with the Beasts. Drop down into the pit and go up the blocks on the other side to get back up the other side and Sprint N, into the open gate, use the Cog Wheel to the R (middle) and go into the next gate to get a Spirit Key. There are more gates that need Cogwheels, so remember this spot.
Head out and go L/L to the exit and from the ledge at the burning sand below, a runjump up to the block E, runjump to the Cobblestones and go inside the opening there, to the R id=s a gate up in the wall and behind it you can see those 2 Beasts, go into the alcove in the end and place the Spirit Key, the floor goes up and youll be take to the upper level. Go N and come to an opening overlooking the burning sand.
Break ledges.
Save and standjump/grab to the first break ledge. Pull up and runjump to the next, release the forward key and then 2 stand jumps a running jump to the last and quickly take a single step forward, then standjump/grab to the ledge ahead.
Beasts and the 2nd Cog Wheel.
Go on over the walkway to a gate that will open for you, Save and go in, 2 Beasts suddenly appear when you approach the pedestal with the 2nd Cog Wheel. I had to shoot these 2 as you will have to throw 4 switches (E and W) in order to leave through the gate E (I used Shotgun, from close range and they dropped with one round each. *I even managed to drop two with one single round once, as they happened to stand behind each other and very close together*). In the alcove W is some Ammo before you leave.
Go through the passage to a junction and head R, a cutscene will show the gate opening up at those 2 Beasts that are still alive (where you have to place the Cog Wheels) Do a safety drop down from the end of the passage and head down W, through the gates you opened pushing the statue before and go jump over the sand to the W ledge go L (S) and up into the opening in the corner again, to the Beasts. Go R/R and into that gate to place the 2nd Cog Wheel, get the next Spirit Key and it looks like you need one more Cog Wheel.
3rd Cog Wheel.
Go out and now you can use that gate opened near the exit L, slice down into the tunnel where you placed the first Spirit Key and go L, out on the cobble stones and runjump to the floor E, go past the poor bloke to the SE and hop on the low wall again, runjump to the cobblestones in front of the tunnel S and go to the end to place the Spirit Key. The Floor goes up and now you have to go N again, follow the walkways to a gate that opens up and come to a room where sinister music starts, go to the ladder NW and climb up, L a bit and to the top.
Burner Jumps.
Hang L and pull up in the corner, turn R and a bit more
than 90 degrees, hop back and grab the edge, shimmy L around the corners to
the wall and pull up there, now look across the room and from here you can
do a standjump/grab with a L curve to grab the corner of the opposite burner
in the next row 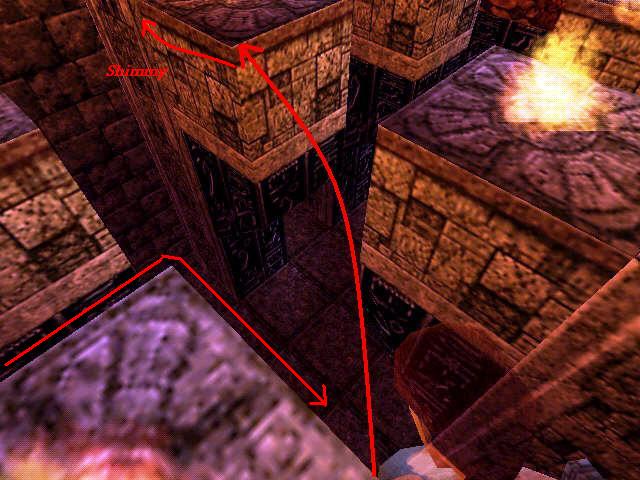 Shimmy L to the wall again and repeat the same jump but now to the other side,
from the last burner you can shimmy to a corner close to the ledge and jump
to the pedestal with the 3rd Cog Wheel.
Shimmy L to the wall again and repeat the same jump but now to the other side,
from the last burner you can shimmy to a corner close to the ledge and jump
to the pedestal with the 3rd Cog Wheel.
The Corpses Hand.
Safety drop to the floor below and head out the now opened gate W, go through the passage to that familiar crossing, go L and drop down into the lower passage, head down W again and over the cobblestones to the W ledge, to the S and up in the SW passage, go R/R and into the Cog Wheel rooms. In the last room is a place for the 3rd Wheel, a flyby shows a gate opening up. Go out and straight S, climb down the blocks to the bottom of the pit and go E. All the way E are the gates you saw in the flyby, go in to get the Corpses Hand. Coming back out of the room, go L and into the SE corner, in the E wall is a CS, pull up and crawl to the other end, drop into the small room with Secret#3, the 2nd Golden Skull.
Roll and sprint out for obvious reasons, go to the pit with the rope and hop the blocks to the top, L curved the last one and sprint N, R and out the E shortcut gate to the dark green tunnel, go L there and R when out on the cobblestones, runjump to the E and go sprint to that statue N in the shallow pool to get rid of those Spirits.
The 1st Spirit Stone and Spirit Key.
Go S to the poor bloke on the jetty and see the flames are off, place the Corpses Hand in his chest cavity and watch the flyby Go NW and through the open doors at the statue, up the ramp and to the R on top, through the place where you saw the Mutant running before and go into the passage in the end, to the R of the hole in the middle is a pedestal with the Spirit Stone and Spirit Key. Look L and down into the pit in the middle of the room, see the opening below, just run in with a grab to land inside and follow through to a Secret room, get Secret#4, a MP, Uzis and Ammo. From the higher ledge in the middle of the room and facing the passage, you can grab up to a passage above, go out through a secret door and go L, through the opened gate and slide back down to the Tar Pit.
Level 1 (part 2) - Return to the Imprisoned Spirits.
Drop from the passage and jump to the bridge, go straight over to the far side and jump to the floor on the L side of the entrance to place the Spirit Key. The door to the R opens, jump to the bridge and go in
Level 3 The Tomb of Hope.
Follow in to where another door opens and youll come to a large lava cave.
The Large Lava Cave.
Runjump around the R to those rocks SW, and go climb down to one level above the Lava, go to the S end and runjump over E to the ledge L of the big pillar, hop around the R hand corner and once more to the S side, from the tip of that rock a runjump and last moments grab to the ledge S. Go to the W side and runjump/grab the rock W, shimmy along the edge to the R and pull up on the ledge, turn R and hop over to the blue light.
To the Top.
Follow the passage up to a climb wall (ladder) and go up to almost at the top to backflip into a passage, follow through to where you can drop down into an opening, safety drop and slide/grab the edge of the rock, shimmy R to the end and pull up to backflip to the ledge behind. Go S and just past the corpse is a passage to the L, go in youre about to do a Timed run.
Timed
Burner Run. 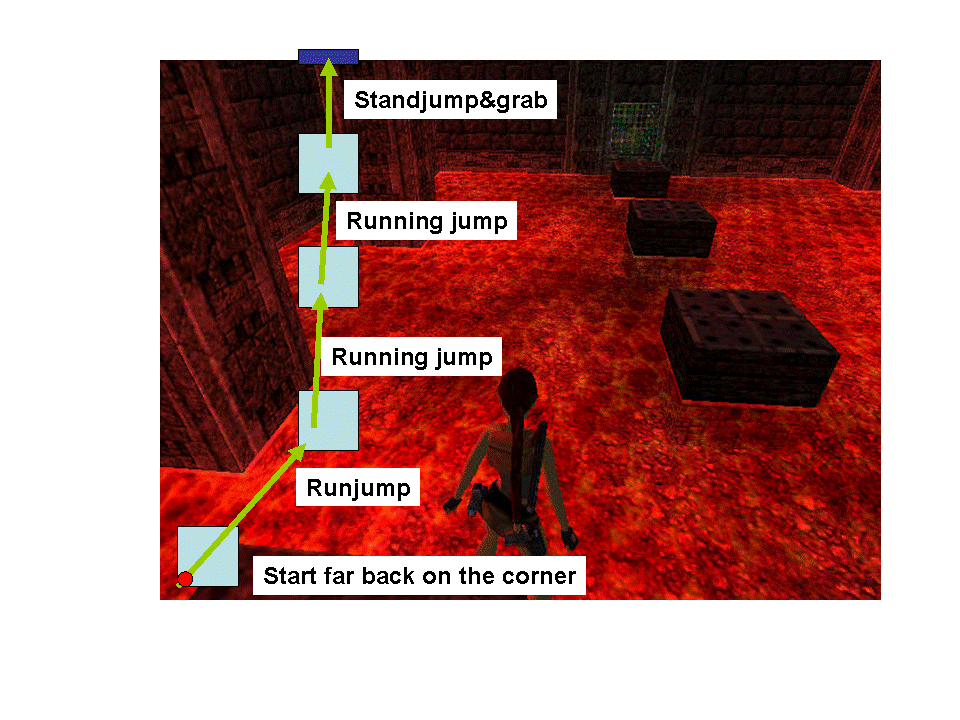
Standjump (no grab) around the R hand corner onto the corner of the burner block turn around and see the other (L) burner is off now, so standjump back into the entrance and jump to the L burner (the lower burners go off), then stand on the most NW tip of the block and face SE, Save and runjump to the first of the lower burner blocks. Turning L a bit a running jump to the next and then to the 3rd, last comes a standjump and grab to land inside the opened gate. (If you dont stand far back on that first block, youll end up to far on the burner blocks and cannot make the last running jump)
The Spirit Key.
Go on in and go R to the SW corner and find the Spirit Key (heavily Guarded) Go back and jump the extinguished Burner blocks back to the Large Lava Cave. Go L and place the Spirit Key to open the nearby gate. Hop on the receptacle block and standjump to the rocks W, at the pillar, go on over the rocks and ledges to a ledge NW and get the Ammo, jump back and get back to the open gate. Enter the gate.
Lava Lake with the Hanging Bridges.
Crossing the bridge you can already see the Corpses Hand down in the S but you cant reach it from here. Go R (W) and look down to the R (N) before entering the passage, theres an opening in the wall below, standjump/grab down from the bridge to land in the passage and follow to a Lava room with break ledges.
Break Ledges and Sloped Blocks.
Stand on the edge and do simple hops over the ledges, from the last you have to jump and curve slightly R to slide forward from the sloped block, stay on the R hand side while slide/jumping and curve R to the R hand block then curve L again and finally jump to a ledge with a switch that will change the position of the blocks. Now you can jump all the way S, start by jumping to the L side of the first block and curve L when you come to the block L, then curve back R and keep slide/jumping on the L hand side as there will be another one of those side blocks in the other end, finally come to a ledge S.
Turn to the W wall and find openings in the pillars, runjump/grab up NW and hop to the N, up L and then a standjump/grab out to the N to the MS and go L to the end (against the wall), drop onto a break ledge and quickly climb up to the switch. This switch will open the gate E on the hanging bridges. Turn SE and runjump up into the opening in the pillar, follow to a passage to the R and go up to a safety drop (drop from the L side of the opening) into a lower passage. Turn R from landing and go out to the bridge, go over to the E side and into that opened gate, Save at the Change Pit.
The Change Pit/Room.
Heres
a nice one for you
As long as you are on the ledge youre on, the central
pillar will be flat, but as soon as you jump to it, it will change shape and
gets sloped. So you better go to one of the sides so you can do a long runjump
to the other corner 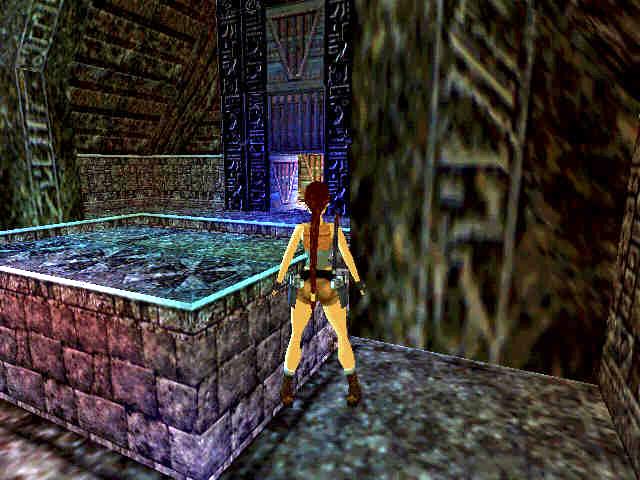 , to land
on the down sloped other side and jump to the ledge E and as soon as you go
into the room youll see it changes too.
, to land
on the down sloped other side and jump to the ledge E and as soon as you go
into the room youll see it changes too.
The Spirit Key.
Go L and stand on a blue tile in the L corner, turn around and see the room changed back. Go step one tile E and then turn S hop over two blue Tiles (dont touch them) and turn L to hop E over the last blue Tile, go into that room and to the back where the Spirit Key waits on a pedestal, jump to the pillar and get it. Go back to the change pit and runjump to one of the far sloped corners, so you can jump back W, go over the bridge (you can see a new passage opened near the Corpses Hand) to the W passage and up the steps to place the Spirit Key and open the gate, go out into a new lava room with hanging bridge.
The Corpses Hand
Go over to the other side and slide down a slope, a flyby kicks in and shows that Mutant running off again. Go on and come to a passage with Fire Breathing Statues, stand L or R of the middle so you will just jump past one and runjump over as the one flame is off, then you will come past a door up on a block to the L (later), go on to another Fire pit and finally come to the Hand. First have a look to the L of it and spot that opening in the wall I mentioned.
Go get the Corpses Hand after you saved and run L, jump/grab to the opening and go up fast, (keep an eye on the health) run up the steps and go R after the door opened for you, through the red passage to the hanging bridge and to the crossing, L and out to the Large Lava Cave, just to the R there is that statue to get rid of the 4 Spirits.
Secret Skull.
If you want a Secret, go back and to the red passage W, up the steps and L through that shortcut door, runjump to the ledge where the hand was and go runjump/grab back over the first and now extinguished pit. Go to the door up R and go in to get Secret#5, a Secret Skull.
The 2nd Spirit Stone.
Make your way back to the Large Lava Cave and go to that Corpse on the ledge straight ahead, place the Hand and take 2 hops back, look up E (R) and jump up to get the 2nd Spirit Stone. The flyby will show the gate across the cave opening up. Go stand on the ledge close the Big central pillar in the cave and runjump/grab to it, pull up where possible and look over the top to the NW to spot a small flat ledge standjump over the top, and then a standjump with grab (or youll go too far) to the NW corner. Get Secret#6, a ½ MP. Check the health and safety drop from the N side of that ledge to the one below, runjump to the lowest ledge straight W and climb up to the R, go N and to the L, stand facing S and backflip to the sloped rock, jump and grab the higher pillar, climb up further and get over to the gate. Slide down and come back to
Level 1 (part 3) - Return to the Imprisoned Spirits.
Using the Spirit Stones.
Go over the bridge to the E and now you have to use the SE Timed switch again to re-open that NE gate and go in again follow up to where you drop down and go W to the caves, then up S and L to the blocks on the R, climb them and runjump/grab over to that opening S. Over the Bridge and to the R, this time a runjump (no grab) from the inside of the corner pole and place the Spirit Stones there. Runjump back to the ledge and go into the opened gate S.
The Pyramid.
Runjump/grab the edge of the opposite wall and shimmy to the L, pull up at the corner and climb up one more block. Turn R and sidejump onto the next sloped wall around the corner and go shimmy to the S end, passing a flat ledge youll return to in a bit. Pull up at the end and runjump from the small ledge into an opening W in that back S wall of the Pyramid (or jump to that ledge near the white pillar S) and get into the entrance of the Pyramid. Use the switch inside and that will open a trapdoor E over the ledge you just passed. Climb a ledge just L (E) of the exit and standjump to the corner ledge, hang from the side and shimmy R to the flat ledge, climb the wall and follow the upper passage to a safety drop down in a room with 2 lava pools.
Go to the W side and jump on to one of the dark green ledges, so you can runjump into the opening over the slope. Pull the switch to raise a block back at the first lava pool and get out, up the block and start jumping S, turn in the end and standjump/grab up to the next pillar, runjump to the one under the MS and go over to the W wall. Drop from the R hand side at the wall and go R, into a door that will open for you.
Level 4 The Spirits Defeated.
Go inside and watch the flyby
Deadly
Sand and Burning Ledges Puzzle. 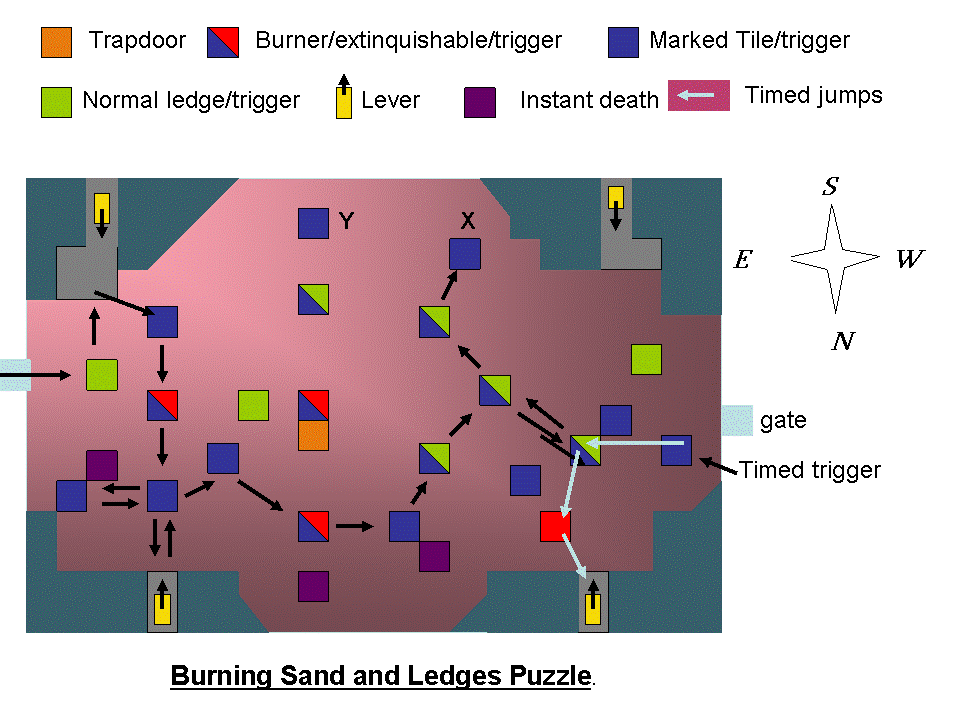
The sand in the next cave is deadly hot, there are safe normal ledges and burner ledges that have to be triggered off by jumping to marked ledges along the way and in addition some deadly ledges that have to be avoided.
Take a step back from the entrance and runjump to the first ledge and pick up the Shotgun, turn R and runjump to the opening with the lever S. Use it and it is the first of four to open a trapdoor in the middle of the room (next to the burner ledge), runjump out to the trigger ledge NW, then do runjumps over the ledges to the N lever, grab to get into the opening at the last jump. Jump back out and jump to that trigger ledge L (E) first before you go in a westerly direction along the N side.
Cross over to the SW (some Beasts will appear in this area, just let them get close first and shoot them with the Shotgun). Jump to the ledge marked X on my map, this one will kill the flames on the burner at the trapdoor and you can go all the way back around the N side and over to the ledge at the trapdoor, now go for ledge Y and the burner at the SW lever will be off, so go back again and get some Ammo there (theres more on a ledge W), throw the lever and jump back out, go to a ledge next to a gate W and this one triggers the burner at the NW lever off, only problem is, its Timed
Stand on the corner close to the gate and face E, runjump to the far R side of the ledge straight ahead, not to the one the Ammo was on or the burner will start again, turn L fast and runjump (curved L) to the burner ledge, quickly standjump and grab (curved L) into the opening with the last lever. The trapdoor is open now and you can go jump back to the middle of the room along the N side and over to the burner ledge next to the trapdoor.
The Torch.
Drop down and go into the NE corner to find the Torch. Light it at the burner ledge E (careful) and go light 4 wall-torches around the room, at the 4th, you better arm yourself and start hopping back while shooting 5 Mutants, dont waste Ammo shooting while they pound on their chest (they will not be harmed then), just wait it out till they come for you again.
Now go check out all the cages,
S cage: MP and 1st Spirit Key.
E cage: 2nd Spirit Key.
N cage: Ammo and 3rd Spirit Key.
W cage: 4th Spirit Key.
The keys can be placed at the base of the central pillar and youll get screenshots of the gate in the Room with the deadly sand, go up the pillar and from the NE corner where the floor is a little higher, you can use only Ctrl to grab up to the raised block, climb the N wall and dont pull up onto the sand, but backflip to the burner ledge, make your way over to the gate W and runjump/grab in
The Eternity Key.
Follow the path down to a lava pit, runjump to the L or R hand sloped ledge in the pit and shoot the vase to be able to runjump to that ledge, go on to where you overlook one of the rooms with the hanging bridges, the place you have to go is straight across, use the overhead MS and go all the way to where you see the electric rays. Youll hear the bridge below collapse while going over to the other side, drop at the pedestal. Get the Eternity Key and drop down the ledges in the next room.
Timed Switches?.
Jump around to the other side and follow the ledges along the lava in the next room to a switch SW, it looks timed at first try, but its not there is a trigger Tile on the same ledge that will drop the gate shut before you reach it, so pull, turn L and runjump over the lava, go L and runjump back, straight to the gate. Get in and straight to the switch ahead in the W wall. There are 2 closed doors one L and one R and a gate in the far NE corner of this corridor.
Save in front of the switch as this one IS Timed, pull/roll and run out sharp R and jump R to get into that L door from the switch, inside to the R hand room and throw the lever (opens gate NE), step on the trigger Tile N and the exit opens up. Go out and L to that NE gate and to a switch on the E wall (to the L is a door you will come out later), the switch will raise blocks in the big lava room with the hanging bridge. Go out and make your way back E to where you got the Eternity Key, notice the pillar in the middle isnt burning anymore and use the MS to go over to that marked Tile on the L hand side. Drop down to the pillar and safety drop to that green ledge below, jump over the ledges to the opening NE and runjump in.
Corpse Caves, Crossbow and Lasersight.
Follow through to the end and go L, use the ceiling to MS over the burning Corpse and use the lever in the next room. Go L and go over the corpse to the room with the Lasersight and Ammo. Go back to the previous room and head back E, go straight into the E room and use the lever, go L and over the corpse, follow out to a big cave and get some more Ammo to the r as you come in, follow the path into the back passage to get the Crossbow. Head back and go to the walkway and to the exit to the Corpse Caves, dont go in yet, but stand on the NW tip of the ledge overlooking the deep dark pit, if you look to the far W and almost on the level you are on, you can just spot a ball on the rope, maybe you have to look sideways a bit to find it, shoot that ball from a spot where you can see it and look down in the pit, there is a Mutant roaming around, shoot that too if you want (8 arrows).
Go
back into the Corpse Caves and in the first room you enter the S gate opened.
Go stand at the burning floor and shoot the ball on the rope, head
back to the first room you visited in the W, the gate N is open and theres
also a ball on the rope, but its hard to see 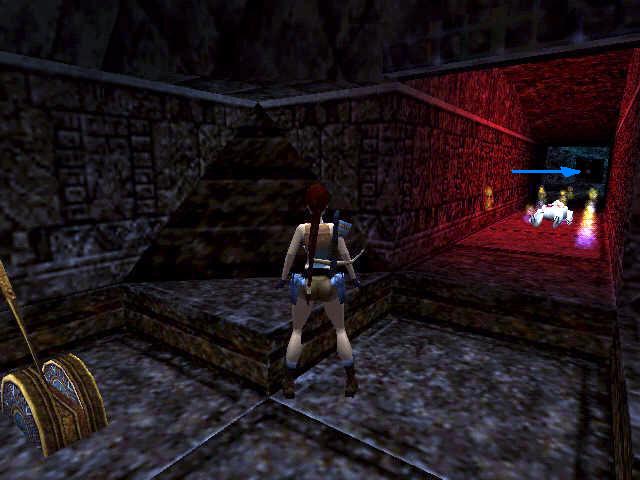
Shooting that ball will open a gate at the lava pool with the hanging bridge, so go back to the main corridor E and R to the end, overlooking the lava pool, you cab just see the ball on the rope in the opposite gate, shoot it and it will open the E gate a bit back in the main corridor, go in there and over the corpse to use the lever that will open the gate near the Timed switches (cutscene) and the W one back in the corridor. Go out and straight, over the Corpse in the W passage and follow up to that door you saw before at a switch. Go R and through the gate and then L, L again opposite the Timed switch and down to the lava, runjump over to that open gate E and get in there to use the Eternity Key on the lock, the big gate S opens up.
Go out of the room and jump to the open gate S, go into a huge hall and there are some Statues you know already, they will take care of all the Spirits in the flyby. Spirits Defeated Go S and into that passage and see your Mutant grunting in anger cause he wasnt able to protect his precious Spirits from dear Laras wits .
Must have missed a Secret somewhere
End of these great levels.
D&G 13-06-2005.
Unauthorized
walk by Dutchy ![]()
Az oldalon közölt képek, a szöveges tartalom, illetve minden sajátkészítésû anyag, a © TR Editor.hu tulajdonát képezi. Azokat semmilyen formában nem lehet reprodukálni, másolni, terjeszteni, csak a szerkesztõség engedélyével.