
Catacombs of the Guardian
Author: George Maciver
Download: Here
Secrets: 4 Golden Skulls needed for bonus level.
Pierre: According to this its something to do with those 4 gold symbols on the wall, it seems straight forward enough
Von Croy: Careful all is not as it seems, concealed traps and pitfalls await the unwary
Pierre: You are so dramatic Von Croy, you play far too much Tomb Raider
Von Croy: Good men have died for the information contained here in and cruel men have battered the information for their own end, for this we must respect it
Pierre: Yeah, yeah, Lara will be along shortly have you heard we are getting married.
Hey what is this about a Guardian?
Von Croy: There is no mentioned of this in the text
Pierre: Listen to this.
Below the fortress of the Crows lies the rivers of the Guardian
Von Croy: These rivers cascade through chambers and caverns deep below these prehistoric foothills
Pierre: There is more. It talks about the eyes of the skull and what do you suppose they are
Von Croy: The eyes of the Ancients are upon us and their vengeance is wrathful
Level 1- City Of Fountains.
One Secret
Go to NE past the fountain, up the little mound and climb up on the right from the highest part (no jump), the door will open when you approach, drop down onto the lower floor. Go to the W wall and right around a corner to get the flares at the end near a gate. Go to a column next to the wall W and climb up. Jump to the column N and up to a ledge there to use the button (a trapdoor opens up). Hop back on the column and drop to the floor, go back S and left around the corner in the NE is a block, on the block in the N wall is a crawlspace. Get in and drop through the open trapdoor. Swim through E and use the underwater lever around the corner past a trapdoor, the trapdoor opens up. You have to use the lever twice to open up another door a bit further where well go now. Swim down into the open trapdoor and follow the tunnel. Get out SE and pick up flares and a small medipack in that passage, proceed and hop over the water.
The Crowbar.
Where the floor goes down is a crawlspace left, but first grab the crack in the opposite E wall, shimmy to the end and use the lever there. Drop down go to the other side W and into the crawlspace. Turn around to climb into the open trapdoor in the end.
Go around the corner and into a crawlspace N. Face the W wall that is climbable so shimmy around to the opposite side and pick up the Crowbar on the floor N.(If you happen to fall into the water here. You can just swim S, follow all the way through with a nasty fish on your tail and swim back down into the trapdoor so you can climb back out SE like you did before)
The Guardian Star.
Go into the passage N, follow through and jump the blade (run and alt+shift), at the end you are at yet another pool (also connected to the trapdoor in case you fall in).
Jump sharp right around the corner into opening, go up the ramp and climb ladder, climb off on the left. Use the button behind the bike to raise a block in the last pool. Go back down the ladder and the ramp to the pool. Jump SE on the block and then into opening E. Next pool look left and up and grab the monkey swing and go to the other side and drop off in front of that Star. Pry the Guardian Star from the wall and write down the symbol that is on that tile (the gate at the Bike opened up). Try to shoot that pesky fish.
Dive into the water and go through the E tunnel and down through that trapdoor in the corner, to the left and climb out NW at the end. Through the crawlspace W into open trapdoor, follow through but now go W and climb higher S. The door opens, go left and jump the blade, once on the balcony you can see the opening in the wall S (its the one you came from before). Take two steps backwards and then one hop and make a running jump with grab to end up in the opening.
The Bike.
The door opens and youre back at the fountain. Go S and climb up on the right (SW), use the Crowbar on the gate there. Around the corner is a button switch to open the gates in the S wall below. Get back down to the fountain and go to the N gate, use the Guardian Star to the left of that gate, get in and go left. In the end is a gate you opened before, this time get the bike. You can proceed through the S gate by foot but why not take the bike you need it later for a timed run anyway.
Drive back to the fountain and in the S gate, Follow trough till you cant go anymore (closed gates) and leave the bike. Head SE and climb up a ledge in the S, a crow will pester you. Align yourself up with the slanted pillar NE, runjump onto that pillar, slide and jump up to the next. Climb up even higher (S) and find a push button in a hole in the floor to the right there. This opens the gates. Drive back to the fountain area. Drive into the opening E of the fountain and leave the bike at the gate, climb up into an opening in the S wall near the gate.
Get in and open the ceiling hatch at the end. Turn around and climb up, get the flares on the left and use a lever on the other side (E). Get back down to the bike and drive through the E gate. After the corner go straight (N) all the way to the end. Leave your bike somewhere facing the ramp S as there is a timed run coming up.
Timed Bike Ride.
Climb up N, jump up, get the medipack and jump up W (see cut scene) to a lever and save there (you got a short screen of another Fountain).
This is the drill use lever, backflip/roll and jump down to the bike, drive up the slope S, go to the right and a left through the gates to the fountain and take a sharp left up the steps S, follow to the gates you opened earlier. Drive through the next caves like area, take a left at a closed gate and then a right to get through the Timed gates into that area with the fountain. Leave the bike and behind the fountain youll find a lever you can use. The door in the S wall is now open. Follow through to the next room, its the Library where Pierre and Von Croy were talking to each other earlier.
Take the Guardian Gem from the desk W and use it E (near the NE desk). Go out to the fountain (through the passage up in the ? wall) and on the right behind the fountain a trapdoor opened up. Climb down to get Secret #1, the Secret Skull. Back into the library room and climb up on the bookcases NW, remember that symbol you had to write down? There is a similar symbol on the wall, climb through it and go to the next level.
Level 2 The Beast Chamber.
One Secret
Follow through and stop at the end. Drop to the ground, go W to that pointy rock in the middle of the square and stand face it N, standjump up and jump over the top to collect shotgun ammo. Hop into the opening N and get a small medipack near that wall torch. Go to the E from there and turn left into the building, follow through, shoot some bats, keep going (you dont need to shoot the monkeys) and watch out for spike traps. At the end youll find a closed door between 2 wall torches (Timed door), face the E wall and go to the right corner and around it is a lever (SE).
Preparing for the Timed Run.
Go all the way back (watch spike traps) to the outer area and go to the waterfall and to the right. NW in the W wall a door opened up, climb in and around the corner left is a lever to turn on the lights, on the other side are some flares. Jump to the other side of the pool and in the back is a lever. Save as this is timed and will open the door shown in the flyby, the one deep into those caves, but also a trapdoor in the pool under the fountain
First you can go for a Secret, pull the lever, run out and dive in the pool outside swim to the W, stay on the right and along the wall there are two holes in the ceiling, take the first one and get Secret #2, the 2nd Golden skull. Back into the water and go W again, up into the next opening, a door opens up. Now you are back where you started, climb out left and kill that bloody fish, go back to the Timed lever.
Save again.
Pull the lever, run around the pillar out of the room, jump the pool and run straight out of the opening, go straight and right around the rock, left around the next and into the opening SE. Back into the caves, follow avoiding the spiked traps and at the end the door is just around the corner on your left.
After the Timed Run.
Jump to the rocks on the left and grab the edge, shimmy to the other side. Jump to the ledge to collect the Shotgun. Jump down to the SE. Take a curved running jump (no grab) from the lowest ledge into the opening NW. Drop down onto a square with a large fountain, go to the pool and turn W into the opening there. Go through the passages to the next underground square, a high place.
A Lever Frenzy.
Go SE and climb the ladder on the back of that column. When you reach a crack, drop and grab and immediately shimmy around the corner to the ledge. Up here you also have to watch out for spiked traps. Face W, jump across and face SW, jump to the alcove and find lever # 1. Climb the block next to the lever (W) for lever # 2. Jump back down and go N and jump over that spike trap going W. (Or jump onto the wall NW, then a left curved runjump down to the ledge W) In the SW corner is lever # 3. Go N and jump over a spike trap to find lever # 4 near a wall torch in the N wall. Follow the ledge going E into the NE corner on the left against the wall is lever # 5. Go back on that ledge now going W and stop halfway and look down right. There is lever # 6. Jump back to the ledges and make you way back to the S, to lever # 2. Face NW and jump to that wall and face SW to jump (grab) into that alcove and use lever # 7, jump back and up and use the monkey climb (it is a very long climb all the way around the room) to the end and end up on a column. Turn around and jump SE and from there to S, this is lever # 8. Jump back to the pillar N and drop down facing S. Face E and jump to the ledge and grab the gab and shimmy and climb down the ladder to the ground.
All the blocks are raised now in the wall in the middle of the room so start pull/push the block on top from one end to the other. A door opens up near that large fountain. The exit is N near that wall torch and go outside. On the left of that water spouting face is the door that has opened (NE).
The Beast Camber Key.
On the next square youll find a ladder left of the opening N, once up get the small medipack around the corner and enter N. Jump in the pool and grab the Beast Camber Key SW on the bottom. Youll be back here. Get out and down the ladder and jump a block NW, turn S and jump higher and get a medipack. Back to the ground and go NE into the opening between two wall torches. Use the Key there. Now go SE to the previous square, the door is in the S wall. Go into the SW corner under the door, jump up SE onto the rocks and enter. Shoot bats and slide backwards into the pit, let go and loose a bit of health. Another safety drop, facing S and from the left side drop on a green block. Jump down and get the medipack S.
The Beast Chambers.
Follow through up a slope and slide down into a larger area. Go to the NE and up a small ramp, turn left and follow this passage to the end. In the SW is a small medipack.
Grab one of the pillars and shimmy to the left (spike traps) and pull up at the end. Take the Shotgun from the next ledge and hop up to the ledge SE, then a runjump with a curve over the burner to the SE and towards the ladder there. Use the lever that is there to raise a block under a Star, climb the ladder, and climb to the left to drop in the corner of that burning tile. Quickly turn left and hop backwards and grab the edge, shimmy left to the next corner, hoist up and jump to the higher pillar NW.
The Guardian Star.
Climb higher and go through the opening E, youre back on one of the fountain squares. Go through the opening on the right of that water spouting head and pry the Guardian Star from the wall. Make a note of the symbol on the wall. Get out and go back to the N and through the door on the left and carefully jump down the pillars till you are on the ground floor. Go through the passage and leave. Go S and left as there is another opening and around in a corner you can place the Star. This of course releases the beasts (3 of them) so take care of them. Go into the cage and find the Torch SE on the floor and light it on the wall torch. Go out to the large area and into the opening W where youll find a medipack in the cage where another beast was.
The Guardian Gem.
Go outside and up the ramp NE and right of the gate to ignite the wall Torch there, shoot the beast and enter his cage. Get the Guardian Gem that is on the corner. Leave the Torch as you dont need it anymore. Head N through the passage and climb those pillars again (the burner tile at the ladder is now safe) and go through the door on top. Climb the ladder E again and go into the room, past the pool to place the Gem SW and find the symbol you wrote down and climb through it. Slide down into water, swim left and left again to find an opening up in the NE and climb a ladder there. Follow through
Level 3 - The Fortress Of Crows.
One Secret
Follow through and run over the breakable tiles. Keep going and run towards the closed gate. This opens a door a bit back N, so go in there. Keep going down a slope and at the end go to the N wall (a bit back from the gates) and use the lever up there. Jump down and go up the slope (W), as the other gate is open. Go to the N wall and into the opening near the NW corner, go up the ramp and find some flares. Follow through to a square and kill the 2 tigers. Go right around this building and find the shotgun ammo in a corner, enter opening E, follow all the way through and youll get in the top of the main room.
Grab the shotgun ammo bit further on the bridge (the Secret skull is out of reach on a ledge E) and use the rope to swing over to the W. Go S and to the ledge there and jump to the walkway on the wall to the N. At the end look NW and take a curved jump into the opening there. Use the lever and drop down and climb down the ladder, Climb back into that tunnel N and follow through, right around the building again and in the far corner is that block you saw in the cut scene. Push the face block once and use the lever, gates open up. Go out through the E opening to the main room and the gate that opened is straight ahead.
Enter the next big hall and hop down to the ledge on the left and straight ahead is on a ledge S is some shotgun ammo. Jump down, walk to the edge and use the binoculars to spot a small block on the ground floor (NE), go to the ledge and make a safety drop onto that block. Go to the S and the door there opens, shoot the two beasts that run out, one will drop a medipack. Use the lever in this room this closes a door in the ladder of the main room and will also open the door W in this room, go in and climb higher and higher.
Now go to the E and look SE, see that ledge.. jump there. Position Lara with her right shoulder one tile away from the wall, aim to the ledge and take a running jump with a slight curve to grab the ledge. Watch out not to aim to tight or else she will bang her head. (screenshot)
Go into opening S and save after the steps. Take a running jump and grab the tile, hoist up and a running jump and grab to the next, one more to get to the other side. Use the lever to open up another gate in the main room. To get back you can use the monkey climb over the pit. Down the steps and out on the ledge in the hall you can do the same kind of jump you did earlier, this time to the left to get back to the ledge NW, head N through the open gates to the stone bridge in the main room.
Go left and jump to the walkway against the W wall and again NW into the opening there. Use the lever again and see a gate open up in the big hall. You can do a runjump out to the right and land back on the walkway, go jump to the ledge S and through the gate S into the big hall, to the right is the gate you just opened. If you cant make that jump you can also go down the ladder, go into opening N and around the building into the E opening. Once on the bridge use the rope to get to the other side (W bridge) and go S. Jump down right, go through the gate and up the stairs, find some flares on the right, keep going W till you see a pit. Use a flare and throw it, there is an invisible tile in the middle. Jump over and enter the opening and kill the beast and then use the lever N. Go back the way you came in to the stone bridge in the main room. Jump from the bridge down into a pool SW, go up the rock under the ladder and climb the ladder into the next open door.
The Guardian Gem.
Use the lever and get back to the bridge, I just jumped (with grab) and lost some of health (The alternative is to take the route down the ladder, through the tunnel N around the building into the opening E and with the rope to the W side bridge). The gate N is open so go in there, face S at the pit and climb the ladder, around the corner and down as the water is deadly. Use the lever and back up the ladder again, a block appeared at the pit. Now you can use the ropes so swing to the other side (use the pillar as a first stop). Follow through and find the Guardian Gem on a pedestal in the E. Just around the corner from the pedestal you can find a door that has opened in the E wall. Follow through and the door at the end will open.
The Guardian Star.
Youre back on the square with the building, go SE and into the tunnel down to the ground floor of the main room. Climb the ladder W to the top and climb off to the left. Jump down and jump to the ledges S, wait up a bit and kill two birds there, then jump (no Ctrl) to the tip of the NE ledge, then jump SE, go left into the building and pry the Guardian Star off the wall (make a note of the symbol). Step out and turn left (E) a door at the end is open. If you want the next Skull, dont go in there just yet. Jump to the ledge N and look down. Stand SE facing E and be sure you have enough health and slide down and jump to the ledge with the pedestal. Once there get the medipack and Secret #3, the 3rd Golden Skull, top up your health again and safety drop down to the ground floor facing N go to and climb the ladder W and jump the ledges back to where you got the Star so you can now enter that door SE.
Slide down, follow through and climb down as far as possible on the ladder to safety drop in the passage youve been before. Go down the slope, place the Star and kill the beast. Enter and run around the structure and see a cut scene of a lever. Go outside again, walk up the slope a bit as it is the same the lever on your right up in an alcove. Use it again, go down the slope into the room and find a block at the back of that structure (SE). Face NW and jump onto the ledge to place the Gem.
Remember that symbol (S wall)? Climb through it and slide to the next level.
Level 4 - Catacombs Of The Guardian.
One Secret
The Cistern Key.
You slide down into water and climb out, as the slopes are fine to walk on. I went SE and shot the beast from there. Go over to where the beast was and see he dropped the Cistern Key (The Guardian Star receptacle is also on this S side floor). Go straight W and jump in the water to walk out SW and use the Key there. Go into the gate around the corner, up a slope and up some steps and go left (S) at the end.
The Garden Key.
There are 4 blocks with symbols in the corners of this large Cistern, go around and jump on all 4 of them, this opens a trapdoor on top of a ladder S. Climb the ladder and use the lever, the room is flooded now. In the W is a small medipack and over the top of that structure you can get out and there is a door N. Go left and around a corner and another corner and climb up S to get the Garden Key, this also opens a door. Jump down and retrace your steps and near a wall torch (N) is an alcove. Jump in and use the crack to the right to shimmy right around the corner and get into a small room, jump the pit and enter the door. Slide down and in the next room jump down to the top of that structure and get the Torch. Slide down to the floor and light the Torch on a wall torch, go to the N side and ignite the wall torch there (screen of an underwater gate). Take the Torch with you to the exit is SE. Follow through and go left, down the steps and the slope till youre back at the main pool.
The Chasm Key.
Wade into the water and Lara will swim with the Torch. You have to go to the E (you can also let Lara wade on the slopes, that is a bit faster than swimming) and from there go to the SE. Drop the Torch and use the Garden Key there. Get the Torch and enter, go E and ignite the wall torch near the opening E. Drop the Torch and enter the opening. Get in the water to the right and swim into deeper water and find the Chasm Key.
The Secret Key.
Get out and leave (NW) to the main pool, get to the W side of the pool, get into the water and swim into the opening underwater while facing E. Pick up the Secret Key. Swim back out, go right (NW) and use the Chasm Key on the gate there. Enter and follow through till you end up at a deep pit. Jump up the block N and from there a running one to the opposite side (watch out for your head), shoot the bat and continue to jump the blocks and shooting bats. The gate opens up, jump to the ledge in front and enter.
The Fountain Key.
You have to stand on all 4 marked tiles in every corner, that extinguishes the fire on top of the structure. Pick up the small medipack on one of the tiles. Jump on to the top and get the Fountain Key and leave through the door. Jump the pit again and go to the main pool. Make your way to the E side.
The Pool Key.
The Fountain Key goes in the E (on the right of that structure) climb the ladder around the corner and shimmy as left as you can when you are almost at the top, back flip and jump with a curve to the left. Jump down and shoot the 3 vases W, N and SE with your Shotgun (aiming with the look key). This opens the door S, grab the Pool Key there and return to the exit SW, climb the block to the right and back flip onto the slope, slide and jump to grab the ladder and climb down, head back to the main pool again. Dive in and swim to the right (NE) to use the Pool Key there.
The Tower Key.
Get in and in this room you have to push the 5 blocks with faces on them in the alcoves around the pool to raise a block W so you can get to the ropes. Swing over to the E, go up some steps and jump to the top of that structure from the NW and grab the Tower Key. Go back to the mail pool area, into the water and go right to the W side. Walk up to the floor and use the Pool Key left. Go in and follow to where a flyby shows you the Tower.
The Tower.
Go left (W) and take a right after the gate between the wall torches and use the Secret Key there. That gate between the wall torches is now open, go in to get Secret #4, the 4th Secret Skull. Go to the other side of this tower and climb to the top of the ladder on the wall, back flip and roll/grab then shimmy to a corner, hoist up and jump inside. Go to the right (W) and slide to jump and grab the ledge. One of the faces is pushable. Pull it out and to the side to use the lever in the passage. Drop down to the floor and climb the ladder again and again back flip and jump in to the Tower.
The Guardian Star.
Once inside look up and climb that ladder and climb off to the left. Jump and grab into that opening S, jump to the 4 corners of the pyramid and shoot the 4 vases with the shotgun. Go to the SE and climb up, use the monkey climb to the W and grab that medipack. Jump back to the monkey climb and now go to the top of the structure, jump forwards and grab to hoist up in the passage.
Jump to the small roof N and jump around on other small roof parts till you are on the other side and get into opening in the Tower. Climb the ladder and back flip off. Jump over and pry the Guardian Star from the wall (make a note of the symbol), go back down the ladder, jump back along the roof parts and kill a bat in the process. Jump back into the opening and drop in the hole to slide down the pyramid. Keep going straight, jump back into the Tower and go down the ladder and jump then to the ladder N and climb down to the floor. (Or run W out of the Tower to land in the pool below)
Leave the room NE to follow back to the main pool and swim to the floor S of the structure to place the Star there. Swim over to the E side and be sure to have enough air, dive and swim into the underwater tunnel. There is a sea hag to make things complicated
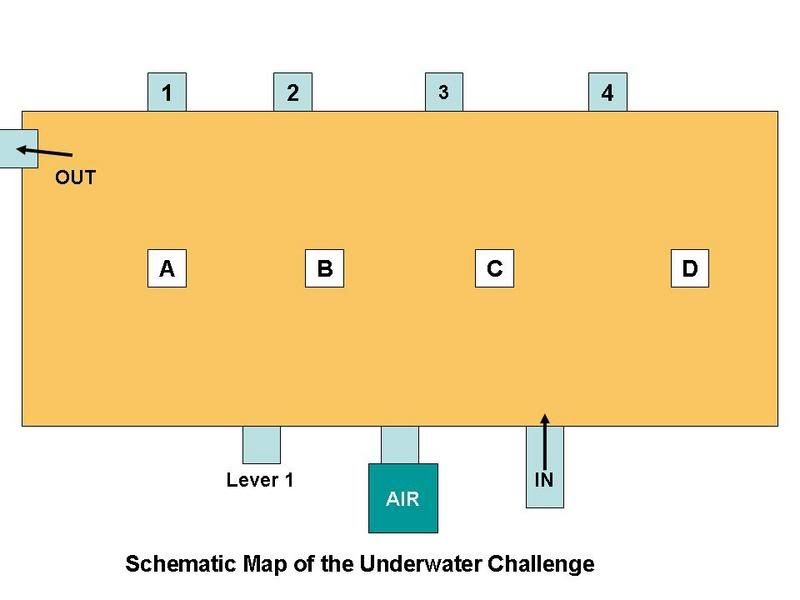
Underwater Challenge. (MAP)
So here is the drill:
E wall are 4 doors, from left to right 1 till 4
W wall are 3 doors, from left to right: entrance, air hole and lever.
N wall 1 door
Ceiling 4 openings from N to S, A till D
Swim in and go left around the corner, into the first tunnel left (W=air hole) get some air and turn around. Swim back and take a left and another left towards a closed lattice door that will open when you approach (lever 1) and use the lever in there (the sea hag appears). Swim back to get some air (right and right).
Swim back out and go to the opposite side to almost the far left corner (NE - door # 1) and use another lever there. Roll and swim out and a bit right to swim up to the ceiling and into the opening (Opening # A). Hoist up and get the small medipack near the wall torch.
Use the lever and back into the water and swim S along the left side into the open (E- door # 4) and use the lever. Then swim N and up to the (middle) opening in the ceiling (opening # B). Get the small medipack and use the lever.
Back to the E wall and use the lever in door # 2, this opens ceiling opening # C.
Get the small medipack and again use a lever.
The last door E is door # 3 and the last opening is # D (S) In this last room is also a beast and a small medipack. Use the lever and swim all the way N, as that lattice door will be open. Climb out and kill the Sea Hag.
The Guardian Gem.
Remember that symbol? Well it is in the SE corner bottom, swim through it and grab the Guardian Gem. This triggers the iron gate in the S to open so leave through there.
Bonus Level 5 - Return to the City.
For this level you need all the 4 Secrets Skulls.
If you dont have 4 Skulls the level will continue like this:
Go through the symbol into the Library, drop down on the floor and use the Gem in the E, Lara will look up to the exit. Jump up the E ledge and into the opening NE, follow through, a door opens and you are back at the fountain near the bike. Go to the opening W and follow through till you see a pool where Pierre is waiting
Hey I like the look of this
Lara sweetheart, where have you been, youre soaking wet.
Did you sort out the Guardian?
No problem.
Good Im glad you are OK. By the way I completed another adventure for us
Excellent, well done.
Well thinking young lady. Are you tired?
What do you think?
Yes me too, Time for bed sweetheart
Now is time for .. well, an adventure
With 4 Skulls you have the right to access the bonus level:
Follow through, drop to the floor and use the Gem at the receptacle E. (Lara looks at the exit to where she left the bike) Place the 4 skulls on the W wall, leave through the opening N, back at the fountain go E to the bike but before using it you can get the flares a bit further. Get on the bike and drive through and step off at a closed gate at the end. Go back jumping up the slope and on the top use the binoculars to look up N, theres an alcove in the upper left corner. Climb in there and use the lever inside. Get out and down the slope, the gate is now open.
Get the bike drive S, around the corner over a slope, park the bike at the gate there. Walk back and see a block on the ramp at the N wall, climb on top and higher and use the button on that ledge to open the gate. Outside the gate and back at the fountain where it all started, go left and climb up to that iron crowbar gate, open with crowbar and get a small medipack. Get down to the fountain and go into the opening E, climb back into the opening near the gate (S wall). Into the open hatch and use the lever on that roof again (nope, this time no flares). Get down to the fountain and the gates are open so take the bike and drive trough to the end and park the bike near the timed lever all the way in the back.
Save before using the lever.
To the bike and drive straight and out, at the fountain sharp left, follow through and through the gates on the square, keep going as you need to go straight through another gate. I would save inside, just in case.
When you reach a fountain area, you can step off the bike. Head all the way to the S and get the Torch that is on the desk in the back. Ignite it on the fire in the basket and light another basket on the opposite side (E) and back to the fountain. Go into the left opening (the one you came from with the bike) and in that NW is another basket, so light that one as well. Go back to the fountain and now take the other opening (NE) right around the corner on the right is # 3 basket, # 4 is a bit further in the next room on the left.
Go to the E opening and on the left is # 5.
The door S is open leave the torch and get in. Shoot the grate in the E (jump up with pistols) and crawl in. Drop down at the end and follow through, find some Shotgun ammo, medipack and Revolver in a corner to the right.
This triggers a door further down to open up. Slide down and kill those beasts. Go N more beasts will show up, one of them leaves a Golden Key and one or two small medipacks. Go E and use the Key there. Get into the opening and climb up, through crawlspace and drop down at the end.
T-Rex.
Go to the lever S and grab the medipack and shotgun ammo from the left and right of the lever, and use it. Around the corner shoot the T-Rex. Get the lever in this room (S wall). Follow through and in the last room there is a lever SE. Go back and through a new open door in the W wall. Use the lever around the corner and climb the ladder. Pick up the Thistle and look in your inventory what it is called. Slide down and go to the fountain, get on the bike and drive out and go right and down (W) and through the door behind the fountain W.
Hey I like the look of this
Lara sweetheart, where have you been, youre soaking wet.
Did you sort out the Guardian?
No problem.
Good Im glad you are OK. By the way I completed another adventure for us
Excellent, well done.
Well thinking young lady. Are you tired?
What do you think?
Yes me too, Time for bed sweetheart
Now is time for .. well, an adventure
Unauthorized Walkthrough D&G Productions.
Az oldalon közölt képek, a szöveges tartalom, illetve minden sajátkészítésû anyag, a © TR Editor.hu tulajdonát képezi. Azokat semmilyen formában nem lehet reprodukálni, másolni, terjeszteni, csak a szerkesztõség engedélyével.